移動ツールはレイヤーや選択、 パス、 ガイドを移動するときに使います。 テキストも移動できます。
There are different possibilities to activate the tool:
-
From the main menu: → → .
-
By clicking the tool icon
 in the Toolbox.
-
By pressing the M keyboard shortcut.
-
ガイド (見当線) を作ったときは自動的に移動ツールが起用されます。
Normally, tool options are displayed in a window attached under the Toolbox as soon as you activate a tool. If they are not, you can access them from the main menu through → → which opens the option window of the selected tool. The available tool options can also be accessed by double clicking the corresponding tool icon in the Toolbox.
- 移動
-
![[注記]](images/note.png)
注記 これらのオプションについては 変形ツールの共通オプション に説明があります。
移動対象として選んだオプションは移動ツールを終了しても保持されることを忘れないでください。
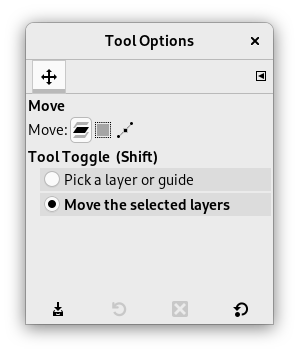
- 機能の切り替え (Shift)
-
「レイヤー」を対象とした移動ならば、

- つかんだレイヤーまたはガイドを移動
-
レイヤーを複数持つ画像の、 現在活性化しているレイヤーに属する要素の上ではマウスポインターの姿が移動十字矢印に替わります。 その要素はクリックしてドラッグすれば移動できます。 もしポインターの姿に小さな掌が加わっている場合 (つまりまだ活性レイヤーの部品を 何も つかんでいないことを表しているとき) には、 代わりに不活性レイヤーを移動する可能性があります。 (移動の最中は一時的にそのレイヤーが活性レイヤーとなります。)
画像上にガイド (見当線) を置いていた場合は、 線上にマウスポインターをかざすと線が赤色に変わります。 これはガイドが活性化したことを示しており、 移動できます。
At the point of intersection of two guides, you can click-and-drag to move them together. This is useful when the guides are used to mark a point, rather than a pair of lines (e.g, as is the case for the mandala symmetry guides, which mark the symmetry point of origin).
- Move the selected layers
-
Only the selected layers will be moved (if smaller than canvas). This may be useful if you want to move layers with transparent areas, where you can easily pick the wrong layer through these transparent areas.
注記 You also can move the selected layers by setting its offset in the Edit Layer Attributes dialog.
「パス」を対象とした移動ならば、

- つかんだパスを移動
-
既定ではこちらが選ばれています。 マウスポインターを 可視パス にかざすと、 その姿が小さな掌に替わります。 このときマウスでクリックしてドラッグすればパスを移動できます。 パスは移動の最中だけ活性化します。
- アクティブなパスを移動
-
Only the current path will be moved. You can change the current path in the Paths Dialog.
- 選択範囲を移動
-
移動ツールは選択範囲の輪郭だけを移動できます。 移動対象が「レイヤー」の場合は、 Ctrl+Alt キーを押しながら行います。
移動対象が選択範囲の場合は、 キャンバス上ならばどこでクリックしてドラッグしても選択範囲の境界線を移動できます。 また 上 下 左 右 矢印キーを使うと精密に選択範囲を移動できます。 このとき Shift キーを押しながらだと 25 ピクセルごとに移動します。
選択範囲を移動ツールで移動する際に、 選択範囲の中央には小さな十字の印がつきます。 選択範囲の境界線やこの十字は、 画像ウィンドウのメニューで → (あるいは ) のオプションを有効にすると、 それらのガイドに吸い付きます。 これで選択範囲を揃えるのが楽になります。
選択範囲の移動 をご覧ください。
- レイヤーを移動
-
The Move Mode must be 「Layer」. Then you can choose between Move the selected layers and, if you have one or more layers, Point to Layer (or Guide).
- 連結された複数のレイヤーを移動
-
If layers are grouped they will all move, regardless of which layer is currently active.
- ガイド (見当線) を移動
-
画像ウィンドウ辺上の定規からガイドをドラッグして曳き出すと、 移動ツールが自動的に呼びだされます。 そのあと他のツールを使用したのなら、 移動ツールはご自分で呼びだしてください。 マウスポインターをガイドの上にかざすとガイドは赤色に変わりますので、 それをクリックしてドラッグすれば移動できます。
- パスを移動
-
The Path Tool dialog has its own moving function: see 「パス」. But you can also use the Move Tool. The Move Mode must be set to 「Path」. Note that the path becomes invisible; make it visible in the Paths dialog. You can choose the path to be moved or move the active path.
- テキストを移動
-
テキストはそれぞれがレイヤーになっていますので、 レイヤーと同じ移動方法をとります。 「テキスト」 をご覧ください。


