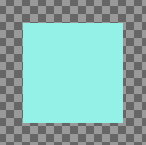
切り抜きツールは画像を刈り込んだり切り抜いたりするときに使います。 画像上のすべてのレイヤーに対し、 可視か不可視かにかかわらず作用します。 このツールは周辺部を取り除いたり、 焦点の当たる部分を残して不要な領域を削減するのによく使われます。 あるいはいまある画像の大きさが必要な大きさや縦横比にそぐわないときにも重宝します。
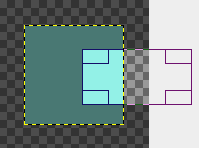
To define the crop area click and drag with the mouse. A highlighted area will appear that shows the crop boundaries. To move the whole crop area, click in the middle and drag the rectangle. Resizing can be done by moving close to the borders. The mouse cursor will change and you can drag either one side, if you are in the middle, or two sides, if you are in a corner. While you are changing the drag area, the size of the cropped area and the aspect ratio will be shown in the status bar.
マウスポインターの姿が移動十字矢印になっているときはキーボードの 上 下 左 右 矢印キーで切り抜き矩形を移動できます。 Shift キーを押しながらだと 25 ピクセルづつ移動します。
To finalize cropping, click inside the crop rectangle or press the Enter key.
![[注記]](images/note.png)
|
注記 |
|---|---|
|
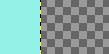
By default the image canvas size isn't changed after cropping. The Tool Options of the Crop Tool have a setting Delete cropped pixels that can be checked to make sure the canvas size is also adjusted to the cropped area. |
![[ヒント]](images/tip.png)
|
ヒント |
|---|---|
|
You can use Guides to position the crop area. Make sure that the → option is checked. |
There are different possibilities to activate the tool:
-
From the main menu: → → .
-
By clicking the tool icon
 in the Toolbox.
-
By pressing the Shift+C keyboard shortcut.
切り抜き矩形を描いてからその内側でクリックしたままマウスボタンを押し続けると、 ハンドルが消えて...
-
Ctrl キーを押している間は 中央から拡げる オプションが有効になります。 (反応がないときは Alt+Ctrl)
-
Shift キーを押している間は 固定 オプションが有効になり、 位置や寸法などの一部が固定されます。
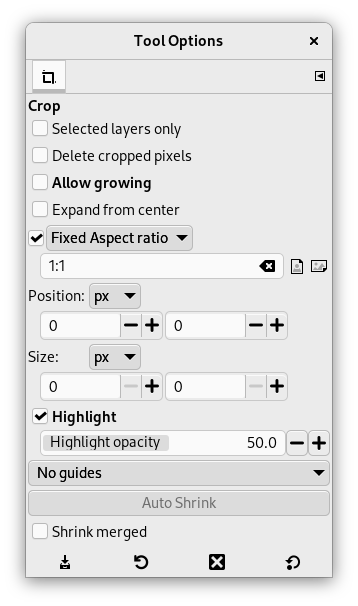
Normally, tool options are displayed in a window attached under the Toolbox as soon as you activate a tool. If they are not, you can access them from the main menu through → → which opens the option window of the selected tool. The available tool options can also be accessed by double clicking the corresponding tool icon in the Toolbox.
- Selected layers only
-
This option will make crop affect only the selected layers.
- Delete cropped pixels
-
When checked, the canvas size is adjusted to the cropped area. By default this is not checked, which means that after cropping the layers have been adjusted, but the canvas size is still the same. This is to make sure you don't remove anything by accident.
- 拡大を許可
-
このオプションは画像 (レイヤー) はおろかキャンバスをはみ出しても切り抜きやリサイズができるようにします。 この方法で出来上がりの画像の大きさが決められるようになります。 何も無い部分を切り抜き範囲に加えるとそこは透過部分となります。
- 中央から拡げる
-
このオプションを有効にすると、 切り抜き矩形は最初にクリックした画素を中心として拡がります。 切り抜きの作業中に Ctrl キーを押すと、 その間はこのオプションの有効無効が切り替わります。
- 値を固定
-
切り抜き矩形をつくっている最中には Ctrl キーを押している間もこのオプションが有効になります。 このオプションは寸法の一部や縦横比を固定して切り抜き矩形をつくるためのものです。
-
: 固定される値は既定ではこちらです。 切り抜き矩形をつくるときその幅と高さの比率がつねに元の画像の縦横比と同じになります。
-
, : 幅のみもしくは高さのみが固定されます。 その値は直下の入力欄で設定でき、 初期値は 100 ピクセルです。
-
Size: Both Width and Height will be fixed. Their values can be set in the text box below, in the form 「150×100」 for example. The crop rectangle will adopt these values as soon as you click the image. On the right, two buttons let you choose a (widthwise) or (upright) format for the crop rectangle.
-
- 左上角の座標
-
These two text fields contain the current horizontal and vertical coordinates of the upper left corner of the selection. You can use these fields to adjust the selection position precisely.
- サイズ
-
These two text fields contain the current width and height of the selection. You can use these fields to adjust the selection size precisely.
- ハイライト表示
-
If you enable this option, the selected area is emphasized by a surrounding mask to make visual selection much easier.
The dark area opacity can be set using the Highlight opacity cursor.
- ガイド
-
With this menu you can select the type of guides that is shown within the selection to make the creation of a selection easier, respecting Photo composition rules.
Six options are available:
-
No Guides
-
センターライン
-
三分割法
-
五分割法
-
黄金分割
-
対角線構図
-
- Auto Shrink
-
このボタンを切り抜き矩形を作成中に押すと、 活性レイヤー上の形象に矩形の境界線が自動的に合わされます。 このオプションは背景の色と形象とがくっきりと分かれている場合に正しく動作します。
- Shrink merged
-
このオプションは「見えている色で」オプションのようにはたらきます。 活性レイヤーのみならず、 すべての 可視 レイヤーからのピクセル情報をもとに判断します。