ディジタルカメラで撮ったような大きな画像があって、 これをウェブページや掲示板に載せたり電子メールに添付するのに最適な大きさにしたいときはどうすればよいでしょう。
The first thing that you might notice after opening the image, is that GIMP opens the image at a logical size for viewing. If your image is very large, like the sample image, GIMP sets the zoom so that it displays nicely on the screen. The zoom level is shown in the status bar at the bottom of the image window. This does not change the actual image.
The other thing to look at in the title bar is the mode. If the mode shows as RGB in the title bar, you are fine. If the mode says Indexed or Grayscale, read the 「モードを変える」.
Select → . You can right click on the image to open the menu, or use the menu along the top of the Image window.
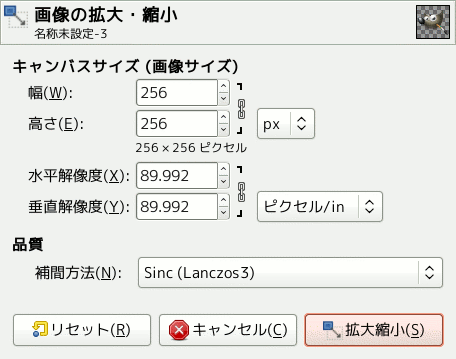
画面上に画像を表示するときの画像の大きさを表す単位はピクセルです。 ダイアログでは 幅 と 高さ のところと 解像度 の 2 つの部分に分かれているのが見てとれます。 解像度は印刷時にのみ適用される値ですし、 ディスプレイモニターとかモバイルデバイスで表示するときには意味がありません。 というのもデバイスによって表示できる画素数は異なるうえに、 見た目の寸法ですらデバイスが異なればたとえばスマートフォンと LCD のプロジェクターでは違って見えるからです。 画面に表示するのが目的なら解像度の値は気にしなくても大丈夫です。 同じ理由から「高さ・幅」の記入欄でピクセル以外の単位を使用してはいけません。
If you know the desired width, enter it in the dialog at the top where it says Width. This is shown in the figure above. If you don't have such a number in mind, choose an appropriate width for the desired use. Common screen sizes range between 600 pixels for simpler phones and 1920 pixels for an HD screen.
画像の縦か横の一方の寸法を変更すれば GIMP は自動的にもう一方の寸法も同じ割合で変更します。 [幅 欄と 高さ 欄を結ぶ鎖アイコンでこの自動化調節機能の無効/有効を切り替えられます。] 形の違う寸法にしたい場合は 「画像を切り抜く」 をご覧ください。 ここで 幅 と 高さ を個別に変更してしまうと画像の中身が伸びたり拉げたりします。


