There are two methods to create a new brush:
-
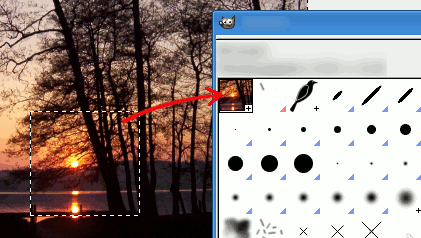
First, the quick temporary method. You have an image area from which you want to make a brush, to be used with a tool like pencil, airbrush, etc. Select it with the rectangular (or elliptical) select tool, then this selection. Immediately you can see this copy in the first position of the Brush Dialog, and its name is “Clipboard”. It is immediately usable.
This brush is temporary: it disappears when you close GIMP. You can make it permanent by clicking on the at the bottom of the brush panel.
-
두번째 방법은 약간 복잡합니다.
Select → from the main menu.
Set Width and Height for example to 30 pixels.
In the Advanced Options, set for example the Color space to Grayscale and set Fill with to White.
이미지를 확대해서 검정색 연필로 그림을 그립니다.
Select → from the main menu.
Export the image with a
.gbrextension in thebrushesdirectory located inside your personal GIMP configuration folder.In the Brush Dialog, click on the button
 .
.
Your brush appears among the other brushes. You can use it immediately, without restarting GIMP.