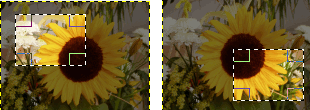
Rechthoekige en ovale selecties hebben twee modi. De standaard modus heeft handvatten op de selectie. Deze handvatten kunnen worden gebruikt om de grootte van de selectie te veranderen. Slepen van binnen de selectie, maar niet van binnen de handvatten, verplaatst de selectie. Als u klikt op de selectie of drukt op de Enter-toets, verdwijnen de handvatten en laten alleen de gestippelde omtrek van de selectie achter (marcherende mieren). U kunt terugkeren naar de modus met de handvatten door opnieuw binnen de selectie te klikken.
Als u klikt-en-sleept aan de selectie zonder handvatten, maakt u een nieuwe selectie. De andere gereedschappen voor Selectie hebben deze opdeling in twee modi niet.
Zoals hierboven vermeld geven de gereedschappen “Rechthoekige selectie” en “Ovale selectie” standaard een frame voor de selectie met handvatten weer. Het is mogelijk de grootte en locatie van de selectie te wijzigen, maar ook om de selectie te verplaatsen, inclusief de inhoud van de laag.
Verplaatsen of de grootte veranderen van het frame van de selectie, zonder de inhoud van de afbeelding te verplaatsen, kan zowel met de muis als met het toetsenbord worden gedaan.
Klik, om de selectie met de muis te verplaatsen, binnen de selectie in een gebied dat niet een van de handvatten weergeeft. Sleep het dan met de muis naar de door u gewenste locatie.
Voor het verplaatsen van de selectie met het toetsenbord, is het momenteel vereist dat de muisaanwijzer binnen het frame van de selectie staat, anders werkt het niet. Druk in en houd Alt ingedrukt (of Ctrl+Alt), om een beeldpunt per keer te verplaatsen. Voeg de Shift-toets toe aan bovenstaande combinatie om te verplaatsen met 25 beeldpunten per keer.
De selectie van grootte veranderen met de muis, plaats de muisaanwijzer in het gebied van het handvat waar u de grootte wilt wijzigen en klik-sleep dan in de gewenste richting. De grootte in een richting veranderen, gebruik de middelste handvatten; grootte veranderen van twee naburige richtingen, gebruik de handvatten in een van de hoeken.
De grootte veranderen met het toetsenbord, verplaats de muisaanwijzer tot binnen de handvatten langs de randen van het frame van de selectie en gebruik dan de sneltoetsen voor het toetsenbord die hierboven zijn vermeld voor het verplaatsen.
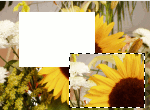
Voor het verplaatsen van de inhoud van de selectie (d.i. het deel van de laag binnen de selectie), drukt u op Ctrl+Alt en klikt-en-sleept de selectie. De originele locatie van het geselecteerde deel van de laag zal worden leeggemaakt (d.i. gevuld met de huidige achtergrondkleur).
Onthoud dat deze actie een zwevende laag zal maken die moet worden verankerd aan de laag eronder, of een nieuwe laag worden gemaakt.
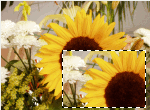
Verplaatsen van de inhoud van de selectie zonder het origineel te wijzigen, gebruik Shift+Alt en klik-en-sleep de selectie. De originele locatie van het geselecteerde deel van de laag zal hetzelfde blijven, terwijl u een kopie verplaatst.
Onthoud dat deze actie een zwevende laag zal maken die moet worden verankerd aan de laag eronder, of een nieuwe laag worden gemaakt.
![[Opmerking]](images/note.png)
|
Opmerking |
|---|---|
|
Op sommige systemen moet u op Alt drukken voordat u drukt op Shift of Ctrl. Op die systemen zorgt het eerst drukken op Shift of Ctrl ervoor dat GIMP naar een modus gaat die toevoegt aan of aftrekt van de huidige selectie. Na dat gedaan te hebben, is de Alt-toets niet meer effectief! |
De andere gereedschappen voor Selectie (Vrije selectie, Toverstaf, Selecteren op kleur, etc.) hebben geen handvatten. Gebruiken van klik-en-sleep verplaatst deze selecties niet. Voor het verplaatsen van hun inhoud, net als met rechthoekige en ovale selecties, moet u drukken op de Ctrl+Alt of Shift+Alt-toetsen en dan klik-en-sleep gebruiken.
Als u in plaats daarvan de pijltoetsen op het toetsenbord gebruikt of klik-en-sleep, verplaatst u alleen de omtrek van de selectie.
U kunt ook een meer rondgaande methode gebruiken om een selectie te verplaatsen. Maak de selectie zwevend. Dan kunt u de inhoud ervan verplaatsen met het gereedschap Verplaatsen, de originele locatie leegmaken, door te klikken-en-slepen of met de pijltoetsen van het toetsenbord.


