Bruk verktøyet «Juster og fordel» for å justera lag eller banar i høve til kvarandre eller for å fordela dei utover. Når dette verktøyet er i bruk, ser musepeikaren ut som ei hand.
Innstillingane for Juster bestemmer referanseobjektet for justeringa. Innstillingane for Måla bestemmer kva objekt som skal justerast eller fordelast.
Bruk knappane nedføre innstillingane for å bestemma korleis objektet skal justerast eller fordelast.
Du kan slå på verktøyet på fleire måtar:
-
Frå hovudmenyen via → → .
-
Ved å klikka på verktøysymbolet
 i verktøykassen.
 -
Ved å trykkja på tasten Q.
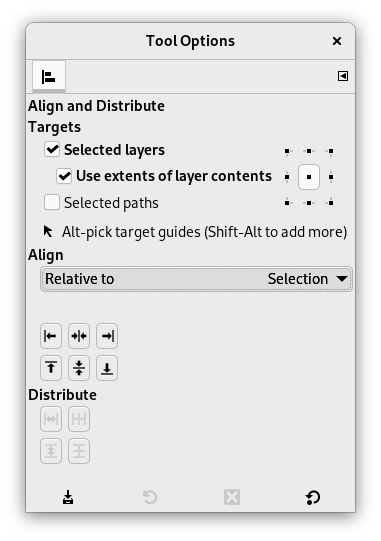
Normalt vert innstillingane for det valde verktøyet vist under verktøykassa så snart som du slår på verktøyet. Dersom dette ikkje er tilfelle, kan du få tilgang til dei frå biletmenyen via → → som vil opna verktøyinnstillingane for det valde verktøyet. Du kan også opna verktøyinnstillingane ved å dobbeltklikka på det tilsvarande verktøyikonet i verktøykassen.
- Mål
-
- Merkte lag
-
Når slatt på, vert laga merkte i Lagdialogvindauget brukte som mål.
- Bruk omfanget av laginnhaldet
-
Når denne er slått av, vert justeringa og fordelinga gjort ut frå kantane til mål-laga. Når denne er slått på, skjer det ut frå innhaldsgrenseboksen.
- Å velja eit kontrollpunkt
-
Dei ni små firkantane viser dei tilgjengelege kontrollpunkta. Du kan merkja eit punkt ved å klikka på ein av firkantane. Det merkte punktet vert brukt som referansepunkt for justeringa eller fordelinga av målet.
Som standard er kontrollpunktet i midten merkt. Ved justering betyr dette at midten av kvart mål vert justert i høve til dette. Kva side av referansen som skal brukast ved justeringa er avhengig av justeringstypen som er vald.
Vel du eit av dei andre kontrollpunkta, vert justeringspunktet endra i målet til eit av hjørna eller ein av kantane i staden for midten.
- Merkte banar
-
Når denne er slått på, vert banane merkte i Banedialogvindauget brukte som mål.
- Målhjelpelinjene
-
Når «Målhjelpelinjer» er slått på vert desse også brukt som mål. Alt-klikk på målhjelpelinja for å velja ho som eitt av måla. Alt+Shift-klikk for å leggja til ei ny målhjelpelinje eller å fjerna ei. Merkte målhjelpelinjer er merkte med raudt i staden for med blått.
- Juster og fordel
-
- Relativ til:
-
I denne nedtrekkslista vel du referansen som er biletobjektet målet vert justert i høve til.
-
Bilete: Biletet vert brukt som referanse som målobjektet vert justert i høve til.
-
Utval: Utvalet vert brukt som referanse som målobjektet skal refererast til. Viss ikkje, vert biletet brukt i staden.
![[Notat]](images/note.png)
Notat Det er ein kjent feil at å velja Utval saman med Bruk omfanget av laginnhaldet ikkje verkar slik det skal.
-
Plukka referanseobjekt: Objektet som skal brukast som kjelde i som dei andre valde objekta vert justerte i høve til. Dette kan vera eit lag, ein bane eller ei hjelpelinje.
Du vel referanseobjektet ved å klikka på laget, banen eller hjelpelinja i biletet. Det vert så vist med små firkantar i hjørna.
Namnet på det gjeldande referanseobjektet vert vist nedføre innstillingane. Viss ingen referanseobjekt er valde, vert justeringsknappen vist der.
-
- Innrettingsknappane
-
Desse knappane vert slått på når eit referanseobjekt og minst eitt mål er merkt.
-
 Juster ankerpunktet for målet med den venstre kanten av referansen.
 -
 Juster ankerpunktet for målet med det vassrette midtpunktet av referansen.
 -
 Juster ankerpunktet for målet med den høgre kanten av referansen.
 -
 Juster ankerpunktet for målet med den øvre kanten av referansen.
 -
 Juster ankerpunktet for målet med det loddrette midtpunktet av referansen.
 -
 Juster ankerpunktet for målet med den nedre kanten av referansen.
-
- Eksempel 1
-
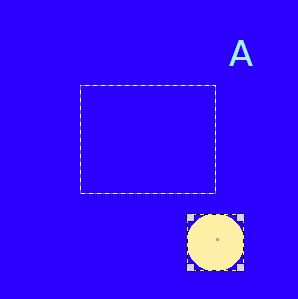
Figur 14.95. Eksempel på relativ justering i høve til eit utval

Eit bilete med eit gjennomsiktig bakgrunnslag, eit merkt lag med ein liten sirkel og eit utval. Firkantane i hjørna viser at det er referanseobjektet.
Me vil setja den raude sirkelen midt i utvalet.
Me klikkar
for å justera laget til det vassrette midtpunktet i utvalet.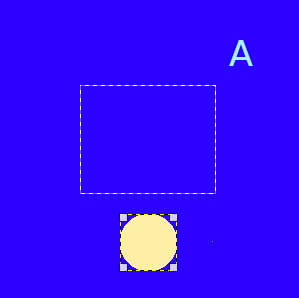
Så trykkjer me på
for å justera laget i høve til det loddrette midtpunktet i utvalet.
- Eksempel 2
-
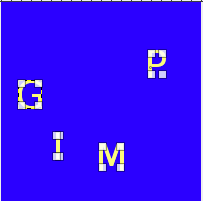
Figur 14.96. Eksempel på justering i høve til ei målhjelpelinje

Eit bilete med eit gjennomsiktig bakgrunnslag, tre små farga lag som er merkte og ei loddrett målhjelpelinje som er sett som referanseobjekt slik det vert vist med firkantane oppe og nede i målhjelpelinja.

Me ønskjer å justera dei øvre, venstre kantane på dei farga lage med denne hjelpelinja. Me set difor det venstre kantankerpunktet som målplassering for justeringane.

Me klikkar på
for å justera den venstre kanten av laga til hjelpelinja.
- Fordel
-
- Fordel knappane
-
Desse knappane vert brukte for å fordela målobjekta jamt på biletet. Kvar knapp brukar ein bestemt måte for fordelinga. Du må nytta minst tre av desse valde måla for å få fram desse knappane.
-
 Fordel måla vassrett ut frå det valde ankerpunket.
 -
 Fordel måla vassrett med same avstand mellom dei.
 -
 Fordel måla loddrett ut frå det valde ankerpunket.
 -
 Fordel måla loddrett med same avstand mellom dei.
-
- Eksempel 3
-
Figur 14.97. Eksempel på fordeling av tre lag med same avstand mellom dei
Me brukar det same biletet som i eksempel 2.

Me ønskjer å fordela dei tre farga laga med same avstanden mellom dei både vassrett og loddrett.
Me klikkar på
for å fordela laga vassrett og
for å gjera det same loddrett.
Figur 14.98. Eksempel på «Juster og fordel»

Eit bilete med fire tekstlag og eit farga bakgrunnslag. Alle tekstlaga er merkte i lagdialogvindauget.
Me ønskjer å setja tekstlaga i det loddrette midtpunktet i biletet, med same avstand mellom dei.
Me klikkar
![]() for å justera tekstlaga loddrett i høve til biletet.
for å justera tekstlaga loddrett i høve til biletet.

Deretter klikkar me
![]() for å fordela tekstlaga med same avstand mellom dei.
for å fordela tekstlaga med same avstand mellom dei.


