Just like for normal brushes, these animated brushes can also be either grayscale or color. For grayscale images, where the actual brush will use the current foreground color, you use white for transparency. For color images, transparent parts are used as such and when making brush strokes, the actual colors will be used instead of the foreground color.
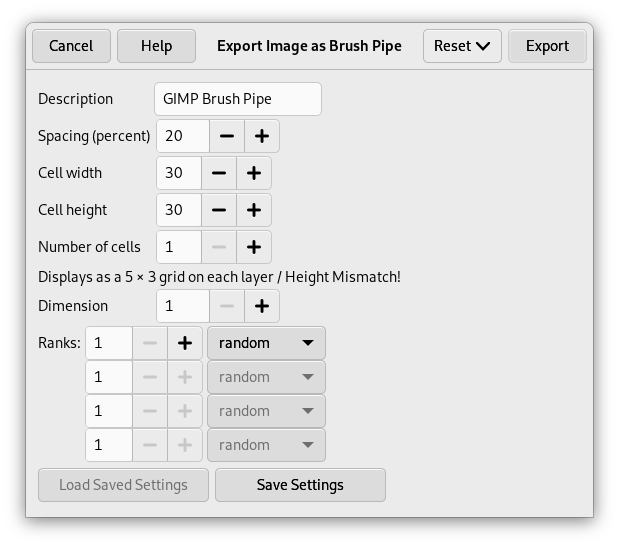
To create a new animated brush, create either a grayscale or color image, based on whether you want the brush to use the user's foreground color, or the actual colors in the image. Then create the images for your animation steps. To save the brush into gih format, select → , name your work with the gih extension, and press the button. The following window is displayed:
This dialog box has several options that allow you to select how your brush is animated.
- Espaçamento (Percentagem)
-
“Espaçamento” é a distância entre marcas de pincel consecutivas quando você traça uma pincelada com o ponteiro do mouse. Você deve considerar o ato de desenhar com o pincel — ou qualquer outra ferramenta de pintura, exceto a ferramenta de Tinta — como se fosse uma série de carimbos. Se o espaçamento for pequeno, as marcas de carimbo ficam muito próximas e a pincelada parece um traço contínuo. Se o espaçamento for grande, as marcas serão separadas: isso é interessante para um pincel colorido (como pincel de “pimentão”, por exemplo). Os valores variam entre 1 e 200, e essa porcentagem se refere ao “diâmetro” do pincel: 100% equivale a um diâmetro.
- Descrição
-
É o nome do pincel que vai aparecer no diálogo de pinceis quando o pincel for selecionado.
- Tamanho da célula
-
That is size of cells you will cut up in layers. Default is one cell per layer and size is that of the layer. Then there is only one brush aspect per layer.
Nós poderíamos ter uma grande camada e recortar as células, que se tornariam diferentes aspectos (quadros) do pincel animado.
For instance, we want a 100×100 pixels brush with 8 different aspects. We can take these 8 aspects from a 400×200 pixels layer, or from a 300×300 pixels layer but with one cell unused.
- Número de células
-
Esse é o número de células (uma célula para cada aspecto) que será cortado da imagem. O padrão é o número de camadas da imagem.
- Mostrar como
-
Essa linha lhe diz como as células estão arranjadas nas camadas. Se, por exemplo, você especificar a largura das células de forma que haja duas células por camada em quatro camadas (8 células no total), o GIMP vai mostrar:
2 linhas de 1 coluna em cada camada. - Dimension, Ranks, Selection dropdown
-
Aqui as coisas começam a se complicar! São necessárias algumas explicações para entender como arranjar as células e camadas
GIMP starts retrieving cells from each layer and stacks them into a FIFO stack (First In First Out: the first in is at the top of the stack and so can be first out). In our example 4 layers with 2 cells in each, we'll have, from top to bottom: first cell of first layer, second cell of first layer, first cell of second layer, second cell of second layer, …, second cell of fourth layer. With one cell per layer or with several cells per layer, result is the same. You can see this stack in the Layers Dialog of the resulting
.gihimage file.O GIMP cria uma tabela (um tipo de dado em “array”, internamente) para essa pilha, com as Dimensões que você configurar. Você pode usar até 4 dimensões.
Em ciência da computação, uma matriz (array) tem a forma “minhamatriz(x,y,z)” para uma matriz de 3 dimensões. É fácil imaginar uma matriz de 2 dimensões: em papel, é uma tabela com linhas e colunas
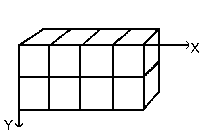
. Com uma matriz tridimensional, nós não falamos em linhas e colunas, mas em Dimensões e Níveis. A primeira dimensão é ao longo do eixo x, a segunda ao longo do eixo y, e a terceira ao longo do eixo z. Cada dimensão tem níveis de células.
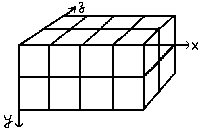
To fill up this array, GIMP starts retrieving cells from the top of stack. The way it fills the array reminds that of an odometer: right rank digits turn first and, when they reach their maximum, left rank digits start running. If you have some memories of Basic programming you will have, with an array(4,2,2), the following succession: (1,1,1),(1,1,2),(1,2,1),(1,2,2),(2,1,1),(2,1,2),(2,2,2),(3,1,1),…, (4,2,2). We will see this later in an example.
Além do número de níveis que você pode dar a cada dimensão, você também pode atribuir a elas um modo de Seleção. Você tem vários modos que serão aplicados quando se pintar com este pincel. De acordo com o nível selecionado em cada dimensão, será escolhida a célula contendo o “carimbo” para aquela parte da pincelada:
- Incremental
-
O GIMP seleciona um nível daquela dimensão de acordo com a ordem dos níveis, em sequência - nível 1, 2, 3, etc...
- Angular
-
O GIMP seleciona um nível para a dimensão em questão de acordo com o ângulo do pincel (direção de pintura)
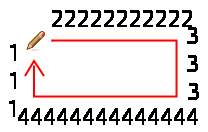
The first rank is for the direction 0°, upwards. The other ranks are affected, clockwise, to an angle whose value is 360/number of ranks. So, with 4 ranks in the concerned dimension, the angle will move 90° clockwise for each direction change: second rank will be affected to 90° (rightwards), third rank to 180° (downwards) and fourth rank to 270° (-90°) (leftwards).
- Random (aleatório)
-
O GIMP seleciona um nível ao acaso (aleatoriamente) da dimensão em questão.
- Velocity, Pressure, X tilt, Y tilt
-
Essas opções são para desenhos sofisticados feitos com mesas digitalizadoras (tablets)
Exemplos
- Um tubo de imagens de uma dimensão
-
Bem! E tudo isso é útil para que mesmo? Vamos examinar gradualmente com exemplos. Você pode na verdade colocar em cada dimensão configurações que vão lhe dar uma ação particular.
Vamos começar com um pincel de uma dimensão (1D) que vai nos ajudar a estudar como funcionam os modos de seleção. Nós podemos imaginar isso:

- siga esses passos:
-
Select → from the main menu.
Set Width and Height for example to 30 pixels.
In the Advanced Options, set the Color space to RGB color and set Fill with to Transparency.
Using the Text tool create 4 layers “1”, “2”, “3”, “4”. Delete the “background” layer.
-
Select → from the main menu to first save your image as an
.xcffile to keep its properties.Select → from the main menu to export the image as an animated brush with the
.gihextension.Export the image with a
.gbrextension in thebrushesdirectory located inside your personal GIMP configuration folder. -
In the Export Image as Brush Pipe dialog, provide a Description, set the Spacing (percent) to 100, set the Cell size to 30×30, set Dimension to 1, and set Ranks to 4, and the Selection drop-down to incremental. Then click the button.
-
In the Brush Dialog, click on the button
.
Your brush appears among the other brushes. You can use it immediately, without restarting GIMP.
Select your brush. Select pencil tool for instance and click and hold with it on a new image:

Você vê os números 1, 2, 3 e 4 um após o outro, em ordem.
-
Take your
.xcfimage file back and export it as.gihsetting the Selection drop-down to random:
Os dígitos serão exibidos numa ordem aleatória
-
Now set the Selection drop-down to angular:
-
- Um tubo de imagens de 3 dimensões
-
Agora vamos criar um pincel animado com 3 dimensões. Sua orientação vai mudar de acordo com a direção do pincel, ele vai alternar as mãos direta e esquerda regularmente e sua cor se alternará ao acaso entre preto e azul.
The first question we have to answer to is the number of images that is necessary. We reserve the first dimension (x) to the brush direction (4 directions). The second dimension (y) is for Left/Right alternation and the third dimension (z) for color variation. Such a brush is represented in a 3D array “myarray(4,2,2)”:
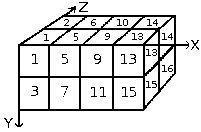
There are 4 ranks in first dimension (x), 2 ranks in second dimension (y) and 2 ranks in third dimension (z). Thus there are 4×2×2 = 16 cells. We need 16 images.
-
Criando as imagens da dimensão 1 (x)
Open a new 30×30 pixels image, RGB with Transparent Fill Type. Using the zoom draw a left hand with fingers upwards.[2] Save it as
handL0k.xcf(hand Left 0° Black).Open the Layers Dialog. Double click on the layer to open the Layer Attributes Dialog and rename it to handL0k.
Duplicate the layer. Let visible only the duplicated layer, select it and apply → → . Rename it to handL90k.
Repita a operação mais duas vezes e crie as camadas “esquerda-180-preta” e “esquerda-270-preta”.
-
Criando as imagens da dimensão 2 (y)
Esta dimensão no nosso exemplo tem dois níveis, um para a mão direita, e um para a mão esquerda. As imagens da mão esquerda já existem — nós criaremos as imagens de mão direita espelhando a mão esquerda.
Duplicate the handL0k layer. Let it visible only and select it. Rename it to handR0K. Apply → → .
Repita nela as mesmas operações feitas com a mão esquerda para criar a mão direita nas quatro direções diferentes, com os nomes apropriados (“direita-90-preta”...)
Re-order layers to have a clockwise rotation from top to bottom, alternating Left and Right: handL0k, handR0k, handL90k, handR90k, …, handR-90k.
-
Criando as imagens da dimensão 3 (z)
Criando imagens da dimensão 3 (z): A terceira dimensão tem dois níveis: um para a cor preta, e um para a cor azul. O primeiro nível, preto, já está pronto. As imagens do segundo nível serão uma cópia, em azul, das imagens já feitas até a dimensão 2. Então teremos 16 imagens. Mas uma pilha de 16 camadas já começa a ficar complicada de gerenciar, então usaremos camadas com duas imagens.
Select the handL0k layer and let it visible only. Use → to change the canvas size to 60×30 pixels.
Duplicate handL0k layer. On the copy, fill the hand with blue using Bucket Fill tool.
Selecione a ferramenta de Mover, e marque nas opções de ferramenta seu modo está em Mover a camada atual. Mova a mão azul para o lado direito da imagem - faça isso de forma precisa, usando .
Make sure only handL0k and its blue copy are visible. Right click on the Layers dialog: Apply the command with the option Expand as Necessary. You get a 60×30 pixels layer with the black hand on the left and the blue hand on the right. Rename it to “handsL0”.
Repita as mesmas operações (tornar única visível, duplicar, pintar de azul, mover, combinar camadas visíveis, renomear) com as outras 7 camadas.
-
Coloque as camadas em ordem
Layers must be set in order so that GIMP can find the required image at some point of using the brush. Our layers are yet in order but we must understand more generally how to have them in order. There are two ways to imagine this setting in order. The first method is mathematical: GIMP divides the 16 layers first by 4; that gives 4 groups of 4 layers for the first dimension. Each group represents a direction of the brush. Then, it divides each group by 2; that gives 8 groups of 2 layers for the second dimension: each group represents a L/R alternation. Then another division by 2 for the third dimension to represent a color at random between black and blue.
A outra forma é visual, usando a representação em matriz. A correlação entre os dois métodos é representada na imagem seguinte:
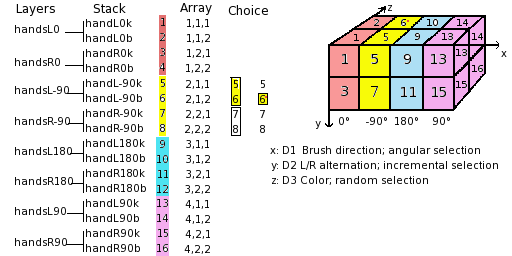
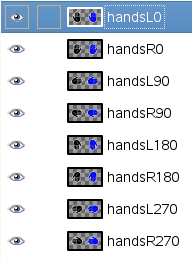
Como o GIMP lê esta matriz: O GIMP começa com a primeira dimensão, que está programada para ser “angular”, por exemplo, 90°. Nesse nível de 90°, na segunda dimensão, ele escolhe dentre o grupo de imagens dentre Esquerda/Direita de forma “incremental”. Então, na dimensão 3, de forma aleatória, ele escolhe uma cor. Por fim, nossas camadas devem estar nesta ordem:
-
Voilà. Your brush is ready. Save it as
.xcffirst, then export as.gihwith the following parameters:-
Espaçamento: 100
-
Descrição: Mãos
-
Cell Size: 30×30
-
Número de células: 16
-
Dimensões: 3
-
Dimensão 1: 4 Níveis, Seleção: angular
-
Dimensão 2: 2 Níveis, Seleção: incremental
-
Dimensão 3: 3 níveis, Seleção: random
-
Place your
.gihfile into the GIMP brush directory and refresh the brush box (see steps above). You can now use your brush.Figura 7.19. Aqui está o contorno de seleção elíptica usando este pincel, com as opções padrão:
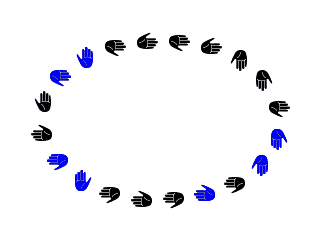
Este pincel alterna as mãos direita e esquerda regularmente, azul e preto ao acaso e a direção de acordo com a direção de pintura.
-
-
[2] Ok, we are cheating here: our hand is borrowed from https://commons.wikimedia.org/wiki/File:Stop_hand.png.
