Just like for normal brushes, these animated brushes can also be either grayscale or color. For grayscale images, where the actual brush will use the current foreground color, you use white for transparency. For color images, transparent parts are used as such and when making brush strokes, the actual colors will be used instead of the foreground color.
To create a new animated brush, create either a grayscale or color image, based on whether you want the brush to use the user's foreground color, or the actual colors in the image. Then create the images for your animation steps. To save the brush into gih format, select → , name your work with the gih extension, and press the button. The following window is displayed:
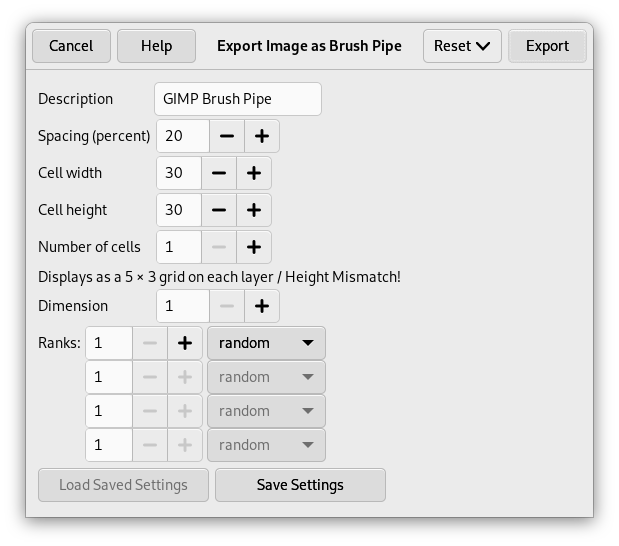
This dialog box has several options that allow you to select how your brush is animated.
- Espaciado (porcentaje)
-
“Espaciado” es la distancia entre las marcas consecutivas de las marcas del pincel cuando traza una pincelada con el puntero. Debe considerar el dibujar con un pincel, con cualquier herramienta de pintar, como si estuviera estampando. Si el espaciado es alto, la estampación estará más separada: eso es interesante con los pinceles de color (como el “pimiento verde” por ejemplo). El valor varia desde 1 hasta 200 y este porcentaje se refiere al “diámetro” del pincel: 100% es un diámetro.
- Descripción
-
Es el nombre del pincel que aparece arriba en el diálogo de pinceles (modo rejilla) cuando el pincel está seleccionado.
- Tamaño de celdas
-
That is size of cells you will cut up in layers. Default is one cell per layer and size is that of the layer. Then there is only one brush aspect per layer.
Podríamos tener solo una gran capa y separarla en celdas que se usarán para los diferentes aspectos del pincel animado.
For instance, we want a 100×100 pixels brush with 8 different aspects. We can take these 8 aspects from a 400×200 pixels layer, or from a 300×300 pixels layer but with one cell unused.
- Número de celdas
-
Es el número de celdas (una por aspecto), que se separará en capas. De manera predeterminada, es el número de capas ya que sólo hay una capa por aspecto.
- Mostrar como
-
Esto muestra como se disponen las celdas en las capas. Si, por ejemplo, ha situado ocho celdas, dos celdas por capa en cuatro capas, GIMP mostrará
1 fila de 2 columnas en cada capa. - Dimension, Ranks, Selection dropdown
-
Las cosas se complican. Las explicaciones son necesarias para entender como se disponen las celdas y las capas.
GIMP starts retrieving cells from each layer and stacks them into a FIFO stack (First In First Out: the first in is at the top of the stack and so can be first out). In our example 4 layers with 2 cells in each, we'll have, from top to bottom: first cell of first layer, second cell of first layer, first cell of second layer, second cell of second layer, …, second cell of fourth layer. With one cell per layer or with several cells per layer, result is the same. You can see this stack in the Layers Dialog of the resulting
.gihimage file.Entonces, GIMP crea una tabla informática de esta fila con las Dimensiones que había seleccionado. Puede usar cuatro dimensiones.
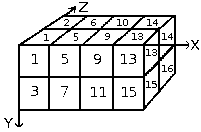
En informática, una tabla tiene la forma “mitabla(x,y,z)” para una tabla de 3 dimensiones (3D). Es fácil imaginar una tabla 2D: sobre el papel, es una tabla con filas y columnas
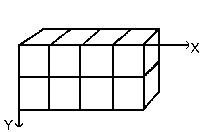
Con una tabla 3D no hablamos de filas y columnas pero si de Dimensiones y Rangos. La primera dimensión está a lo largo del eje x, la segunda a lo largo del eje y, y la tercera a lo largo del eje Z. Cada dimensión tiene rangos de celdas.
To fill up this array, GIMP starts retrieving cells from the top of stack. The way it fills the array reminds that of an odometer: right rank digits turn first and, when they reach their maximum, left rank digits start running. If you have some memories of Basic programming you will have, with an array(4,2,2), the following succession: (1,1,1),(1,1,2),(1,2,1),(1,2,2),(2,1,1),(2,1,2),(2,2,2),(3,1,1),…, (4,2,2). We will see this later in an example.
Además del número rango que puede dar a cada dimensión, también le puede dar un modo Selección. Hay varios modos que se aplicarán cuando se dibuja:
- Incremental
-
GIMP selecciona un rango de las dimensiones interesadas de acuerdo con el orden de rangos que tiene en esa dimensión.
- Angular
-
GIMP selecciona un rango en la dimensión interesada de acuerdo con el ángulo del movimiento del pincel.
The first rank is for the direction 0°, upwards. The other ranks are affected, clockwise, to an angle whose value is 360/number of ranks. So, with 4 ranks in the concerned dimension, the angle will move 90° clockwise for each direction change: second rank will be affected to 90° (rightwards), third rank to 180° (downwards) and fourth rank to 270° (-90°) (leftwards).
- Aleatorio
-
GIMP selecciona un rango aleatorio desde la dimensión interesada.
- Velocity, Pressure, X tilt, Y tilt
-
Estas opciones son para tabletas de dibujo sofisticadas.
Ejemplos
- Un pincel animado de una dimensión
-
Bien. ¿Para que es útil todo esto? Lo veremos gradualmente con ejemplos. Puede situar en cada dimensión cajas que darán a su pincel una acción particular.
Se empieza con un pincel 1D que permite estudiar las acciones en modo selección. Se puede imaginar como esto:
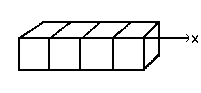
Siga estos pasos:
-
Select → from the main menu.
Set Width and Height for example to 30 pixels.
In the Advanced Options, set the Color space to RGB color and set Fill with to Transparency.
Using the Text tool create 4 layers “1”, “2”, “3”, “4”. Delete the “background” layer.
-
Select → from the main menu to first save your image as an
.xcffile to keep its properties.Select → from the main menu to export the image as an animated brush with the
.gihextension.Export the image with a
.gbrextension in thebrushesdirectory located inside your personal GIMP configuration folder. -
In the Export Image as Brush Pipe dialog, provide a Description, set the Spacing (percent) to 100, set the Cell size to 30×30, set Dimension to 1, and set Ranks to 4, and the Selection drop-down to incremental. Then click the button.
-
In the Brush Dialog, click on the button
 .
.
Your brush appears among the other brushes. You can use it immediately, without restarting GIMP.
Select your brush. Select pencil tool for instance and click and hold with it on a new image:

Verá los dígitos 1, 2, 3, 4 seguidos uno de otro, en orden.
-
Take your
.xcfimage file back and export it as.gihsetting the Selection drop-down to random: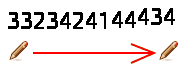
Los dígitos se mostrarán el orden aleatorio.
-
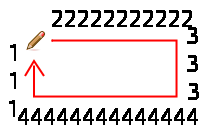
Now set the Selection drop-down to angular:
-
- Un pincel animado de 3 dimensiones
-
Ahora vamos a crear un pincel 3D animado: su orientación variará según la dirección del pincel, alternando, regularmente, izquierda y derecha y su color cambiará aleatoriamente entre negro y azul.
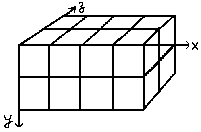
The first question we have to answer to is the number of images that is necessary. We reserve the first dimension (x) to the brush direction (4 directions). The second dimension (y) is for Left/Right alternation and the third dimension (z) for color variation. Such a brush is represented in a 3D array “myarray(4,2,2)”:
There are 4 ranks in first dimension (x), 2 ranks in second dimension (y) and 2 ranks in third dimension (z). Thus there are 4×2×2 = 16 cells. We need 16 images.
-
Crear imágenes de dimensión 1 (x)
Open a new 30×30 pixels image, RGB with Transparent Fill Type. Using the zoom draw a left hand with fingers upwards.[2] Save it as
handL0k.xcf(hand Left 0° Black).Open the Layers Dialog. Double click on the layer to open the Layer Attributes Dialog and rename it to handL0k.
Duplicate the layer. Let visible only the duplicated layer, select it and apply → → . Rename it to handL90k.
Repita la misma operación para crear «handL180k» y «handL-90k».
-
Crear imágenes de dimensión 2 (y)
Esta dimensión en nuestro ejemplo tiene dos rangos, uno para la mano izquierda y otro para la mano derecha. La mano izquierda ya existe. Construiremos las imágenes de la mano derecha invirtiéndola horizontalmente.
Duplicate the handL0k layer. Let it visible only and select it. Rename it to handR0K. Apply → → .
Repita la misma operación en las capas de las otras manos izquierdas para crear sus equivalentes manos derechas.
Re-order layers to have a clockwise rotation from top to bottom, alternating Left and Right: handL0k, handR0k, handL90k, handR90k, …, handR-90k.
-
Crear imágenes de dimensión 3 (z)
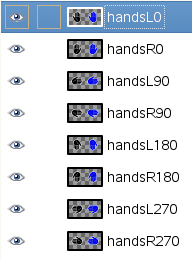
Crear imágenes de la dimensión 3 (z): La tercera dimensión tiene dos rangos, uno para el color negro y otro para el color azul. El primer rango, negro, ya existe. Vemos que las imágenes de la dimensión 3 serán una copia, en azul, de las imágenes de la dimensión 2. Así que tendremos 16 imágenes. Pero una fila de 16 capas no es fácil de gestionar: usaremos capas con dos imágenes.
Select the handL0k layer and let it visible only. Use → to change the canvas size to 60×30 pixels.
Duplicate handL0k layer. On the copy, fill the hand with blue using Bucket Fill tool.
Ahora, seleccione la herramienta «Mover». Doble pulsación sobre ella para acceder a sus propiedades: marque la opción Mover la capa actual. Mueva la mano azul a la parte derecha de la capa con precisión con la ayuda de .
Make sure only handL0k and its blue copy are visible. Right click on the Layers dialog: Apply the command with the option Expand as Necessary. You get a 60×30 pixels layer with the black hand on the left and the blue hand on the right. Rename it to “handsL0”.
Repita la misma operación sobre las otras capas.
-
Ordenar las capas
Layers must be set in order so that GIMP can find the required image at some point of using the brush. Our layers are yet in order but we must understand more generally how to have them in order. There are two ways to imagine this setting in order. The first method is mathematical: GIMP divides the 16 layers first by 4; that gives 4 groups of 4 layers for the first dimension. Each group represents a direction of the brush. Then, it divides each group by 2; that gives 8 groups of 2 layers for the second dimension: each group represents a L/R alternation. Then another division by 2 for the third dimension to represent a color at random between black and blue.
El otro método es visual, mediante la representación de la tabla. La correlación entre los dos métodos se representa en la siguiente imagen:
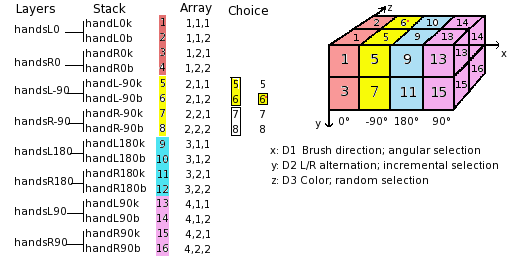
¿Como lee GIMP esta tabla?: GIMP empieza con la primera dimensión que está programada para “angular”, por ejemplo, 90°. En este rango 90°, en amarillo, en la segunda dimensión, selecciona la alternancia I/D , en forma “incremental”. Entonces, en la tercera dimensión, en forma aleatoria, elige un color. Finalmente, nuestras capas deben tener el orden siguiente:
-
Voilà. Your brush is ready. Save it as
.xcffirst, then export as.gihwith the following parameters:-
Espaciado: 100
-
Descripción: Manos
-
Cell Size: 30×30
-
Número de celdas: 16
-
Dimensiones: 3
-
Dimensión 1: 4 rangos Selección: Angular
-
Dimensión 2: 2 rangos Selección: Incremental
-
Dimensión 3: 2 rangos Selección: Aleatoria
-
Place your
.gihfile into the GIMP brush directory and refresh the brush box (see steps above). You can now use your brush.Figura 7.19. Aquí está el resultado de trazar una selección elíptica con el pincel:
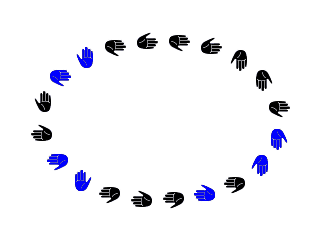
Este pincel alterna la mano derecha y la izquierda, regularmente, el color negro y azul de manera aleatoria, la dirección según las cuatro direcciones del pincel.
-
-
[2] Ok, we are cheating here: our hand is borrowed from https://commons.wikimedia.org/wiki/File:Stop_hand.png.


