Just like for normal brushes, these animated brushes can also be either grayscale or color. For grayscale images, where the actual brush will use the current foreground color, you use white for transparency. For color images, transparent parts are used as such and when making brush strokes, the actual colors will be used instead of the foreground color.
To create a new animated brush, create either a grayscale or color image, based on whether you want the brush to use the user's foreground color, or the actual colors in the image. Then create the images for your animation steps. To save the brush into gih format, select → , name your work with the gih extension, and press the button. The following window is displayed:
Figura 7.18. Diàleg per exportar una imatge com a pinzell
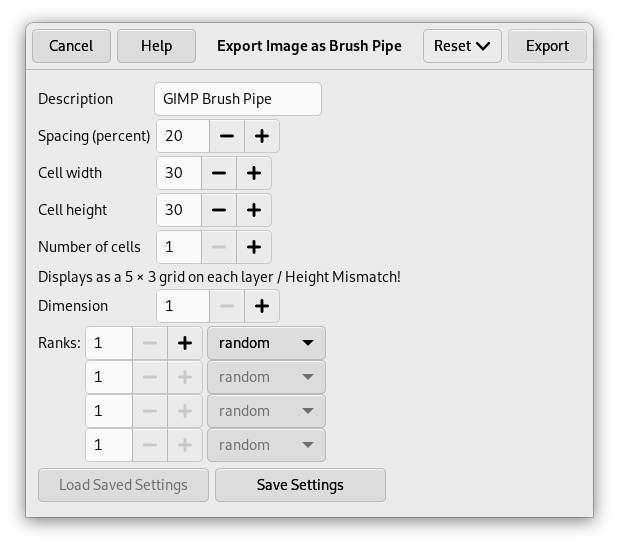
Dialog to export an image as GIMP image hose
This dialog box has several options that allow you to select how your brush is animated.
- Espaiat (percentatge)
-
L'«Espaiat» és la distància entre les marques consecutives del pinzell quan es traça una pinzellada amb el punter. Heu de considerar que dibuixar amb un pinzell, és com si estiguéssiu estampant. Si l'espaiat és baix, els cops estampats estaran més a prop i les traces semblaran més contínues. Si l'espaiat és alt, els cops estaran més separats: això és interessant amb els pinzells de figures, com el del «pebrot verd», per exemple. El valor varia des de l'1 fins a 200 i aquest percentatge es refereix al «diàmetre» del pinzell: 100% és un diàmetre; a 50, els pebrots estan mig superposats, mig diàmetre; a 100, un diàmetre de separació; a 150, un diàmetre i mig de separació; 200, dos diàmetres de separació.
- Descripció
-
És el nom del pinzell que apareix a dalt en el diàleg dels pinzells (mode graella) quan el pinzell està seleccionat.
- Mida de les cel·les
-
És la mida de les cel·les que se separen en capes. Per defecte és una cel·la per capa i la mida és la de la capa. Llavors només hi ha un aspecte de pinzell per capa.
Podríem tenir només una gran capa i separar-la en cel·les que s'utilitzaran pels diferents aspectes del pinzell animat.
Per exemple, volem un pinzell de 100x100 píxels amb 8 aspectes diferents. Podem tenir 8 aspectes d'una capa de 400x200 píxels, o d'una capa de 300x300 píxels però amb una cel·la buida sense ús.
- Nombre de cel·les
-
És el nombre de cel·les (una per aspecte), que es tallarà en cada capa. Per defecte, aquest és el nombre de capes ja que només hi ha una capa per aspecte.
- Mostra com
-
Això mostra com es disposen les cel·les en les capes. Si per exemple, heu situat vuit cel·les a dues cel·les per capa en quatre capes, el GIMP mostrarà
1 fila de 2 columnes per cada capa. - Dimensió, Rangs, Menú desplegable de la selecció
-
Les coses es compliquen. Calen explicacions per a entendre com es disposen les cel·les i les capes.
El GIMP comença a recuperar cel·les de cada capa i les apila en una pila FIFO («First In First Out» el primer en la primera sortida: el primer que està a la part superior de la pila pot ser el primer a sortir). En el nostre exemple de quatre capes amb dues cel·les en cadascuna tindrem de dalt a baix: primera cel·la de la primera capa, segona cel·la de la primera capa, primera cel·la de la segona capa, segona cel·la de la segona capa, ..., segona cel·la de la quarta capa. Amb una cel·la per capa o amb diverses cel·les per capa, el resultat és el mateix. Podeu veure aquesta pila en el Diàleg de capes del fitxer d'imatge
.gihresultant.Llavors, el GIMP crea una matriu informàtica a partir d'aquesta pila amb les Dimensions que heu indicat, podeu utilitzar-ne quatre.
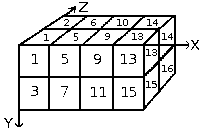
En informàtica, una matriu té la forma (x,y,z) per a una taula de 3 dimensions (3D). És fàcil imaginar una taula 2D: sobre el paper, és una taula amb files i columnes
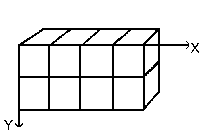
Amb una taula 3D no parlem de files i columnes però sí de Dimensions i Rangs. La primera dimensió està a l'eix x, la segona a l'eix y, i la tercera a l'eix z. Cada dimensió té rangs de les cel·les.
Per omplir aquesta matriu, el GIMP recupera les cel·les de dalt de la pila. La forma d'omplir la taula recorda la d'un compte quilòmetres: els dígits del rang dret giren primer i quan arriben al màxim, els del rang esquerre comencen a girar. Si recordeu la programació Basic amb una taula (4,2,2), la següent successió: (1,1,1),(1,1,2),(1,2,1),(1,2,2),(2,1,1),(2,1,2),(2,2,2),(3,1,1).... (4,2,2). Veurem això més endavant amb un exemple.
A més del nombre de rang que es pot donar a cada dimensió, també es pot afegir un mode Selecció. Hi ha diversos modes que s'aplicaran quan es dibuixin:
- Incremental
-
El GIMP selecciona un rang de les dimensions interessades en funció de l'ordre dels rangs que hi ha en aquesta dimensió.
- Angular
-
El GIMP selecciona un rang en la dimensió interessada d'acord amb l'angle de desplaçament del pinzell.
El primer rang és per a la direcció 0°, cap amunt. Els altres rangs estan afectats, en el sentit horari, en un angle on el valor és 360/nombre de rangs. Per tant, amb 4 rangs en la direcció interessada, l'angle girarà 90° en sentit horari per cada canvi de direcció: el segon rang estarà afectat a 90° (cap a la dreta), el tercer rang a 180° (cap avall) i el quart a 270° (-90°) (cap a l'esquerra).
- Aleatori
-
El GIMP selecciona un rang aleatori des de la dimensió interessada.
- Velocitat, Pressió, X tilt, Y tilt
-
Aquestes opcions són per a tauletes gràfiques perfeccionades.
Exemples
- Imatge d'un tub d'una dimensió
-
Bé. Per què és útil tot això? Ho veurem gradualment amb exemples. Podeu situar en cada dimensió casos que donaran al pinzell animat una acció particular.
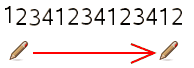
Comencem amb un pinzell 1D que permet estudiar les accions en modes de selecció. Es pot imaginar així:
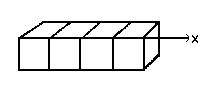
Seguiu els passos següents:
-
Seleccioneu → des del menú principal.
Estableix l'amplada i l'alçada, per exemple a 30 píxels.
A les Opcions avançades, establiu l'espai de color a color RGB i establiu Ompliu amb a Transparència.
Utilitzant l'eina Text es creen quatre capes «1», «2», «3», «4». Suprimeix la capa de «fons».
-
Seleccioneu → des del menú principal per a desar primer la imatge com un fitxer
.xcfper a mantenir les seves propietats.Seleccioneu → des del menú principal per a exportar la imatge com un pinzell animat amb l'extensió
.gih.Export the image with a
.gbrextension in thebrushesdirectory located inside your personal GIMP configuration folder. -
En el diàleg Exporta la imatge com a pinzell, proporciona una Descripció, estableix l' espaiat (percentatge) a 100, establiu la mida de la cel·la a 30x30, establiu la Dimensió a 1, els Rangs a 4 i el desplegable de la Selecció a incremental. A continuació, feu clic al botó .
-
En el Diàleg del pinzell, feu clic al botó
 .
.El vostre pinzell apareix al mig dels altres pinzells. Podeu utilitzar-lo immediatament sense reiniciar el GIMP.
Seleccioneu el pinzell. Seleccioneu l'eina llapis per exemple, i feu clic i manteniu-la premuda sobre una imatge nova:
Veureu els dígits 1, 2, 3, 4 seguits, en ordre.
-
Take your
.xcfimage file back and export it as.gihsetting the Selection drop-down to random: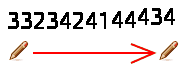
Els dígits es mostraran a l'atzar.
-
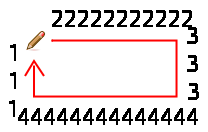
Ara estableix el desplegable de la selecció a angular:
-
- Un pinzell animat de 3 dimensions
-
Ara crearem un pinzell 3D animat: la seva orientació variarà segons la direcció del pinzell (4 direccions) alternant regularment esquerra i dreta, el color canviarà a l'atzar entre negre i blau.
El primer és saber el nombre d'imatges necessàries. Reservem la primera dimensió (x) per a la direcció del pinzell (4 direccions). La segona dimensió (y) és per a l'alternança esquerra/dreta i la tercera dimensió (z) per a la variació del color. Aquest pinzell estarà representat per una matriu 3D «myarray(4,2,2)»:
. Hi ha 4 rangs en la primera dimensió (x), 2 rangs en la segona (y) i 2 rangs en la tercera (z). Així hi ha 4×2×2 = 16 cel·les. Necessitem 16 imatges.
-
Crea imatges de la dimensió 1 (x)
Obriu una nova imatge de 30x30 píxels, RGB amb un farciment transparent. Utilitzant la lupa, dibuixeu una mà esquerra amb els dits cap amunt.[2] Deseu-lo com a
handL0k.xcfque vol dir «hand Left 0° Black» (mà esquerra 0° negre).Obriu el diàleg de capes. Feu doble clic sobre la capa per a obrir el diàleg Atributs de la capa i reanomeneu-la en handL0k.
Duplica la capa. Deixa visible només la capa duplicada, seleccioneu-la i apliqueu → → . Canvia-li el nom a handL90k.
Repetiu la mateixa operació per a crear handL180k i handL-90k (o handL270k).
-
Creació d'imatges de dimensió 2 (i)
Aquesta dimensió en el nostre exemple té dos rangs, un per a la mà esquerra i un altre per a la mà dreta. La mà esquerra ja existeix. Construirem les imatges de la mà dreta capgirant-les horitzontalment.
Duplica la capa handL0k. Deixeu-la visible i seleccioneu-la. Canvia el nom a handR0K. Apliqueu → → .
Repetiu la mateixa operació en les altres capes de la mà esquerra, per a crear les mans dretes equivalents.
Reordena les capes perquè tinguin una rotació en sentit de les agulles del rellotge de dalt a baix, alternant esquerra i dreta: handL0k, handR0k, handL90k, handR90k, ..., handR-90k.
-
Creació d'imatges de dimensió 3 (z)
Crea imatges de la dimensió 3 (z): la tercera dimensió té dos rangs, un per al color negre i un altre per al color blau. El primer rang, el negre, ja existeix. Veiem que les imatges de la dimensió 3 seran una còpia en blau de les imatges de la dimensió 2. Així que tindrem 16 imatges. Però una fila de 16 capes no és fàcil de gestionar: llavors utilitzarem capes amb dues imatges.
Seleccioneu la capa handL0k i deixeu-la només visible. Utilitzeu → a canvia la mida del llenç a 60×30 píxels.
Duplicate handL0k layer. On the copy, fill the hand with blue using Bucket Fill tool.
Seleccioneu l'eina Mou. Doble clic per a accedir a les seves propietats: marqueu l'opció Mou la capa actual. Moveu la mà blava a la part dreta de la capa amb precisió amb l'ajuda de l'.
Assegureu-vos que només es poden veure handL0k i la seva còpia blava. Feu clic-dret en el diàleg de capes: apliqueu l'ordre amb l'opció Expandida fins on calgui. Obtindreu una capa de 60×30 píxels amb la mà negra a l'esquerra i la mà blava a la dreta. Canvia-ho a «handsL0».
Repetiu la mateixa operació sobre les altres capes.
-
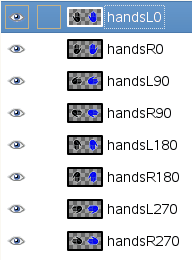
Ordena les capes
S'han d'ordenar les capes perquè el GIMP pugui trobar la imatge desitjada quan s'utilitzi el pinzell. Les capes ja estan en ordre però s'ha d'entendre de forma més general com posar-les en ordre. Hi ha dues maneres de fer-ho. El primer és matemàtic: el GIMP divideix primer les 16 capes per 4; això dona 4 grups de 4 capes per a la primera dimensió. Cada grup representa una direcció del pinzell. Llavors, divideix cada grup per 2; això dona 8 grups de 2 capes per a la segona dimensió: cada grup representa l'alternança E/D (esquerre dreta). Després una altra divisió per 2 perquè la tercera dimensió representi un color a l'atzar entre el negre i el blau.
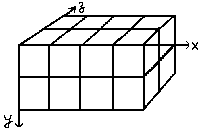
L'altre mètode és visual, basat en la representació de la matriu. La correlació entre els dos mètodes es representa en la següent imatge:
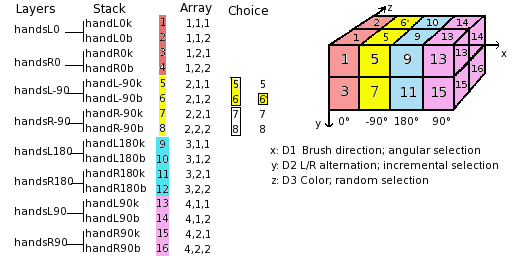
Com llegeix el GIMP aquesta matriu? El GIMP comença amb la primera dimensió que està programada per una tria «angular», per exemple, 90°. En aquest rang de 90°, en groc en la segona dimensió, se selecciona l'alternança E/D de manera «incremental». Llavors, en la tercera dimensió, en forma aleatòria, es tria un color. Finalment, les nostres capes han de tenir l'ordre següent:
-
Heus ací. El vostre pinzell està llest. Deseu-lo primer amb el format
.xcf, i després amb el format.gihamb els següents paràmetres:-
Espaiat: 100
-
Descripció: mans
-
Mida de les cel·les: 30x30
-
Nombre de cel·les: 16
-
Dimensions: 3
-
Dimensió 1: 4 rangs Selecció: angular
-
Dimensió 2: 2 rangs Selecció: incremental
-
Dimensió 3: 2 rangs Selecció: aleatòria
-
Col·loqueu el fitxer
.gihen el directori dels pinzells del GIMP i actualitzeu la capsa dels pinzells. Ara, ja podeu utilitzar el pinzell.Figura 7.19. Ací hi ha el resultat de traçar una selecció el·líptica amb el pinzell:
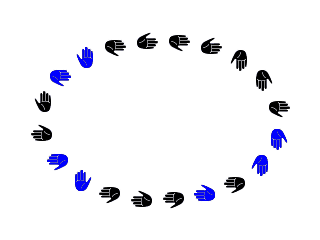
Aquest pinzell alterna la mà dreta i la mà esquerra amb regularitat, els colors negre i blau a l'atzar, d'acord amb les quatre direccions del pinzell.
-
-
[2] Bé, hem fet una mica de trampa ací: la nostra mà està agafada de https://commons.wikimedia.org/wiki/File:Stop_hand.png.


