The GIMP user interface is available in two modes:
-
modul multi-fereastră,
-
mod fereastră unică.
When you open GIMP for the first time, it opens in single-window mode by default. You can enable multi-window mode by unchecking the → option in the main menu. After quitting GIMP, GIMP will start in the mode you have selected next time.
- Modul multi-fereastră
-
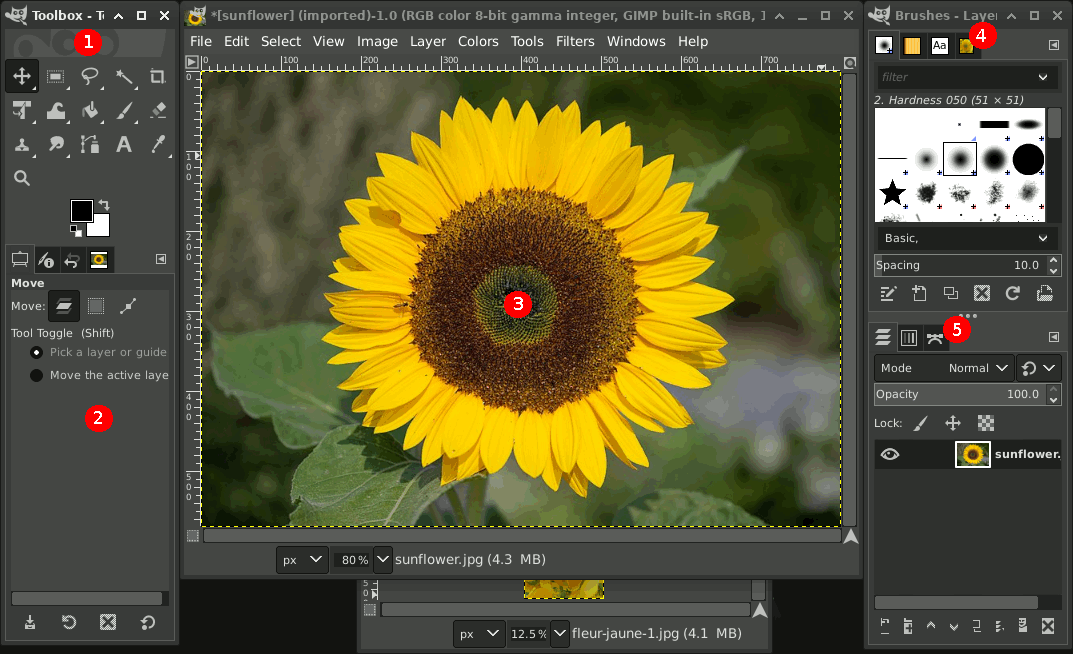
The screenshot above shows the most basic multi-window arrangement for GIMP that can be used effectively.
You will see two panels, left and right, and an image window in the middle. A second image is partially masked. The left panel contains the Toolbox as well as Tool Options, Device Status, Undo History and Images dialogs together. The right panel contains Brushes, Patterns, Fonts and Document History dialogs together in a multi-tab dock, and Layers, Channels and Paths dialogs together in another multi-tab dock.
-
The Toolbox: Contains a set of icon buttons used to select tools. By default, it also contains the foreground and background colors. You can add brush, pattern, gradient and active image icons. Use → → to enable, or disable the extra items.
-
Tool options: Docked below the Toolbox is a Tool Options dialog, showing options for the currently selected tool (in this case, the Move tool).
-
Image windows: Each image open in GIMP is displayed in a separate window. Many images can be open at the same time, limited by only the system resources. Before you can do anything useful in GIMP, you need to have at least one image window open. The image window holds the Menu of the main commands of GIMP (File, Edit, Select, etc.), which you can also get by right-clicking on the window.
O imagine poate fi mai mare decât fereastra de imagine. În acest caz, GIMP afișează imaginea la un nivel de zoom redus, ce permite vederea completă a imaginii în fereastra de imagine. Dacă comutați la nivelul de zoom de 100%, apar barele de derulare, permițându-vă să navigați deasupra imagini.
-
The Brushes, Patterns, Fonts, Document History dock — note that the dialogs in the dock are tabs. The Brushes tab is open: it shows the type of brush used by paint tools.
-
Layers, Channels, Paths: The docked dialog below the brushes dialog shows the dialogs (tabs) for managing layers, channels and paths. The Layers tab is open: it shows the layer structure of the currently active image, and allows it to be manipulated in a variety of ways. It is possible to do a few very basic things without using the Layers dialog, but even moderately sophisticated GIMP users find it indispensable to have the Layers dialog available at all times.
Dialogul și gestionarea andocărilor sunt descrise în Secțiune 2.3, „Dialoguri și andocare”.
-
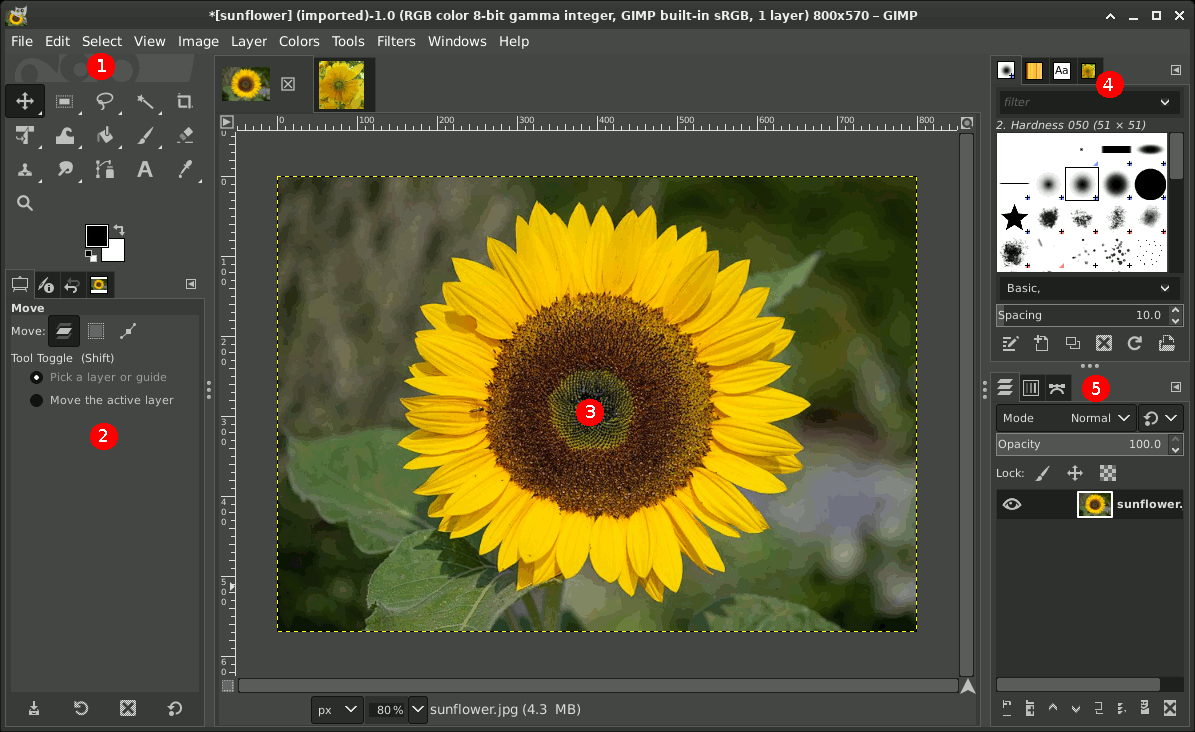
- Modul fereastră unică
-
Veți găsi aceleași elemente, cu diferențe în gestionarea lor:
-
Left and right panels are fixed; you can't move them. But you can decrease or increase their width by dragging the moving pointer that appears when the mouse pointer overflies the right border of the left pane. If you want to keep the left pane narrow, please use the scroll bar at the bottom of the tool options to pan across the options display.
If you reduce the width of a multi-tab dock, there may be not enough room for all tabs; then arrow-heads
 ,
,
 appear allowing you
to scroll through tabs.
appear allowing you
to scroll through tabs.
Ca în modul multi-fereastră, puteți masca aceste panouri folosind tasta Tab.
-
Fereastra imagine ocupă tot spațiul dintre ambele panouri.
When several images are open, a new bar appears above the image window, with a tab for every image. You can navigate between images by clicking on tabs or either using Ctrl+Page Up or Page Down or Alt+Number. „Number” is tab number; you must use the number keys of the upper line of your keyboard, not that of keypad (Alt-shift necessary for some national keyboards).
-
Aceasta este o configurare minimalistă. Există peste o duzină de alte tipuri de dialoguri folosite de GIMP pentru diverse scopuri, dar utilizatorii, de obicei, le deschid atunci când au nevoie de ele și închid atunci când termină. Utilizatorii experimentați păstrează, în general, caseta de instrumente (cu opțiuni de instrument) și straturi de dialog deschise permanent. Setul de instrumente este esențial pentru multe operațiuni GIMP. Secțiunea Opțiuni instrument este de fapt un dialog separat, afișat andocat la setul de instrumente principal pe ecran. Utilizatorii cu experiență aproape întotdeauna l-au configurat astfel: este foarte dificilă utilizarea instrumentelor în mod eficient, fără a fi capabil a vedea modul în care opțiunile lor sunt stabilite. Dialogul straturi intră în joc atunci când lucrați cu o imagine cu mai multe straturi: după ce ați avansat dincolo de etapele cele mai de bază ale GIMP, acest lucru înseamnă aproape întotdeauna. Și, bineînțeles, ajută la afișarea imaginilor pe care le editați pe ecran; Dacă închideți fereastra imagine înainte de a salva munca, GIMP vă va întreba dacă doriți să închideți fișierul.
![[Notă]](images/note.png)
|
Notă |
|---|---|
|
If your GIMP layout is lost, your arrangement
is easy to recover using
→ .
This menu command is only available while an image is open.
To add, close, or detach a tab from a dock, click
|
Următoarele secțiuni vă asistă prin componentele fiecărei dintre ferestrele afișate, explicând ceea ce sunt și modul în care acestea funcționează. Odată ce le-ați citit, plus secțiunea care descrie structura de bază pentru imagini GIMP, ar trebui să considerați că ați învățat suficient pentru a utiliza GIMP pentru o mare varietate de manipulări asupra imaginilor de bază. Puteți căuta apoi prin restul manualului ca petrecere a timpului liber (sau doar experiment) pentru a afla numărul aproape nelimitat de lucruri mai subtile și de specialitate, care sunt posibile. Distracție plăcută!
Trusa de instrumente este inima lui GIMP. Aici este un tur rapid despre ceea ce veți găsi acolo.
![[Indicație]](images/tip.png)
|
Indicație |
|---|---|
|
În trusa cu unelte, ca și în cele mai multe părți ale GIMP, prin deplasarea mausului deasupra a ceva și menținându-l acolo pentru un moment, de obicei, afișează un „sfat despre instrument” care îl descrie. Tastele scurtături sunt, de asemenea, frecvent afișate în acest mesaj. În multe cazuri, puteți deplasa mausul peste un element și apăsa tasta F1 pentru a obține ajutor despre ceea ce este sub maus. |
By default, only the Foreground/Background Colors area is visible. You can add the Brush/Pattern/Gradient area and Active Image area through → → : Tools configuration.
-
The GIMP logo: At the top of the toolbox, you can click-drag-and-drop images from a file browser into this area or into the tool icons to open the images. You can hide this logo by unchecking the Show GIMP logo option in the Toolbox Preferences.
-
Pictograme instrument: Aceste pictograme sunt butoane care activează instrumente pentru o mare varietate de scopuri: selectarea părților de imagini, desenarea unei imagini, transformarea unei imagini, etc. Secțiune 1, „The Toolbox” oferă o prezentare generală a modului de lucru cu instrumente, iar fiecare instrument este descris sistematic în capitolul Instrumente.
-
Foreground/Background colors:
The color area shows GIMP's current foreground and background colors, which are used for painting, filling, and many other operations. Clicking on either one of them brings up a color selector dialog that allows you to change to a different color.
Clicking on the small symbol in the lower left corner resets the foreground and background colors to black and white. Pressing the D key has the same effect.
Clicking on the double-headed arrow symbol swaps the foreground and background colors. Pressing the X key has the same effect.
-
Pensulă/model/degradeu: Simbolurile de aici vă arată actualele selecții ale GIMP pentru: pensulă, folosit de toate instrumentele care permit să se deseneze pe imagine („desenarea” include operațiuni cum ar fi și ștergerea cernelii apropo); pentru model, care este utilizat în completarea zonelor selectate ale unei imagini; și pentru degrade, care intervine ori de câte ori o operațiune necesită trecere ușoară printr-o gamă de culori. Apăsând clic pe oricare dintre aceste simboluri va deschide o fereastră de dialog care permite modificări ale instrumentelor.
-
Imagine activă: În GIMP, puteți lucra cu multe imagini de-o dată, dar la orice moment dat doar o imagine este „imagine activă”. Aici veți găsi o reprezentare printr-o pictogramă a imaginii active. Apăsați clic pe pictogramă pentru a afișa un dialog cu lista imaginilor deschise în prezent, apoi apăsați clic pe o imagine din dialog pentru a o face activă. De obicei, apăsați clic pe o fereastră a imaginii în modul fereastră multiplă, sau pe un tab al imaginii în modul fereastră unică, pentru a face imaginea activă.
If you use GIMP on a Unix-like operating system with the X Window System, you can also drag and drop the thumbnail to an enabled XDS file manager to directly save the corresponding image.
|
|
Notă |
|---|---|
|
At every start, GIMP selects the brush, color, pattern you used when quitting your previous session because the Save input device settings on exit in Preferences/Input Devices, is checked by default. If you uncheck it, GIMP will use a color, a brush and a pattern by default, always the same. |


