The GIMP user interface is available in two modes:
-
マルチウィンドウモード
-
シングルウィンドウモード
When you open GIMP for the first time, it opens in single-window mode by default. You can enable multi-window mode by unchecking the → option in the main menu. After quitting GIMP, GIMP will start in the mode you have selected next time.
- マルチウィンドウモード
-
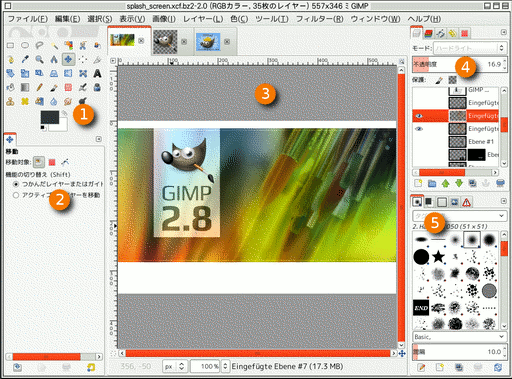
The screenshot above shows the most basic multi-window arrangement for GIMP that can be used effectively.
You will see two panels, left and right, and an image window in the middle. A second image is partially masked. The left panel contains the Toolbox as well as Tool Options, Device Status, Undo History and Images dialogs together. The right panel contains Brushes, Patterns, Fonts and Document History dialogs together in a multi-tab dock, and Layers, Channels and Paths dialogs together in another multi-tab dock.
-
The Toolbox: Contains a set of icon buttons used to select tools. By default, it also contains the foreground and background colors. You can add brush, pattern, gradient and active image icons. Use → → to enable, or disable the extra items.
-
Tool options: Docked below the Toolbox is a Tool Options dialog, showing options for the currently selected tool (in this case, the Move tool).
-
Image windows: Each image open in GIMP is displayed in a separate window. Many images can be open at the same time, limited by only the system resources. Before you can do anything useful in GIMP, you need to have at least one image window open. The image window holds the Menu of the main commands of GIMP (File, Edit, Select, etc.), which you can also get by right-clicking on the window.
画像ウィンドウはその寸法より大きな画像も表示できます。 この場合GIMP はウィンドウ内に画像の全体像を収めるため倍率を落として縮小表示します。 表示倍率を 100% に変えると、 画像の見たい部分を繰り寄せられるようスクロールバーが現れます。
-
The Brushes, Patterns, Fonts, Document History dock — note that the dialogs in the dock are tabs. The Brushes tab is open: it shows the type of brush used by paint tools.
-
Layers, Channels, Paths: The docked dialog below the brushes dialog shows the dialogs (tabs) for managing layers, channels and paths. The Layers tab is open: it shows the layer structure of the currently active image, and allows it to be manipulated in a variety of ways. It is possible to do a few very basic things without using the Layers dialog, but even moderately sophisticated GIMP users find it indispensable to have the Layers dialog available at all times.
ダイアログとドックの管理操作方法については 「ダイアログとその合体」 で説明しています。
-
- シングルウィンドウモード
-
上記マルチウィンドウモードと内容は同じものですが、 管理操作方法が異なっています。
-
Left and right panels are fixed; you can't move them. But you can decrease or increase their width by dragging the moving pointer that appears when the mouse pointer overflies the right border of the left pane. If you want to keep the left pane narrow, please use the scroll bar at the bottom of the tool options to pan across the options display.
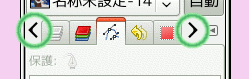
If you reduce the width of a multi-tab dock, there may be not enough room for all tabs; then arrow-heads
 ,
,
 appear allowing you
to scroll through tabs.
appear allowing you
to scroll through tabs.
マルチウィンドウモードの場合と同じく Tab キーを使ってパネルをいっぺんに隠せます。
-
画像ウィンドウは両側パネル間の全域を占めます。
When several images are open, a new bar appears above the image window, with a tab for every image. You can navigate between images by clicking on tabs or either using Ctrl+Page Up or Page Down or Alt+Number. 「Number」 is tab number; you must use the number keys of the upper line of your keyboard, not that of keypad (Alt-shift necessary for some national keyboards).
-

ここでは最低限のものしか出ていません。 GIMP では目的にあわせて十数種ものダイアログがありますが、 それが必要なときに開いて、 用が済んだら閉じればよいのです。 要領のいいユーザーは普段ツールボックス (とツールオプション) とレイヤーダイアログを出したままにしています。 ツールボックスは GIMP を使うほとんどの作業の要です。 ツールオプション区画はこの例ではツールボックスに合体させていますが、 もともと別のダイアログです。 しかし要領のいいユーザーはだいたいいつもこの形にしています。 ツールがどう調整されているか見ないで使いこなすのは無理なことですから。 レイヤーダイアログは画像を複数のレイヤーで扱う場合にのみ必要なものですが、 GIMP を使いはじめるとまもなくこれも ほぼ常備 品となることでしょう。 そしてもちろん、 加工中の画像を画面に出しておかねば何もできません。 作品を保存していないまま画像ウィンドウを閉じようとすると GIMP はこのファイルを閉じるのかどうか尋ねてきます。
![[注記]](images/note.png)
|
注記 |
|---|---|
|
If your GIMP layout is lost, your arrangement
is easy to recover using
→ .
This menu command is only available while an image is open.
To add, close, or detach a tab from a dock, click
|
この先の節ではスクリーンショットに出てきたウィンドウのそれぞれの部品をひとつひとつ見てゆき、 それらの名前や役割を説明します。 ひととおり目を通したあとで GIMP 画像の基本構造を解説した章を押さえれば、 GIMP の多様な基本操作は充分マスターできています。 その後はこのてびきの残りを読んでいろいろ遊んでみたり (試したり) しながら、 数えきれないほどの巧妙かつ高度な技を身に付けてゆきましょう。 さあ楽しもう!
ツールボックスは GIMP の心臓部です。 さて図にでているものを順に素早く見てゆきましょう。
![[ヒント]](images/tip.png)
|
ヒント |
|---|---|
|
ツールボックスも GIMP の各所と同じく、 なにかの部品の上でポイントしたままちょっと待つとそれについてのメッセージが書かれた「ツールチップ」が現れます。 ついでにショートカットキーもよくツールチップに表示されます。 ほとんどの部品はその上にマウスポインターを置いたまま F1 キーを押せば関連するヘルプが立ち上がるようになっています。 |
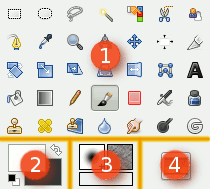
By default, only the Foreground/Background Colors area is visible. You can add the Brush/Pattern/Gradient area and Active Image area through → → : ツールアイコンの設定.
-
The GIMP logo: At the top of the toolbox, you can click-drag-and-drop images from a file browser into this area or into the tool icons to open the images. You can hide this logo by unchecking the Show GIMP logo option in the Toolbox Preferences.
-
ツールアイコン: ここに並ぶアイコンは、 画像の一部を選択したり、 色付けしたり、 変形したりといった様々な目的にあわせたツールをそれぞれ表しています。 「ツールボックス」 の節ではツールの使い方が大まかに述べてありますが、 ツール の章全体ではそれぞれのツールについて体系的に説明しています。
-
Foreground/Background colors:
The color area shows GIMP's current foreground and background colors, which are used for painting, filling, and many other operations. Clicking on either one of them brings up a color selector dialog that allows you to change to a different color.
Clicking on the small symbol in the lower left corner resets the foreground and background colors to black and white. Pressing the D key has the same effect.
Clicking on the double-headed arrow symbol swaps the foreground and background colors. Pressing the X key has the same effect.
-
Brush/Pattern/Gradient: The symbols here show you GIMP's current selections for: the Paintbrush, used by all tools that allow you to paint on the image (「painting」 includes operations like erasing and smudging, by the way); for the Pattern, which is used in filling selected areas of an image; and for the Gradient, which comes into play whenever an operation requires a smoothly varying range of colors. Clicking on any of these symbols brings up a dialog window that allows you to change it.
-
活性画像: GIMP では同時に複数の画像を扱えますが、 どの時点でもそのうちのただ一枚だけが「活性画像」 (アクティブな画像) です。 今の活性画像をアイコン化したものがここに表示されます。 これをクリックすると現在開かれているすべての画像をリストにしたダイアログが出てきて、 どれかの画像をクリックするとそれが活性画像になります。 しかし普段はマルチウィンドウモードなら目的の画像ウィンドウをクリック、 シングルウィンドウモードなら目的の画像タブをクリックしてその画像を活性化させる方法をいちばんよく行なうことになるでしょう。
If you use GIMP on a Unix-like operating system with the X Window System, you can also drag and drop the thumbnail to an enabled XDS file manager to directly save the corresponding image.
|
|
注記 |
|---|---|
|
At every start, GIMP selects the brush, color, pattern you used when quitting your previous session because the Save input device settings on exit in Preferences/Input Devices, is checked by default. If you uncheck it, GIMP will use a color, a brush and a pattern by default, always the same. |


