
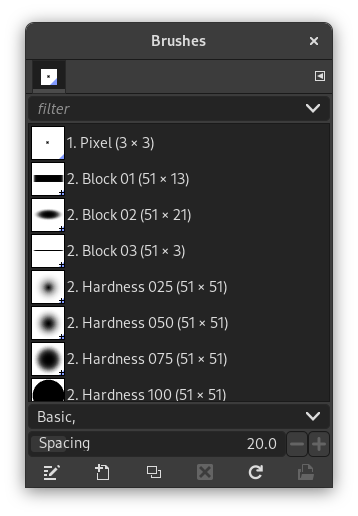
The „Brushes“ dialog is used to select and manage brushes. These brushes are used by the Paintbrush, Pencil and Airbrush tools. The MyPaint Brush uses its own kind of brushes. GIMP comes with a wide selection of brushes and more can be added easily. You can also create custom brushes using the Brush Editor, or by exporting an image as a brush.
See the Brushes section for basic information on brushes and how they are used in GIMP.
There can be only one brush active at any time. To make a brush active, select it in the list or grid. The name of the currently active brush is shown directly above the list of brushes. The active brush can also be recognized by a selection rectangle around the preview (which can sometimes be difficult to see, depending on your theme). The size, angle, spacing and several other characteristics of a brush can be set in the Tool Options Dialog when one of the relevant paint tools is active.
Der Dialog „Ablagen“ ist dockbar. Informationen hierzu finden Sie im Abschnitt Abschnitt 2.3, „Docks und Dialoge“.
-
From the main menu select → → .
-
From the Tab menu in any dockable dialog click the tab menu button
 and select
→ .
and select
→ .
-
If you enabled the „Show active brush, pattern & gradient“ option in the Toolbox Preferences, you can click on the active brush icon in the Brush, Pattern, Gradient area.
-
From the Tool Options dialog for the Paintbrush, Pencil and Airbrush tools, by clicking on the Brush icon button. This opens a popup with similar functionality that allows you to quickly choose a brush from the list. To open the actual brush dialog click on the button at the bottom right corner of the popup.
Der vereinfachte Pinseldialog
The button bar at the bottom offers the following functionality:
-
 Kleinere Vorschaubilder
 -
 Größere Vorschaubilder
 -
 Listenansicht
 -
 Rasteransicht
 -
 Open the brush selection dialog
Note that, depending on your Preferences, a brush selected with the popup may only apply to the currently active tool, not to other paint tools. See the Paint Options Shared Between Tools section in the Tool Options Preferences for more information.
-
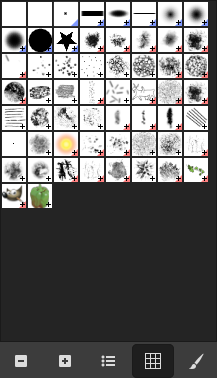
In the Tab menu, you can choose between and . In Grid mode, the brush shapes are laid out in a rectangular array, making it easy to see many at once and find the one you are looking for. In List mode, the shapes are lined up in a list, with the names beside them.
In the Tab menu, the option Preview Size allows you to adjust the size of brush previews to your liking.
- Rasterdarstellung
-
Am oberen Rand des Dialoges wird der Name der aktuell aktiven Pinselspitze sowie deren Größe in Pixeln angezeigt.
Im zentralen Bereich des Dialoges werden die verschiedenen Pinselspitzen in einem Raster angezeigt. Die aktive Spitze wird durch einen Rahmen hervorgehoben.
- Listendarstellung
-
Im Wesentlichen funktioniert der Dialog in dieser Darstellung genau so, wie in der Rasterdarstellung. Einzige Ausnahme:
Wenn Sie auf den Namen einer Pinselspitze doppelklicken, haben Sie die Möglichkeit, den Namen zu bearbeiten. Beachten Sie in diesem Zusammenhang bitte, dass Sie generell die mit GIMP ausgelieferten Spitzen nicht bearbeiten, folglich auch nicht umbenennen können. Dieses Verhalten gilt übrigens nicht nur für Pinselspitzen, sondern auch für alle Muster, Farbverläufe, Farbpaletten und so weiter, soweit diese mit GIMP ausgeliefert werden. Sie können jedoch jederzeit eine Kopie dieser Elemente anlegen und diese dann selbstverständlich auch beliebig bearbeiten.
When you click on a brush preview, it becomes the active brush that will be used when using one of the relevant painting tools. Double-clicking a brush preview, activates the Brush Editor.
Brushes can be managed in several ways using the buttons at the bottom of the dialog or the right-click context menu.
Meaning of the symbols at the bottom right corner of a brush preview
-
A plus sign indicates that the brush preview is shown at a reduced size. To preview the normal size, left click and hold the preview.
-
A blue corner indicates the brush is a parametric brush, created with the Brush Editor.
-
A red corner indicates this is an animated brush. To preview the animation, left click and hold the preview.
On the right side, next to the filter selection, there is a
![]() Use theme colors for preview button.
Use theme colors for preview button.
By default, brushes and fonts show a white background for each preview. If you prefer the background to be more in line with your theme, you can toggle that by clicking this button. GIMP will then use the background color as set by your theme.
The „filter“ drop-down allows you to select one or more tags to filter and reduce the number of brushes shown. The „tags“ can be managed below the preview area. For more information on tagging see Abschnitt 3.7, „Tagging“.
Mit diesem Schieberegler können Sie einstellen, wie groß der Abstand zwischen den Stellen, an denen die Pinselspitze beim Malen einer Linie aufgetragen wird, sein soll. Der Abstand wird in Prozent der Pinselgröße angegeben.
The button bar at the bottom offers the following functionality:
-
 Pinsel bearbeiten
-
This activates the Brush Editor. Pressing the button will open the Editor for any brush. It only works, however, for parametric brushes, which can be recognized by the blue bottom right corner in the preview. For other types of brushes the Editor will show you a preview, but not allow you to make any changes.
-
 Neuer Pinsel
-
This creates a new parametric brush, initializes it with a small fuzzy round shape, and opens the Brush Editor so that you can modify it. The new brush is automatically saved in your personal Brushes Folder.
-
 Pinsel duplizieren
-
This button is only enabled if the currently selected brush is a parametric brush. If so, the brush is duplicated, and the Brush Editor is opened so that you can modify the copy. The result is automatically saved in your personal Brushes Folder.
-
 Pinsel löschen
-
This option is active for parametric brushes only. This removes all traces of the brush, both from the dialog and the folder where its file is stored, if you have permission to do so. It asks for confirmation before doing anything. The brushes that come with GIMP can not be removed.
-
 Pinsel neu laden
-
If you add brushes to your personal Brushes Folder or any other folder in your brush search path, by some means other than the Brush Editor, this button causes the list to be reloaded, so that the new entries will be available in the dialog.
-
 Pinsel als Bild öffnen
-
Clicking this, opens the selected brush as a regular image that you can edit. It can be turned back into a brush by copying it and selecting → → , or by exporting it as a brush. This is different from Abschnitt 3.2.3, „Der Pinseleditor“ that allows you to modify an existing parametric brush.
The functions performed by these buttons can also be accessed from the dialog pop-up menu, activated by right-clicking anywhere in the brush grid/list, or by choosing the top item, , from the tab menu.
Right clicking on a brush preview opens a context menu. Most of the commands of this submenu are described with the Buttons, except for the following.
- Copy Brush Location
-
Copy Brush Location allows you to copy the brush path to the clipboard. After that you can use the → , command, to open the brush as a new image.
- In Dateiverwaltung anzeigen
-
Show in File Manager opens the location of the brush in the default File Manager on your system.
- Elliptical, Feathered…, Elliptical…, Rectangular, Feathered…, Rectangular…
-
Options to create elliptical and rectangular brushes. These brushes can be feathered, but they are not parametric brushes.
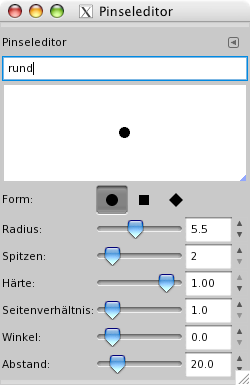
The Brush Editor allows you to view the brush parameters of a brush supplied by GIMP, and you can't change them. You can also create a custom brush: click on the New Brush button to activate the functions of the brush editor; you can select a geometrical shape, a circle, a square or a diamond. This editor has several elements:
The dialog bar:
As with all dialog windows, the
tab menu button
![]() opens a menu allowing you to access and set further related options.
opens a menu allowing you to access and set further related options.
Darunter finden Sie ein Eingabefeld, in welchem Sie den Namen der aktuell bearbeiteten Pinselspitze ändern können.
Das obere Drittel des Dialoges nimmt der Vorschaubereich ein. Dieser zeigt ihnen eine Vorschau (ach?) der aktuellen Pinselspitze.
Den Rest des Dialoges füllen verschiedene Bedienelemente aus, mit deren Hilfe Sie Form und Größe der Pinselspitze Ihren Bedürfnissen entsprechend anpassen können.
- Form
-
Mit dieser Eigenschaft legen Sie die Grundform der Pinselspitze fest. Hierzu stehen Ihnen Kreis, Quadrat sowie Karo zur Auswahl.
- Radius
-
Mit dieser Eigenschaft können Sie den Abstand zwischen Mitte und Rand der Spitze einstellen. Ein Quadrat mit einem Radius von 10 Pixeln wird eine Kantenlänge von 20 Pixeln haben. Um die Einstellungen vorzunehmen, stehen Ihnen ein Schieberegler sowie ein Eingabefeld zur Verfügung.
- Spitzen
-
Diese Eigenschaft ist nur für die Grundformen Quadrat und Karo sinnvoll. Sie bestimmt die Anzahl der Ecken und Kanten der Pinselspitze. Ein Quadrat wird so zum Polygon und ein Karo verwandelt sich in einen Stern.
- Härte
-
Mit dieser Eigenschaft kontrollieren Sie die Härte der Kante der Spitze. Die Einstellung können Sie mit Hilfe eines Schiebereglers oder des zugeordneten Eingabefeldes im Bereich von 0.00 bis 1.00 vornehmen. Ein Wert von 1.00 steht dabei für eine maximal harte Kante.
- Seitenverhältnis
-
Mit dieser Eigenschaft können Sie das Verhältnis von Breite zu Höhe der Pinselspitze bestimmen. Bei einem Wert von 2 wird die Pinselspitze also doppelt so breit wie hoch sein. Bitte beachten Sie, dass sich das Seitenverhältnis auf die Grundform bezieht. Insbesondere wenn Sie die Anzahl der Spitzen erhöhen, kann die Einstellung des Seitenverhältnisses zu sehr überraschenden Ergebnisse führen.
- Winkel
-
This angle is the angle between the brush width direction, which is normally horizontal, and the horizontal direction, clock-wise. When this value increases, the brush width turns clock-wise (0° to 180°).
- Abstand
-
Wenn Sie mit einer Pinselspitze eine Linie zeichnen, wird die Form der Pinselspitze wiederholt aufgetragen. Mit dieser Eigenschaft können Sie den Abstand zwischen zwei Stellen einstellen, an denen die Pinselspitze beim Malen einer Linie aufgetragen wird.
The Brush Editor has a context menu that can be opened with the
tab menu button
![]() and then choosing
. It only has one option.
and then choosing
. It only has one option.
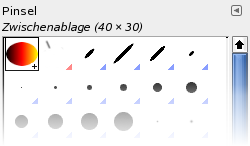
Wenn Sie einen der Zwischenablage-Befehle „Ausschneiden“ oder „Kopieren“ verwenden, erscheint der kopierte bzw. ausgeschnittene Bereich als neuer Pinsel, bei der Rasteransicht in der linken oberen Ecke des Pinseldialogs. Dieser Pinsel bleibt bis zum nächsten Kopiervorgang erhalten. Erst wenn Sie GIMP verlassen, wird dieser Pisel endgültig gelöscht.
![[Anmerkung]](images/note.png)
|
Anmerkung |
|---|---|
|
You can save this clipboard brush with → → as soon as it appears in the „Brushes“ dialog. See Abschnitt 3.10.8, „Als neuen Pinsel einfügen“. |


