The «Brushes» dialog is used to select and manage brushes. These brushes are used by the Paintbrush, Pencil and Airbrush tools. The MyPaint Brush uses its own kind of brushes. GIMP comes with a wide selection of brushes and more can be added easily. You can also create custom brushes using the Brush Editor, or by exporting an image as a brush.
See the Brushes section for basic information on brushes and how they are used in GIMP.
There can be only one brush active at any time. To make a brush active, select it in the list or grid. The name of the currently active brush is shown directly above the list of brushes. The active brush can also be recognized by a selection rectangle around the preview (which can sometimes be difficult to see, depending on your theme). The size, angle, spacing and several other characteristics of a brush can be set in the Tool Options Dialog when one of the relevant paint tools is active.
Aquest diàleg és un diàleg acoblable; mireu la secció Secció 2.3, «Diàlegs i acobladors» sobre el seu ús.
-
From the main menu select → → .
-
From the Tab menu in any dockable dialog click the tab menu button
 and select
→ .
and select
→ .
-
If you enabled the «Show active brush, pattern & gradient» option in the Toolbox Preferences, you can click on the active brush icon in the Brush, Pattern, Gradient area.
-
From the Tool Options dialog for the Paintbrush, Pencil and Airbrush tools, by clicking on the Brush icon button. This opens a popup with similar functionality that allows you to quickly choose a brush from the list. To open the actual brush dialog click on the button at the bottom right corner of the popup.
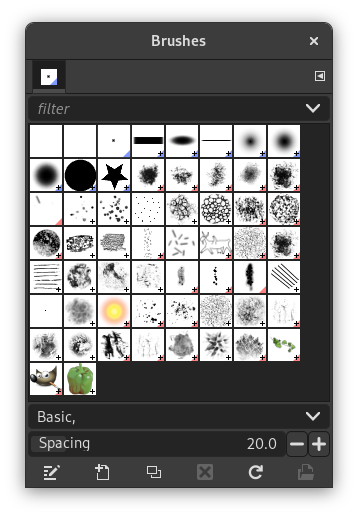
El diàleg dels «Pinzells» simplificat
La barra de botons de la part inferior ofereix la funcionalitat següent:
-
 Previsualitzacions més petites
 -
 Previsualitzacions més grans
 -
 Visualitza com a llista
 -
 Visualitza com a quadrícula
 -
 Obre el diàleg de selecció de pinzell
Note that, depending on your Preferences, a brush selected with the popup may only apply to the currently active tool, not to other paint tools. See the Paint Options Shared Between Tools section in the Tool Options Preferences for more information.
-
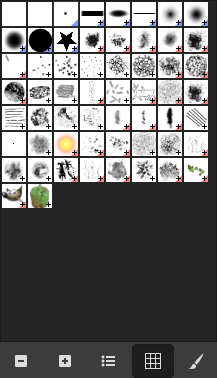
Al Menú de la pestanya, podeu triar entre i . En mode graella les formes del pinzell es disposen en una taula rectangular, fent que sigui fàcil veure-les a la vegada i trobar la que esteu buscant. En el mode Llista, les formes s'alineen en una llista, amb els noms al costat.
In the Tab menu, the option Preview Size allows you to adjust the size of brush previews to your liking.

- En mode graella
-
En la part superior del diàleg hi apareix el nom del pinzell seleccionat, amb les dimensions en píxels.
Al centre, una vista en graella de tots els pinzells disponibles, amb el pinzell actiu ressaltat.
- Mode llista
-
Bàsicament, el diàleg funciona de la mateixa manera que en el mode graella i llista, amb una excepció:
Si feu doble clic sobre el nom d'un pinzell, us permetrà editar-ho. Tingueu en compte que només es permet canviar els noms dels pinzells que hàgiu creat o instal·lat vosaltres, no els que venen amb el GIMP. Podeu canviar el nom d'un pinzell del GIMP, però tan aviat com pressioneu la tecla Retorn o un altre lloc, recuperarà el nom original. Com a norma general: no es poden canviar els recursos proporcionats pel GIMP.
When you click on a brush preview, it becomes the active brush that will be used when using one of the relevant painting tools. Double-clicking a brush preview, activates the Brush Editor.
Brushes can be managed in several ways using the buttons at the bottom of the dialog or the right-click context menu.
Meaning of the symbols at the bottom right corner of a brush preview
-
A plus sign indicates that the brush preview is shown at a reduced size. To preview the normal size, left click and hold the preview.
-
A blue corner indicates the brush is a parametric brush, created with the Brush Editor.
-
A red corner indicates this is an animated brush. To preview the animation, left click and hold the preview.
On the right side, next to the filter selection, there is a
![]() Use theme colors for preview button.
Use theme colors for preview button.
By default, brushes and fonts show a white background for each preview. If you prefer the background to be more in line with your theme, you can toggle that by clicking this button. GIMP will then use the background color as set by your theme.
The «filter» drop-down allows you to select one or more tags to filter and reduce the number of brushes shown. The «tags» can be managed below the preview area. For more information on tagging see Secció 3.7, «Etiquetatge».
El lliscador permet establir la distància entre les marques consecutives del pinzell quan traça una pinzellada amb el punter del ratolí. L'espaiat és un percentatge de l'amplada del pinzell.
La barra de botons de la part inferior ofereix la funcionalitat següent:
-
 Edita el pinzell
-
This activates the Brush Editor. Pressing the button will open the Editor for any brush. It only works, however, for parametric brushes, which can be recognized by the blue bottom right corner in the preview. For other types of brushes the Editor will show you a preview, but not allow you to make any changes.
-
 Pinzell nou
-
Això crea un pinzell paramètric nou, s'inicia amb una petita forma circular difusa, i obre l'editor de pinzells perquè pugueu modificar-ho. El nou pinzell es desa automàticament a la carpeta de pinzells personal.
-
 Duplica el pinzell
-
Aquest botó només està disponible si el pinzell actual és paramètric. Si així és, el pinzell es duplica, i l'editor de pinzells s'obre perquè en pugueu modificar la còpia. El resultat es desa automàticament a la carpeta de pinzells personal.
-
 Suprimeix el pinzell
-
This option is active for parametric brushes only. This removes all traces of the brush, both from the dialog and the folder where its file is stored, if you have permission to do so. It asks for confirmation before doing anything. The brushes that come with GIMP can not be removed.
-
 Actualitza els pinzells
-
Si afegiu pinzells a la carpeta de pinzells personal o en qualsevol altra carpeta per un altre mitjà que no sigui l'editor de pinzells, aquest botó farà que la llista es torni a carregar, i així les noves entrades estaran disponibles en el diàleg.
-
 Obre el pinzell com a imatge
-
Clicking this, opens the selected brush as a regular image that you can edit. It can be turned back into a brush by copying it and selecting → → , or by exporting it as a brush. This is different from Secció 3.2.3, «Editor de pinzell» that allows you to modify an existing parametric brush.
També es pot accedir a les funcions realitzades per aquests botons des del menú emergent del diàleg, activat fent clic-dret a qualsevol lloc de la graella/llista de pinzells, o escollint l'element superior, el , des del menú de la pestanya.
En fer clic-dret sobre una previsualització del pinzell, s'obre un menú contextual. La majoria de les ordres d'aquest submenú es descriuen amb els botons, excepte les següents.
- Copia la ubicació del pinzell
-
Copia la ubicació del pinzell us permet copiar el camí del pinzell al porta-retalls. Després d'això, podeu utilitzar l'ordre → per obrir el pinzell com una imatge nova.
- Mostra en el Gestor de fitxers
-
Mostra en el Gestor de fitxers obre la ubicació del pinzell en el Gestor de fitxers predeterminat del sistema.
- El·líptica, difuminada..., El·líptica..., Rectangular, difuminada..., Rectangular...
-
Opcions que permeten crear pinzells el·líptics i rectangulars. Aquests pinzells poden ser suaus, però no són pinzells paramètrics.
Figura 15.27. El diàleg de l'editor de «Pinzells»
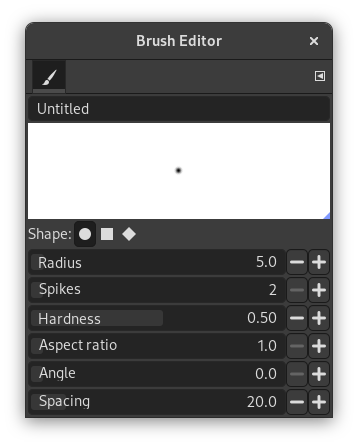
L'editor de pinzells, activat per a un pinzell nou.
L'editor de pinzells us permet veure els paràmetres d'un pinzell proporcionat pel GIMP, i que no podeu canviar. També es pot crear un pinzell personalitzat: fent clic al botó Pinzell nou; es pot seleccionar una forma geomètrica, un cercle, un quadrat, un rombe. Aquest editor té diversos elements:
La barra de diàleg: com amb totes les finestres de diàleg, el botó del menú de la pestanya
![]() obre un menú que us permet accedir i establir més opcions relacionades.
obre un menú que us permet accedir i establir més opcions relacionades.
La barra del títol: per a donar-li un nom al pinzell.
L'àrea de previsualització: mostra els canvis del pinzell en temps real.
Paràmetres:
- Forma
-
Estan disponibles un cercle, un quadrat i un rombe. Podeu modificar-ho amb les següents opcions:
- Radi
-
La distància entre el centre i la vora, en la direcció de l'amplada. Un quadrat amb 10 píxels de radi, tindrà un costat de 20 píxels. Un rombe amb un radi de 5 píxels tindrà 10 píxels d'amplada.
- Puntes
-
Aquest paràmetre és útil només per al quadrat i el rombe. Si s'augmenten les puntes d'un quadrat, es converteix en un polígon. Si es fa el mateix amb un rombe, s'obté una estrella.
- Duresa
-
Aquest paràmetre controla el difuminat de les vores del pinzell. Un valor = 1.00 fa un pinzell amb una vora nítida (0.00-1.00).
- Relació d'aspecte
-
Aquest paràmetre controla la proporció amplada/alçada del pinzell. Un rombe amb 5 píxels de radi i una proporció d'aspecte = 2, s'aplanarà amb una amplada de 10 píxels i una alçada de 5 píxels (1.0-20.0).
- Angle
-
Aquest angle és l'angle entre la direcció de l'amplada del pinzell, que normalment és horitzontal, i la direcció horitzontal, en sentit horari. Quan aquest valor augmenta, l'amplada del pinzell gira en sentit horari (de 0° a 180°).
- Espaiat
-
Quan el pinzell dibuixa una línia, en realitat estampa la icona del pinzell repetidament. Si els cops del pinzell estan molt properes, té l'efecte d'una línia contínua: s'aconsegueix amb un espaiat = 1 (1.00 a 200.0).
L'Editor de pinzells té un menú contextual que es pot obrir amb el botó del menú de la pestanya
![]() i després triant el . Només té una opció.
i després triant el . Només té una opció.
Quan s'utilitza l'ordre copiar o tallar sobre una imatge o una selecció d'ella, apareix una còpia d'un pinzell nou en la cantonada superior esquerra del diàleg dels «Pinzells». Aquest pinzell persistirà fins que utilitzeu un altre cop l'ordre copia. Desapareix quan es tanca el GIMP.

![[Nota]](images/note.png)
|
Nota |
|---|---|
|
Podeu desar aquest pinzell del porta-retalls utilitzant → → tan aviat com aparegui en el diàleg dels «Pinzells». Consulteu Secció 3.10.8, «Enganxa com a nou pinzell». |


