Obrázek 7.15. Brush strokes example
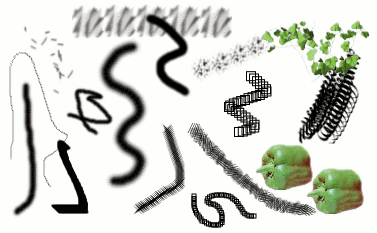
A number of examples of brushstrokes painted using different brushes from the set supplied with GIMP. All were painted using the Paintbrush tool.
A brush is a pixmap or set of pixmaps used for painting. GIMP includes a set of Paint Tools, which not only perform operations that you would normally think of as painting, but also operations such as erasing, copying, smudging, lightening or darkening, etc. All of the paint tools, except the ink tool, use the same set of brushes. The brush pixmaps represent the marks that are made by single „touches“ of the brush to the image. A brush stroke, usually made by moving the pointer across the image with the mouse button held down, produces a series of marks spaced along the trajectory, in a way specified by the characteristics of the brush and the paint tool being used.
Brushes can be selected by clicking on an icon in the Brushes dialog. GIMP's current brush is shown in the Brush/Pattern/Gradient area of the Toolbox. Clicking on the brush symbol there is one way of activating the Brushes dialog.
When you install GIMP, it comes with a number of basic brushes, plus a few bizarre ones that serve mainly to give you examples of what is possible (i. e., the "green pepper" brush in the illustration). You can also create new brushes, or download them and install them so that GIMP will recognize them.
GIMP can use several different types of brushes. All of them, however, are used in the same way, and for most purposes you don't need to worry about the differences when you paint with them. Here are the available types of brushes:
- Obyčejné stopy
-
Most of the brushes supplied with GIMP fall into this category. They are represented in the Brushes dialog by grayscale pixmaps. When you paint using them, the current foreground color (as shown in the Color Area of the Toolbox) is substituted for black, and the pixmap shown in the Brushes dialog represents the mark that the brush makes on the image.
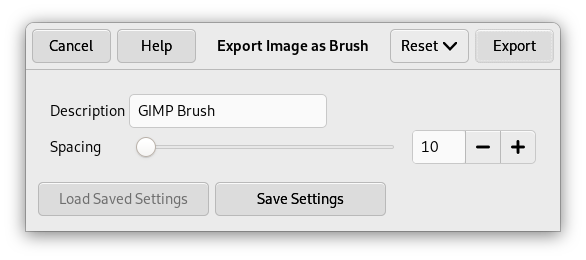
To create such a brush: create a grayscale image in gray levels, where black is fully visible, white is transparent, with gray levels in between. Do not use transparency for these brushes. Save it with the .gbr extension. Click on the Refresh button in the Brushes Dialog to get it in preview without it being necessary to restart GIMP.
- Barevné stopy
-
Brushes in this category are represented by colored images in the Brushes dialog. They can be pictures or text. When you paint with them, the colors are used as shown; the current foreground color does not come into play. Otherwise they work the same way as ordinary brushes.
To create such a brush, create a small RGBA image:
Select → from the main menu.
In the Advanced Options, set for example the Color space to RGB color and set Fill with to Transparency.
Draw your image. Contrary to grayscale brushes, transparent areas here will be drawn transparent.
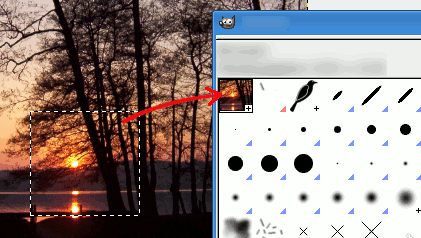
Select → from the main menu to first save your image as an
.xcffile to keep its properties.Select → from the main menu to export the image as a brush with the
.gbrextension.In the Brushes Dialog, click on the button
 .
.
Your brush appears among the other brushes. You can use it immediately, without restarting GIMP.
![[Tip]](images/tip.png)
Tip When you do a Copy or a Cut on a selection, you see the contents of the clipboard (that is the selection) at the first position in the brushes dialog. And you can use it for painting.
- Animated brushes
-
Brushes in this category can make more than one kind of mark on an image. They are indicated by small red triangles at the lower right corner of the brush symbol in the Brushes dialog. They are sometimes called "animated brushes" because the marks change as you trace out a brushstroke. In principle, image hose brushes can be very sophisticated, especially if you use a tablet, changing shape as a function of pressure, angle, etc. These possibilities have never really been exploited, however; and the ones supplied with GIMP are relatively simple (but still quite useful).
You will find an example on how to create such brushes in Animated brushes
- Parametric
-
Kromě bitmapy má každá stopa druhou důležitou vlastnost – rozestup. To je vzdálenost mezi jednotlivými otisky stopy při plynulém tahu štětcem (či jiným nástrojem). Každá stopa má svůj vlastní výchozí rozestup, který však lze v dialogu Stopy změnit.
Now, all brushes have a variable size. In fact, in the option box of all painting tools there is a slider to enlarge or reduce the size of the active brush. You can do this directly in the image window if you have set correctly your mouse wheel; see Varying brush size.
In addition to the brush pixmap, each GIMP brush has one other important property: the brush Spacing. This represents the distance between consecutive brush-marks when a continuous brushstroke is painted. Each brush has an assigned default value for this, which can be modified using the Brushes dialog.
![[Poznámka]](images/note.png)
|
Poznámka |
|---|---|
|
GIMP can use MyPaint brushes. Please refer to 3.11 – „MyPaint Brush“ for more information. |
|
|
Poznámka |
|---|---|
|
There is a quick method to add a new brush: 5.4 – „Creating a brush quickly“. |
Novou stopu, ať už jste si ji vytvořili sami nebo stáhli z Internetu, je nutné uložit ve formátu, který GIMP umí používat. Soubor se stopou musí být uložen do cesty pro hledání stop, aby GIMP mohl stopu zpřístupnit v dialogu Stopy. Nově přidané stopy lze načíst tlačítkem v dialogu Stopy (jinak se automaticky načtou při příštím spuštění Gimpu). GIMP pro stopy používá tři různé souborové formáty:
- GBR
-
The
.gbr("gimp brush") format is used for ordinary and color brushes. You can convert many other types of images, including many brushes used by other programs, into GIMP brushes by opening them in GIMP and saving them with file names ending in.gbr. This brings up a dialog box in which you can set the default Spacing for the brush.A technical specification of the GBR file format can be found on developer.gimp.org.
- GIH
-
The
.gih("gimp image hose") format is used for animated brushes. These brushes are constructed from images containing multiple layers: each layer may contain multiple brush-shapes, arranged in a grid. When you save an image as a.gihfile, a dialog comes up that allows you to describe the format of the brush. See 5.2 – „Creating animated brushes“ for more information about the dialog.A technical specification of the GIH file format can be found on developer.gimp.org.
- VBR
-
Formát
VBR(soubory.vbr) se používá pro tzv. parametrické stopy, tj. stopy vytvořené Editorem stop. Jiný praktický způsob vytvoření stop ve formátu VBR neexistuje. - MYB
-
The
.mybformat is used for MyPaint brushes. Please refer to 3.11 – „MyPaint Brush“ for more information.
Aby byla stopa v Gimpu dostupná, uložte soubor do některého z adresářů v cestě Gimpu pro hledání stop. Ve výchozím nastavení tato cesta obsahuje dva adresáře, systémový adresář brushes, který byste neměli měnit, a uživatelský adresář brushes uvnitř vašeho osobního adresáře pro Gimp. Přidávat další adresáře do této cesty lze v předvolbách na kartě Adresáře. Všechny .gbr, .gih a .vbr soubory obsažené v těchto adresářích se načtou a zobrazí v dialogu Stopy buď po příštím spuštění Gimpu, nebo po stisknutí tlačítka v tomto dialogu.
|
|
Poznámka |
|---|---|
|
Parametrické stopy vytvořené pomocí Editoru stop se automaticky ukládají do uživatelského |
Existuje řada webových stránek nabízejících ke stažení celé sbírky stop pro Gimp. Nemá smysl uvádět seznam odkazů, neboť se rychle mění. Nejlepší je prostě do vašeho oblíbeného vyhledávače zadat frázi „Gimp brushes“ (stopy pro Gimp). Existuje také řada sbírek stop pro jiné grafické rastrové editory. Některé z nich lze snadno převést na stopy pro Gimp, jiné vyžadují speciální konverzní programy a některé nelze použít vůbec. Většina složitějších procedurálních stop spadá bohužel do poslední kategorie.


