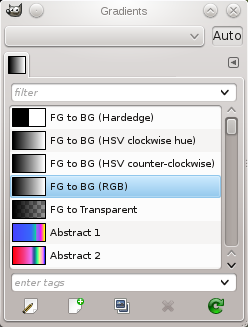
The „Gradients“ dialog offers a gradient palette which is used to select a gradient — a set of colors arranged in a linear scale — for use with the Gradient tool and numerous other operations. It also gives you access to several functions for manipulating gradients. You can select a gradient by clicking on it in the list: it will then be shown in the Brush/Pattern/Gradient area of the Toolbox. A few dozen nice gradients come pre-installed with GIMP. You can create more using the Gradient Editor. General information about gradients and how they are used in GIMP can be found in the Gradients section.
The first five gradients are particular: they reproduce the gradient between Foreground and background colors of toolbox in different ways.
-
FG to BG (Hardedge): only black and white with a sharp limit.
-
FG to BG (HSV clock-wise/counter-clockwise Hue): all hues in the color wheel between the Foreground and the background color, clockwise or counter-clockwise.
-
FG to BG (RGB): default gradient, between the Foreground and the background colors of the Toolbox, in the RGB mode.
-
FG to Transparent: only uses one color (the Foreground color) from complete opacity to complete transparency. This gradient is very useful when you work with softly blended collages or fog effects.
This dialog is a dockable dialog; see the section 2.3 – „Dokování dialogů“ for help on manipulating it.
You can access it:
-
from the main menu: → → ;
-
from the Tab menu in any dockable dialog by clicking the tab menu button
and selecting → ,
-
from the Toolbox, by clicking on the current gradient in the Brush/Pattern/Gradient area (if you have checked the „Show active brush, pattern and gradient“ option in the toolbox preferences).
-
From the image by using the Ctrl+G shortcut.
In the menu, there is a list of detached windows which exists only if at least one dialog remains open. In this case, you can raise the „Gradients“ dialog from the main menu: → .
Nejjednodušší a nejčastěji používaná operace v tomto dialogu je prosté kliknutí na požadovaný přechod, čímž se stane aktivním přechodem v Gimpu. Aktivní přechod používají se pak používá při všech operacích s přechodem.
Dvojité kliknutí na přechod umožňuje nastavit jeho jméno. Uživatel však může měnit pouze jména přechodů, které sám vytvořil, nikoliv jména standardních přechodů dodávaných s Gimpem. Pokud se pokusíte přejmenovat standardní přechod, změny ve jménu se neuloží. V Gimpu je obecným pravidlem, že nemůžete měnit předinstalované standardní zdroje, tedy stopy, vzorky, přechody atd. Měnit můžete jen ty, které jste si sami vytvořili.
- Grid/List modes
-
V nabídce karty můžete volit mezi režimy a . V režimu mřížky jsou přechody zobrazeny v pravidelné mřížce. V tomto režimu ale může být těžké vybrat ten správný, protože okolní přechody ruší. V režimu seznamu, který je výchozí, jsou přechody zobrazeny nad sebou, včetně svých jmen.
In the Tab menu, the option Preview Size allows you to adapt the size of gradient previews to your liking.
The button bar at the bottom offers the following functionality:
-
Upravit přechod
-
Toto tlačítko aktivuje Editor Přechodů.
-
Nový přechod
-
This creates a new gradient, initialized as a simple grayscale, and activates the Gradient Editor so that you can alter it.
Gradients that you create are automatically saved in the
gradientsfolder of your personal GIMP directory. Any gradient files (ending with the extension.ggr) found in one of these folders, will automatically be loaded when you start GIMP. You can add more directories to the gradient search path, if you want to, in the Gradients tab of the Data Folders section of the Preferences dialog. -
Duplikovat přechod
-
This creates a copy of the currently selected gradient. You will be able to edit the copy as editing the original is not supported.
-
Odstranit přechod
-
Pokud k tomu máte oprávnění, odstraní (smaže) zvolený přechod. Budete požádáni o potvrzení svého úmyslu.
-
Obnovit přechody
-
If you add gradients to your personal
gradientsfolder by some means other than this dialog, this button causes the list to be reloaded, so that the new entries will be available.
The functions performed by these buttons can also be accessed from the dialog pop-up menu, activated by right-clicking anywhere in the gradient list, or via in the Tab menu.
The gradient menu also gives you some additional functions:
- Save as POV-Ray…
-
Tato funkce uloží přechod do souboru ve formátu používaném 3D raytracerem POV-Ray.
- Copy Gradient Location
-
This command allows you to copy the gradient file location to the clipboard. You can then use it in a text editor.
- Show in File Manager
-
Show in File Manager opens the location of the gradient in the default File Manager on your system.
- Custom Gradient…
-
This command creates a sample image filled with the selected gradient. You can select width and height of the image as well as the gradient direction in the dialog window.
- Save Gradient as CSS…
-
The CSS (Cascading Style Sheets) language is used to format the display of HTML and XML files, for instance background color, background gradient, or font size. The "CSS Save" plug-in is a CSS3 linear gradient generator that allows you to save a CSS3 code snippet, containing the gradient data for a given GIMP gradient. This code snippet is a text file: you can copy-paste it to the stylesheet related to your HTML file, to get a gradient background on opening the HTML file in Firefox, Chrome or Safari web navigators. This CSS3 code snippet can also be used as a gradient in SVG files.
Here is an example of a CSS3 code snippet, using the Blue Green gradient:
A CSS snippet created with Save as CSS.
background-image: linear-gradient(top, rgb(0,123,255) 0%, rgb(72,226,255) 56%,
rgb(0,255,161) 100%);
You can use tags to reorganize the gradients display. See 3.7 – „Tagging“.
Editor přechodů umožňuje úpravu přechodů. Lze jej však používat pouze na přechodech, které jste si sami vytvořili, nikoliv na přechodech dodávaných spolu s Gimpem. Editor přechodů je poměrně složitý nástroj vyžadující trochu úsilí k plnému zvládnutí. Myšlenkou, na které editor přechodů stojí, je skutečnost, že lze každý přechod rozložit na řadu segmentů, které jsou jednoduchými plynulými přechodu mezi dvěma barvami. Editor přechodů umožňuje spojit libovolný počet takových segmentů, přičemž pro každý segment lze zvolit libovolné barvy a různé způsoby přechodu mezi nimi.
You can activate the Gradient Editor in several ways:
-
by double-clicking on the gradient stripe in the Gradient dialog,
-
from the context menu you get by right clicking on the selected gradient name,
-
by clicking on the
button in the Gradient Dialog,
-
from the Gradient Menu you get by clicking on
in the Gradient Dialog.
- Jméno
-
This is where you can change under what name the gradient shows up in the list of gradients.
- Náhled přechodu
-
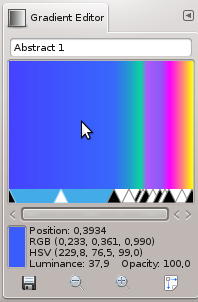
Below the name, you see the current result of your work. If you move the mouse pointer on this display, it works somewhat like a color-picker. Information about the pixel under the mouse is shown below the preview and slider area.
Position is a number between 0.000 on the left and 1.000 on the right side of the gradient. Below that the color values in RGB and HSV mode are shown, followed by the Luminance and Opacity values.
If you click-n-drag on display, then only position and RGB data are displayed. But they are passed on to the Foreground color in the Toolbox and to the four first gradients of the list (by pressing the Ctrl key, the Color is sent to the Background color of the Toolbox).
- Kontrolní posuvníky
-
Below the gradient display, you see a set of black and white triangles lined up in row which allow you to adjust endpoints and midpoints in the gradient preview. A segment is the space between two consecutive black triangles. Inside each segment is a white triangle, which is used to „warp“ the colors in the segment, in the same way that the middle slider in the Levels tool warps the colors there. You can select a segment by clicking between the two black triangles that define it. It turns from white to blue. You can select a range of segments by Shift-clicking on them. The selected range always consists of a set of consecutive segments, so if you skip over any when Shift-clicking, they will be included automatically. If „Instant update“ is checked, the display is updated immediately after any slider movement; if it is unchecked, updates only occur when you release the mouse button.
You can move sliders, segments and selections. If you simply click-n-drag a slider, you only move the corresponding transition. By click-n-drag on a segment you can move this segment up to the next triangle. By Shift+click-n-drag on a segment/selection, you can move this segment/selection and compress/dilate next segments.
- Rolovací lišta
-
Pod posuvníky je vodorovná rolovací lišta. Ta je užitečná tehdy, pokud provedete přiblížení tlačítky dole.
- Informační oblast
-
Below, a color swatch shows the color pointed by the mouse cursor. Information about this color and helpful hints or feedback messages may appear here.
- Tlačítka
-
The button bar at the bottom offers the following functionality:
-
Oddálit
-
Tímto tlačítkem lze oddálit náhled přechodu. Je užitečné po předchozím přiblížení následujícím tlačítkem.
-
Přiblížit
-
Tímto tlačítkem lze přiblížit náhled přechodu. Pomocí rolovací lištu pod náhledem pak můžete náhledem posouvat a detailně prohlížet jeho různé části.
-
Přiblížit vše
-
Stisknutím tohoto tlačítka se náhled přiblíží tak, že přesně pasuje do okna.
-
Nabídku editoru přechodů můžete vyvolat kliknutím pravého tlačítka myši na náhled přechodu nebo volbou první položky v nabídce karty editoru přechodů. Nabídka umožňuje nastavit levou i pravou barvu pro každý segment a způsob přechodu mezi nimi.
The following commands can be found in the menu:
Editing endpoint's color
- Left/Right color type
-
This submenu allows you to select the endpoint color from the toolbox foreground and background colors. Whenever you change the foreground or background color, this endpoint color may be changed as well. The alternative is to select a endpoint color.
The following commands can be found in the menu:
- Fixed
-
Fixed
- Foreground Color
-
Foreground Color
- Foreground Color (Transparent)
-
Foreground Color (Transparent)
- Background Color
-
Background Color
- Background Color (Transparent)
-
Background Color (Transparent)
- Barva levého [pravého] koncového bodu
-
Tyto volby umožňují nastavit barvu pro levý či pravý koncový bod segmentu.
![[Poznámka]](images/note.png)
Poznámka This command is related to the previous one and becomes inactive if you have selected any other value than for the corresponding Left [Right] Color Type.
- Načíst levou [pravou] barvu z
-
Tato podnabídka obsahuje několik různých možností, jak přiřadit koncovému bodu barvu. V případě levého koncového bodu (pro pravý koncový bod je nabídka obdobná) můžete barvu načíst z:
- Pravého koncového bodu levého souseda
-
Tato volba přiřadí koncovému bodu stejnou barvu, jako má přilehlý koncový bod sousedního segmentu. To je užitečné v případě, kdy mají segmenty na sebe plynule navazovat.
- Pravého koncového bodu
-
Tato volba přiřadí levému koncovému bodu barvu pravého koncového bodu.
- Barvy popředí či pozadí
-
Tyto volby přiřadí koncovému bodu barvu popředí nebo pozadí z panelu nástrojů.
- RGBA položky
-
At the bottom of the menu are 10 „memory slots“. You can assign colors to them using the „Save“ menu option described below. If you choose one of the slots, the color in it will be assigned to the endpoint.
- Uložit levou [pravou] barvu do
-
These options cause the color of the endpoint in question to be assigned to the „memory slot“ selected from the submenu.
- Click and drag colors
-
You can also click and drag a color from the toolbox FG-BG colors or from a palette
-
to an endpoint (a black triangle), to set left [right] colors,
-
to the gradient display area, to add a new endpoint with this color on both sides.
-
Blending and coloring functions for segment
- Způsob mísení v segmentu (výběru)
-
Volba z této nabídky určuje způsob mísení barev koncových barev segmentu nebo rozsahu a tedy vzhled přechodu.
- Lineární
-
Default option. Color varies linearly from one endpoint of the range to the other.
- Curved
-
Gradient varies more quickly on ends of the range than on its middle.
- Sinusoidní
-
The opposite of the curved type. Gradients varies more quickly on center of the range than on its ends.
- Spherical (increasing)
-
Gradient varies more quickly on the left of the range than on its right.
- Spherical (decreasing)
-
Gradient varies more quickly on the right than on the left.
- Step
-
Gradient changes from left value to right value in one step without intermediate colors.
- Způsob vybarvení segmentu (výběru)
-
Tato volba umožňuje volit mezi výpočtem přechodu v prostoru RGB nebo HSV.
The following commands can be found in the menu:
- YUV
-
YUV
- HSV (counter-clockwise hue)
-
HSV (counter-clockwise hue)
- HSV (clockwise hue)
-
HSV (clockwise hue)
Modifying segments
- Překlopit segment (výběr)
-
Tento příkaz umožňuje zrcadlově překlopit vybraný segment nebo rozsah segmentů.
- Replikovat segment (výběr)
-
Tento příkaz rozdělí vybraný segment nebo jejich rozsah do dvou nebo více částí, z nichž každá je dokonalou stlačenou kopií původního segmentu nebo rozsahu.
- Rozdělit segment(y) ve středním bodě
-
Tento příkaz rozdělí každý segment ve vybraném rozsahu na dva segmenty, vždy v místě bílého trojúhelníku.
- Rozdělit segment(y) stejnoměrně
-
Tento příkaz je podobný předchozímu, ale rozdělí každý segment přesně uprostřed, nikoliv v místě bílého trojúhelníku.
- Odstranit segment (výběr)
-
Tato volba vymaže všechny segmenty ve zvoleném rozsahu. Smazané segmenty jsou nahrazeny jedním černým trojúhelníkem uprostřed a zvětšením sousedních segmentů tak, aby vyplnily uvolněné místo.
- Vycentrovat středový bod segmentu (středové body ve výběru)
-
Tato volba přesune středový bod (bílý trojúhelník) přesně do středu všech segmentů ve zvoleném rozsahu.
- Přerozdělit řídící body v segmentu (ve výběru)
-
Tento příkaz přemístí všechny řídící body (trojúhelníky) ve zvoleném rozsahu tak, aby byly v rovnoměrných vzdálenostech.
Blending colors
These options are available only if more than one segment are selected.
- Mísení barev koncových bodů
-
Tento příkaz je dostupný pouze tehdy, pokud je vybrán rozsah obsahující více než jeden segment. Zprůměruje barvy sousedních koncových bodů uvnitř rozsahu a tím zajistí plynulý přechod segmenty uvnitř rozsahu.
- Mísení krytí koncový bodů
-
Tento příkaz dělá s krytím koncových bodů totéž, co předchozí příkaz s barvou.
- Edit Active Gradient
-
When enabled, the gradient editor will automatically load the currently active gradient. If it is disabled, the gradient editor will not change when the active gradient changes.
![[Výstraha]](images/caution.png)
|
Výstraha |
|---|---|
|
There is no „undo“ available within the Gradient Editor, so be careful! |
All these options can seem somewhat boring. Here is an example to clear ideas:
-
Open the Gradient Dialog. Click
. The Gradient Editor is opened and shows a gradient from black to white.
-
Right click in this new gradient and select Split Segment Uniformly. If wanted, adjust the number of segments.
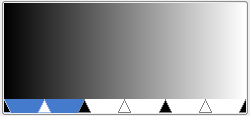
Obrázek 15.35. Gradient with three segments

Every segment is limited with two black triangular sliders. Click a segment to activate it. By pressing the Shift key, you can select several contiguous segments.
-
In the context menu you get by right-clicking in the gradient, set Left Endpoint Color and Right Endpoint Color for the selected segment or segment group.
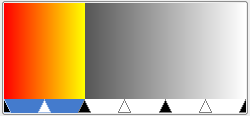
Obrázek 15.36. First segment colored

Red has been chosen for left endpoint and yellow for the right endpoint.
-
Go on the same way for other segments. Then use the Blending functions for segment to achieve various effects.


