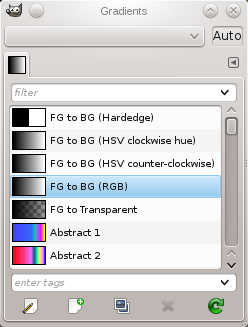
The „Gradients“ dialog offers a gradient palette which is used to select a gradient — a set of colors arranged in a linear scale — for use with the Gradient tool and numerous other operations. It also gives you access to several functions for manipulating gradients. You can select a gradient by clicking on it in the list: it will then be shown in the Brush/Pattern/Gradient area of the Toolbox. A few dozen nice gradients come pre-installed with GIMP. You can create more using the Gradient Editor. General information about gradients and how they are used in GIMP can be found in the Gradients section.
The first five gradients are particular: they reproduce the gradient between Foreground and background colors of toolbox in different ways.
-
FG to BG (Hardedge): only black and white with a sharp limit.
-
FG to BG (HSV clock-wise/counter-clockwise Hue): all hues in the color wheel between the Foreground and the background color, clockwise or counter-clockwise.
-
FG to BG (RGB): default gradient, between the Foreground and the background colors of the Toolbox, in the RGB mode.
-
FG to Transparent: only uses one color (the Foreground color) from complete opacity to complete transparency. This gradient is very useful when you work with softly blended collages or fog effects.
This dialog is a dockable dialog; see the section Skyrius 2.3, „Dialogai ir dokai“ for help on manipulating it.
You can access it:
-
from the main menu: → → ;
-
from the Tab menu in any dockable dialog by clicking the tab menu button
and selecting → ,
-
from the Toolbox, by clicking on the current gradient in the Brush/Pattern/Gradient area (if you have checked the „Show active brush, pattern and gradient“ option in the toolbox preferences).
-
From the image by using the Ctrl+G shortcut.
In the menu, there is a list of detached windows which exists only if at least one dialog remains open. In this case, you can raise the „Gradients“ dialog from the main menu: → .
Dialogą paprasčiausią naudoti spustelint vieną iš sąraše esančių gradientų, norint padaryti jį dabartiniu programos GIMP gradientu, kuris tada bus naudojamas bet kokioms operacijoms, kur naudojamas gradientas.
Jeigu du kartus spustelėsite gradientą, atversite Gradientų rengyklę, kur galėsite redaguoti jo pavadinimą. Tačiau atminkite, kad galite keisti tik savo sukurtų gradientų pavadinimus, bet ne tų, kurie platinami su programa GIMP. Jeigu pabandysite pervadinti su programa GIMP įdiegtą gradientą, galėsite pakeisti pavadinimą, tačiau paspaudus klavišą Enter arba spustelėjus kur nors kitur, pavadinimas bus atstatytas į pradinę reikšmę. Tai yra bendra taisyklė, kad negalite keisti kartu su programa GIMP įdiegtų išteklių: teptukų, raštų, gradientų, ir t. t.; tik tuos, kuriuos sukuriate patys.
- Tinklelio / sąrašo veiksenos
-
Kortelės meniu galite pasirinkti tarp ir . Tinklelio veiksenoje gradientai yra išdėstyti stačiakampiame masyve. Rodant tokiu būdu jie atrodo labai gražiai, tačiau ne visada lengva pasirinkti norimą, dėl kitų vaizdinio trukdymo. Sąrašo veiksenoje gradientai rodomi vertikaliai, kiekvienoje eilutėje rodant jų pavadinimus.
Kortelės meniu esanti parinktis Peržiūros dydis leidžia keisti gradiento peržiūrų dydį.
The button bar at the bottom offers the following functionality:
-
Keisti gradientą
-
Šis mygtukas aktyvuoja Gradientų rengyklę.
-
Naujas gradientas
-
This creates a new gradient, initialized as a simple grayscale, and activates the Gradient Editor so that you can alter it.
Gradients that you create are automatically saved in the
gradientsfolder of your personal GIMP directory. Any gradient files (ending with the extension.ggr) found in one of these folders, will automatically be loaded when you start GIMP. You can add more directories to the gradient search path, if you want to, in the Gradients tab of the Data Folders section of the Preferences dialog. -
Sukurti gradiento kopiją
-
This creates a copy of the currently selected gradient. You will be able to edit the copy as editing the original is not supported.
-
Ištrinti gradientą
-
Šis mygtukas pašalina visus gradiento pėdsakus, jeigu turite tam reikiamas teises. Prieš įvykdant jūsų paprašoma patvirtinti.
-
Atnaujinti gradientus
-
Jeigu pridėsite gradientus savo asmeniniame aplanke
gradientsnaudodamiesi ne šiuo dialogu, spustelėjus šį mygtuką šis sąrašas atnaujinamas, kad būtų prieinami šie nauji įrašai.
The functions performed by these buttons can also be accessed from the dialog pop-up menu, activated by right-clicking anywhere in the gradient list, or via in the Tab menu.
The gradient menu also gives you some additional functions:
- Save as POV-Ray…
-
Tai leidžia išsaugoti gradientą trimatės grafikos spindulių braižymo programos POV-Ray naudojamu formatu.
- Copy Gradient Location
-
This command allows you to copy the gradient file location to the clipboard. You can then use it in a text editor.
- Show in File Manager
-
Show in File Manager opens the location of the gradient in the default File Manager on your system.
- Custom Gradient…
-
This command creates a sample image filled with the selected gradient. You can select width and height of the image as well as the gradient direction in the dialog window.
- Save Gradient as CSS…
-
The CSS (Cascading Style Sheets) language is used to format the display of HTML and XML files, for instance background color, background gradient, or font size. The "CSS Save" plug-in is a CSS3 linear gradient generator that allows you to save a CSS3 code snippet, containing the gradient data for a given GIMP gradient. This code snippet is a text file: you can copy-paste it to the stylesheet related to your HTML file, to get a gradient background on opening the HTML file in Firefox, Chrome or Safari web navigators. This CSS3 code snippet can also be used as a gradient in SVG files.
Here is an example of a CSS3 code snippet, using the Blue Green gradient:
A CSS snippet created with Save as CSS.
background-image: linear-gradient(top, rgb(0,123,255) 0%, rgb(72,226,255) 56%,
rgb(0,255,161) 100%);
You can use tags to reorganize the gradients display. See Skyrius 3.7, „Tagging“.
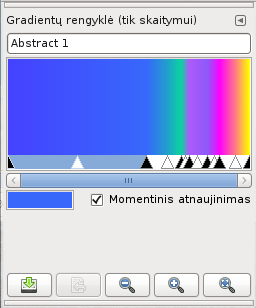
Gradientų rengyklė leidžia redaguoti gradiento spalvas. Ją galima naudoti tik su gradientais, kuriuos sukūrėte patys (arba su sistemos gradientų kopijomis), bet ne su kartu su programa GIMP įdiegtais gradientais. Tai yra sudėtingas įrankis, kurį suprasti gali prireikti šiek tiek laiko. Jo pricipas yra tas, kad gradientą galima išskaidyti į vienas po kito einančius segmentus, kur kiekviename segmente yra perėjimas nuo vienos spalvos prie kitos. Gradientų rengyklė įgalina kartu sudėti kelis segmentus, nepriklausomai nuo jų spalvų, taip pat galima nurodyti kelias spalvų perėjimo formos parinktis.
Gradientų rengyklę galite aktyvuoti keliais būdais:
-
by double-clicking on the gradient stripe in the Gradient dialog,
-
from the context menu you get by right clicking on the selected gradient name,
-
by clicking on the
button in the Gradient Dialog,
-
from the Gradient Menu you get by clicking on
in the Gradient Dialog.
- Pavadinimas
-
This is where you can change under what name the gradient shows up in the list of gradients.
- Gradiento peržiūros langas
-
Below the name, you see the current result of your work. If you move the mouse pointer on this display, it works somewhat like a color-picker. Information about the pixel under the mouse is shown below the preview and slider area.
Position is a number between 0.000 on the left and 1.000 on the right side of the gradient. Below that the color values in RGB and HSV mode are shown, followed by the Luminance and Opacity values.
Jeigu spustelėsite ir vilksite ekraną, tada bus rodoma tik vieta ir RGB duomenys. Tačiau jie yra perduodami įrankinėje rodomai priekinio plano spalvai ir keturiems pirmiems sąrašo gradientams (spustelėjus klavišą Ctrl, spalva yra perduodama ne Priekinio plano, o Fono spalvai).
- Rėžio pasirinkimo / valdymo slankikliai
-
Below the gradient display, you see a set of black and white triangles lined up in row which allow you to adjust endpoints and midpoints in the gradient preview. A segment is the space between two consecutive black triangles. Inside each segment is a white triangle, which is used to „warp“ the colors in the segment, in the same way that the middle slider in the Levels tool warps the colors there. You can select a segment by clicking between the two black triangles that define it. It turns from white to blue. You can select a range of segments by Shift-clicking on them. The selected range always consists of a set of consecutive segments, so if you skip over any when Shift-clicking, they will be included automatically. If „Instant update“ is checked, the display is updated immediately after any slider movement; if it is unchecked, updates only occur when you release the mouse button.
You can move sliders, segments and selections. If you simply click-n-drag a slider, you only move the corresponding transition. By click-n-drag on a segment you can move this segment up to the next triangle. By Shift+click-n-drag on a segment/selection, you can move this segment/selection and compress/dilate next segments.
- Slinkties juosta
-
Po slankikliais yra slinkties juosta. Ji rodoma tik tada, kai apačioje esančiais mygtukais pakeičiate mastelį.
- Grįžtamojo ryšio sritis
-
Below, a color swatch shows the color pointed by the mouse cursor. Information about this color and helpful hints or feedback messages may appear here.
- Mygtukai
-
The button bar at the bottom offers the following functionality:
-
Zoom Out
-
Spustelėjus šį mygtuką gradiento ekranas horizontaliai sumažinamas.
-
Pritraukti
-
Spustelėjus šį mygtuką gradiento ekranas išplečiamas horizontaliai. Tada naudodami slinkties juostą galite paslinkti ekraną į kairę arba dešinę.
-
Zoom All
-
Spustelėjus šį mygtuką ekranas horizontaliai sumažinamas arba padidinamas, kad tiksliai tiktų prie lango.
-
Gradientų rengyklės meniu galite pasiekti dešiniuoju pelės mygtuku spustelėję gradiento ekraną arba pasirinkę dialogo kortelės meniu viršutinį elmentą. Šis meniu įgalina redaguoti galinio taško spalvą (nustatyti kiekvieno segmento kairę ir dešinę kraštines spalvas), sukurti perėjimą tarp spalvų, pasirinkti spalvų modelį ir redaguoti segmentus. Ši rengyklė veiki tik su pasirinktiniais gradientais arba sistemos gradientų kopijomis.
Šiame meniu yra šios komandos:
Galinio taško spalvos redagavimas
- Kairės / dešinės spalvos tipas
-
This submenu allows you to select the endpoint color from the toolbox foreground and background colors. Whenever you change the foreground or background color, this endpoint color may be changed as well. The alternative is to select a endpoint color.
Šiame meniu yra šios komandos:
- Fixed
-
Fixed
- Foreground Color
-
Foreground Color
- Foreground Color (Transparent)
-
Foreground Color (Transparent)
- Background Color
-
Background Color
- Background Color (Transparent)
-
Background Color (Transparent)
- Kairiojo (dešiniojo) galinio taško spalva
-
Šios parinktys įgalina pasirinkti atitinkamo galinio taško spalvą naudojant Spalvų rengyklę.
![[Pastaba]](images/note.png)
Pastaba This command is related to the previous one and becomes inactive if you have selected any other value than for the corresponding Left [Right] Color Type.
- Įkelti kairę (dešinę) spalvą iš
-
Šios parinktys suteikia alternatyvius būdus priskirti galiniams taškams spalvas. Šiame pomeniu galite pasirinkti (turint omeny, kad šiuo metu dirbame su kairiuoju galiniu tašku):
- Kairiojo kaimyno dešinysis galinis taškas
-
Naudojant šią parinktį kairiojo kaimyninio segmento dešinysis galinis taškas bus priskirtas pažymėto rėžio kairiajam galiniam taškui.
- Dešinys galinis taškas
-
Pasirinkus šią parinktį pažymėto režio dešiniojo galinio taško spalva bus priskirta kairiajam galiniam taškui.
- Priekinio plano / fono spalva
-
Pasirinkus šias parinktis programos GIMP dabartinė priekinio plano arba fono spalva, kaip parodyta įrankinėje, bus priskirta galiniam taškui. Atminkite, kad vėliau pakeitus priekinio plano arba fono spalvą šio galinio taško spalva nesikeis.
- RGBA lizdai
-
At the bottom of the menu are 10 „memory slots“. You can assign colors to them using the „Save“ menu option described below. If you choose one of the slots, the color in it will be assigned to the endpoint.
- Išsaugoti kairę (dešinę) spalvą į
-
These options cause the color of the endpoint in question to be assigned to the „memory slot“ selected from the submenu.
- Click and drag colors
-
You can also click and drag a color from the toolbox FG-BG colors or from a palette
-
to an endpoint (a black triangle), to set left [right] colors,
-
to the gradient display area, to add a new endpoint with this color on both sides.
-
Segmento perėjimo ir spalvinimo funkcijos
- Segmento perėjimo funkcija
-
Ši parinktis nurodo perėjimo nuo vieno rėžio (segmento arba pažymėjimo) galinio taško iki kito kursą, rėžio galiniams ir vidurio taškams pritaikant nurodytą funkciją:
- Tiesinis
-
Numatytoji parinktis. Spalva tiesiškai kinta nuo vieno rėžio galinio taško iki kito.
- Kreivinis
-
Gradientas rėžio galuose kinta greičiau nei viduryje.
- Sinusoidinis
-
Kreivinio tipo priešingybė. Gradientai rėžio centre kinta greičiau negu jo galuose.
- Sferinis (didėjantis)
-
Gradientas rėžio kairėje kinta greičiau nei dešinėje.
- Sferinis (mažėjantis)
-
Gradientas rėžio dešinėje kinta greičiau nei kairėje.
- Step
-
Gradient changes from left value to right value in one step without intermediate colors.
- Segmento spalvinimo tipas
-
Ši parinktis leidžia papildomai valdyti perėjimo nuo vieno galinio taško iki kito tipą: kaip liniją RGB arba HSV erdvėje.
Šiame meniu yra šios komandos:
- Ši pasirinktis rodo pikselio Raudoną, Žalią, Mėlyną ir Alfa reikšmes, kaip procentus. Ji taip pat rodo šešioliktainę pikselio spalvos reikšmę.
-
Ši pasirinktis rodo pikselio Raudoną, Žalią, Mėlyną ir Alfa reikšmes, kaip procentus. Ji taip pat rodo šešioliktainę pikselio spalvos reikšmę.
- HSV (counter-clockwise hue)
-
HSV (counter-clockwise hue)
- HSV (clockwise hue)
-
HSV (clockwise hue)
Segmentų keitimas
- Apsukti segmentą
-
Ši parinktis horizontaliai apsuka pasirinktą rėžį (segmentą arba pažymėjimą), apsukant visas spalvas ir galinių taškų vietas.
- Kopijuoti segmentą
-
Ši parinktis suskaido pasirinktą rėžį (segmentą arba pažymėjimą) į dvi dalis, kiekviena yra tiksli originalaus rėžio kopija.
- Padalinti segmentą vidurio taške
-
Ši parinktis suskaido kiekvieną pasirinktame rėžyje esantį segmentą į du segmentus, suskaidant balto trikampio vietoje.
- Suskaidyti segmentą tolygiai
-
Ši parinktis yra panaši į ankstesnę, tačiau ji suskaido kiekvieną segmentą pusiaukėlėje tarp galinių taškų, o ne balto trikampio vietoje.
- Ištrinti segmentą
-
Ši parinktis ištrina visus pažymėtame rėžyje (segmente arba pažymėjime) esančius segmentus, pakeičiant juos vienu centre esančiu juodu trikampiu ir padidant abiejose pusėse esančius segmentus, kad būtų užpildyta tuštuma.
- Percentruoti segmento vidurio taškus
-
Ši parinktis perkelia baltą kiekvieno pasirinktame rėžyje esančio segmento trikampį į pusiaukelę tarp kaimyninių baltų trikampių.
- Perskirstyti rankenėles segmente
-
Dėl šios parinkties pažymėto rėžio baltas ir juodas trikampiai yra perkeliami vienas nuo kito vienodu atstumu.
Spalvų sumaišymas
Šios parinktys yra prieinamos tik, kai pažymėtas daugiau nei vienas segmentas.
- Sumaišyti galinių taškų spalvas
-
Dėl šios parinkties sukuriamas vidiniuose rėžio galiniuose taškuose esančių spalvų vidurkis, kad perėjimas tarp vieno ir kito segmento būtų tolygus.
- Sumaišyti galinių taškų nepermatomumą
-
Ši parinktis daro tą patį, ką ir ankstesnioji, tačiau vietoje spalvos naudojamas nepermatomumas.
- Edit Active Gradient
-
When enabled, the gradient editor will automatically load the currently active gradient. If it is disabled, the gradient editor will not change when the active gradient changes.
![[Atsargiai]](images/caution.png)
|
Atsargiai |
|---|---|
|
There is no „undo“ available within the Gradient Editor, so be careful! |
All these options can seem somewhat boring. Here is an example to clear ideas:
-
Open the Gradient Dialog. Click
. The Gradient Editor is opened and shows a gradient from black to white.
-
Right click in this new gradient and select Split Segment Uniformly. If wanted, adjust the number of segments.
Pav. 15.35. Gradient with three segments
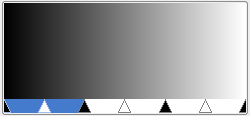
Every segment is limited with two black triangular sliders. Click a segment to activate it. By pressing the Shift key, you can select several contiguous segments.
-
In the context menu you get by right-clicking in the gradient, set Left Endpoint Color and Right Endpoint Color for the selected segment or segment group.
Pav. 15.36. First segment colored
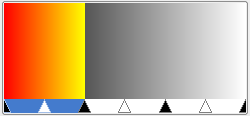
Red has been chosen for left endpoint and yellow for the right endpoint.
-
Go on the same way for other segments. Then use the Blending functions for segment to achieve various effects.
