パレット とは複数の色からなる離散した不規則な集合のことです。 パレットについての基礎的な情報やその作り方と使い方については パレット の節をご覧ください。
「パレット」ダイアログには升目状もしくは列挙型のパレット一覧表があり、 そこで使いたいパレットをクリックして選ぶ用途があります。 多少闇雲に選ばれたと思われるものも含め数十個ものパレットが GIMP に付いてきますが、 自前のパレットも簡単に追加できます。 パレットダイアログは他にも新しいパレットの作成や既存のパレットの操作などの用途もあります。
![[注記]](images/note.png)
|
注記 |
|---|---|
|
パレットダイアログは インデックス化パレットダイアログ と同じではありません。 あちらはインデックス化カラー画像の色マップを操作するために使うものです。 |
「バッファー」ダイアログはドッキング可能です。 その扱い方については 「ダイアログとその合体」 の節をご覧ください。
呼び出し方はつぎのとおりです。
-
from the main menu: → → ;
-
from the Tab menu in any dockable dialog by clicking the tab menu button
and selecting → .
ダイアログのパレット一覧表でいずれかのパレットをクリックするとそのパレットが選択されます。 またこのとき 描画色/背景色 ダイアログの「パレット」のタブにこのパレットの色がすべて表示され、 どれかの色をクリックすれば GIMP の描画色または背景色を変えられます。 一覧表のパレットの見本画像をダブルクリックしたときは (後述する) パレットエディター ダイアログが開かれ、 同様に描画色もしくは背景色を変えられます。 パレットを選ぶ際に 上 下 矢印キーや PgUp、 PgDn キーが使えます (「並べて表示」のときは 左 右 矢印キーも使えます)。
ダイアログのパレット一覧表 (「一覧で表示」モードの場合) でパレットの 名前 をダブルクリックするとその名前が編集できます。 ただし変更できるのは自前で追加インストールしたものに限られ、 GIMP と一緒に提供されたパレットファイルは対象外です。 仮に権限の及ばないものの名前を編集しても、 これを確定しようとして Enter キーを押したりどこか他のところに操作の焦点を移すとたちまち名前は元に戻されます。
- 升目表示と列挙表示
-
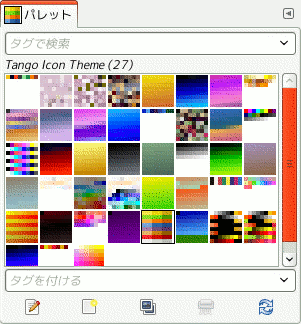
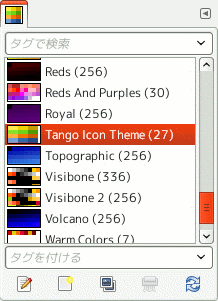
パレットダイアログのタブメニューで と を切り替えられます。 「並べて表示」を選ぶとパレットは升目状に並びます。 この壮観な表示なら一度に多くのパレット見本が見られるので探しだすのが楽になります。 初期設定で選ばれる「一覧で表示」の場合はパレットが縦一列に列挙されてその右側に名前が表示されます。
サブメニューではパレットの見本画像にお好みの大きさが選べます。
- タグづけ
-
タグはパレットの一覧表示を再構成するのに使えます。 「タグづけ」 をご覧ください。
「パレット」ダイアログの利用法
The button bar at the bottom offers the following functionality:
-
Edit this palette
-
このアイコンボタンは (後述する) パレットエディター ダイアログを呼び出します。
-
Create a new palette
-
このアイコンボタンについては (後述する) 脈絡メニューの 新しいパレット をご覧ください。
-
Duplicate this palette
-
このアイコンボタンについては (後述する) 脈絡メニューの パレットの複製 をご覧ください。
-
Delete this palette
-
このアイコンボタンについては (後述する) 脈絡メニューの パレットの削除 をご覧ください。
-
Refresh palettes
-
このアイコンボタンについては (後述する) 脈絡メニューの パレットを再度読み込み をご覧ください。
The 「Palettes」 context menu can be accessed by right-clicking
in the Palettes dialog, or by choosing the top item from the dialog Tab
menu
(
).
![[注記]](images/note.png)
|
注記 |
|---|---|
|
Some of the listed menu entries are installation-dependent, which need version 3 of the Python interpreter to be installed for GIMP 3.0. This includes: Offset Palette…, Palette to Gradient, Palette to Repeating Gradient and Sort Palette…. |
- Edit Palette…
-
「Edit Palette」 is an alternative way of activating the Palette Editor: it can also be activated by double-clicking on a palette in the Palettes dialog, or by pressing the 「Edit Palette」
button at the bottom of the dialog.
- 新しいパレット
-
「新しいパレット」は新たに無名のパレットをまだ何も色がない白紙の状態で作成し、 このパレットに色を加えられるようにするためパレットエディターダイアログを開きます。 作業の結果は自動的に GIMP の個人用
palettesフォルダーに保存され、 次回からパレットダイアログを通じて利用可能になります。 - Import Palette…
-
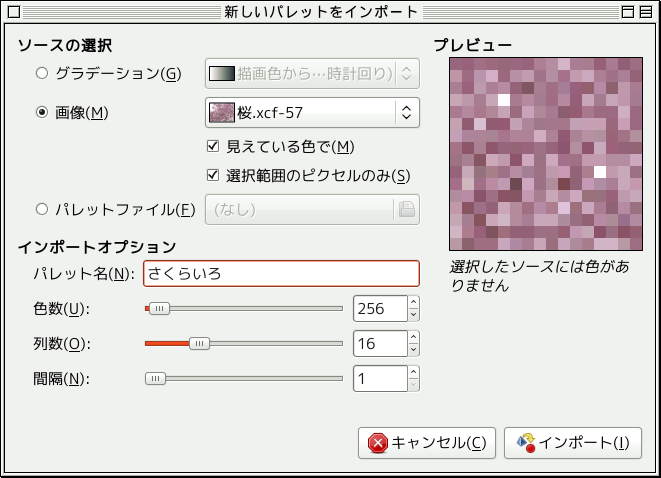
「新しいパレットをインポート」はグラデーションか画像かパレットファイルの色を基に新しいパレットを作成します。 ダイアログが開かれてつぎのようなオプションを選択できます。
- ソースの選択
-
You can import a palette either from any of GIMP's gradients (choosing one from the adjoining menu), or from any of the currently open images (chosen from the adjoining menu).
画像から転用する場合のつぎの 2 つのオプションは、 選ばれた画像が RGB モードであるときに利用できます。
-
Sample merged: If you enable this option, sampling is not calculated only from the values of the active layer, but from all visible layers.
For more information, see the Glossary entry.
-
選択範囲のピクセルのみ: 名前が示すとおり選択範囲の画素だけから色を採取します。 上のオプションに従い活性レイヤーもしくはすべてのレイヤーの選択範囲内の画素が対象です。
You can also import palettes from GIMP's native
.gplformat, or the following external palette formats.-
Microsoft RIFF palette (
.riff) -
Cascading Style Sheets palette (
.css) -
SwatchBooker palette (
.sbz) -
Adobe Color palette (
.aco) -
Adobe Color Book (
.acb) -
Adobe Swatch Exchange palette (
.ase) -
Photoshop binary color palette (
.act) -
Paint Shop Pro color palette (
.psp)
-
- パレット名
-
Enter a name for the new palette. If the name you choose is already used by an existing palette, a unique name will be formed by appending a number (e. g., "#1").
- 色数
-
ここでパレットに収められる色数を決めます。 既定数が 256 となっている理由は 3 つあります。 第 1 にどんなグラデーションにも相異なる色が 256 色入っています。 第 2 に GIF ファイル形式は最大で 256 色が使えます。 第 3 に GIMP のインデックス化カラー画像は相異なる色が最大で 256 色使えるからです。 とはいえお好みで何色でもここで指定できます。 GIMP は与えられた色数をいっぱいにしようとして、 グラデーションや画像の全域にわたって採色を試みることさえあります。
- 列数
-
ここでパレット見本表示の列数を指定できます。 この指定はパレットの表示方法だけが対象なので、 パレットを使用する段においては何ら影響はありません。
- 間隔
-
Even setting 「Number of colors」 to maximum, the number of colors can't exceed 10000 in the palette. RGB images have much more colors. Interval should allow to group similar colors around an average and so get a better palette. This problem doesn't exist with 256 colors indexed images: Interval to 1 allows picking 256 colors (this option is disabled with more than 256 colors indexed palettes too).
インポートされたパレットはパレットダイアログの一覧表に加えられ、 GIMP を終了するときに自動的に個人用
palettesフォルダーに保存されますから、 次回からも利用できます。 - パレットの複製
-
は現在選択されているパレットの写しをとって新たなパレットを作成しパレットエディターダイアログを開きますので、 直ちにパレットが編集できます。 編集後の結果は GIMP を終了する際に自動的に個人用
palettesフォルダーに保存されますから、 次回からもこのパレットが利用できます。 - Merge Palettes…
-
Currently this operation is not implemented, and the menu entry will always be disabled.
- パレットの場所をコピー
-
This command allows you to copy the palette file location to the clipboard. You can then paste it in a text editor.
- Show in File Manager
-
Show in File Manager opens the location of the palette file in the default File Manager on your system.
- パレットの削除
-
は「パレット」ダイアログの一覧表からパレットを消去するのみならずディスク上の保管場所からそのパレットファイルを削除します。 実行に移す前に本当に削除するつもりなのかどうかの確認が求められます。 ちなみに GIMP と一緒に付いてきたパレットはいずれもこの対象外であり、 削除可能なのは自前で追加したものに限られます。
- パレットの更新
-
は検索対象パスに登録されているパレットファイルの保管場所を読み込み直し、 新たに発見されたパレットをパレットダイアログの一覧表に加えます。 何らかの手段で外部から入手したパレットファイルを個人用パレットフォルダーにコピーしたときに、 GIMP を再起動せずとも即座にそのパレットが利用可能になる便利なボタンです。
- Export as
-
The submenu gives several choices to export the current palette in external formats. At this time, exporting to the following formats is supported: , , , , , and . Each of these will open a dialog where you can enter a filename and choose a folder where the exported file will be stored.
- Offset Palette…
-
This command opens a dialog window.
It takes the last color of the palette and moves it to the beginning. In the dialog window, the Offset parameter defines how many times this action will be performed.
If you set a negative Offset, colors are moved from the first position to the end of the colors list.
- Palette to Gradient
-
このコマンドを使うと現在のパレットのすべての色を用いてグラデーションが作成され、 グラデーションダイアログで保存されます。 グラデーションのセグメント数はパレットの色数分あります。
- パレットを循環型グラデーションに
-
このコマンドはパレットのすべての色を用いて繰り返しのグラデーションを作成します。 このグラデーションはグラデーションダイアログに出現して現在の活性グラデーションになります。 グラデーションのセグメント数はパレットの色数より 1 つ多い数です。 最も左端のセグメントの左端色と最も右端のセグメントの右端色が同じになります。
- Sort Palette…
-
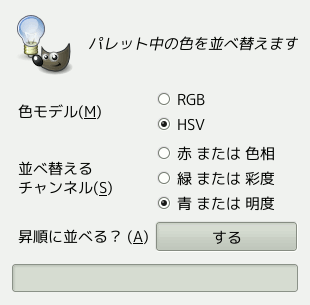
This command opens a dialog window which allows you to sort the colors of the palette according to certain criteria. If the palette is read only a new palette will be created that is sorted based on your settings.
Another way of sorting a palette is by using the sorting options of the Rearrange Colormap dialog.
Several settings of this dialog are not well understood. We would welcome contributions from anyone that knows how to improve this documentation.
-
Selections: This option determines how the palette is going to be sorted. How to use this has not been well documented by its original author. We advise to leave it at the default All.
-
Slice expression: This option affects how the palette is sorted when Slice/Array was chosen above in Selections. Documentation taken from the code:
Leaving this empty, or entering
:selects all items.:4,or:4makes a 4-row selection out of all colors (length auto-determined).:1,4selects the first 4 colors.:,4selects rows of 4 colors (number of rows auto-determined).:4,4selects 4 rows of 4 colors.4:selects a single row of all colors after 4, inclusive.4:,4selects rows of 4 colors, starting at 4 (number of rows auto-determined).4:4,4selects 4 rows of 4 colors (16 colors total), beginning at index 4.4is illegal (ambiguous). -
Channel to sort: This option determines based on what type of color channel the sorting will happen.
-
Ascending: When enabled, the sorting is ascending. When disabled, the sorting is descending.
-
Secondary Channel to sort: This option determines the secondary color channel for sorting in case the first channel sort returns equal values.
-
Ascending: When enabled, the sorting is ascending. When disabled, the sorting is descending.
-
Quantization: Undocumented for now.
-
Partitioning channel: This option is also used to determine how to sort.
-
Partitioning quantization: This option is used in conjunction with the previous one.
-
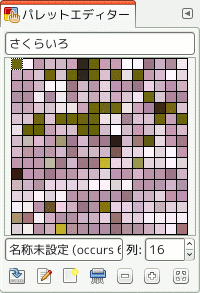
パレットエディターダイアログは主に 2 つの用途があります。 そのひとつはパレットから色を選んで GIMP の描画色と背景色 (ツールボックスの色標識にも表示される) を設定すること、 ふたつめがパレットを改変することです。 パレットダイアログに並ぶどのパレットに対してもパレットエディターダイアログが呼び出せますが、 改変できるものは自作のパレットに限られ、 GIMP の導入の際に提供されたシステム付属のパレットは対象外です。 (もちろん複製をとれば新しくできた方を編集できます。) パレットを改変すると、 その成果は GIMP を終了するときに自動的に保存されます。
The Palette Editor is only accessible from the Palettes dialog: you
can activate it by double-clicking on a palette, or by pressing the
「Edit Palette」 button at the bottom, or by choosing
「Edit Palette」 from the 「Palettes」 Menu.
「パレットエディター」ダイアログはドッキング可能です。 その扱い方については 「ダイアログとその合体」 の節をご覧ください。
パレットの表示部に並ぶ色のひとつをクリックすると、 その色に GIMP の描画色が変わります。 この様子はツールボックスの色標識の領域でも確認できます。 色をクリックするとき Ctrl キーを押しておれば選んだ色が 背景色 に設定されます。
自作のパレットや自前で追加したパレットの場合に色をダブルクリックすると、 その色を描画色にするだけでなく色の変更ダイアログを呼び出し、 選んだ位置の色を変更できます。
パレットの表示部を でクリックするとパレットエディターダイアログの脈絡メニューが現れます。 メニューに並ぶ主な項目はダイアログの底部にあるアイコンボタンと同じはたらきをします。
Below the palette display area, at the left, appears a text entry area that shows the name of the selected color (or 「Untitled」 if it does not have one). This information has no functional significance, and is present only to serve you as a memory aid.
名前の表示欄の右隣には 列: スピンボタンがあって、 ここでパレット表示部の列数を設定できます。 表示の調整だけが目的なのでパレットのはたらきには影響ありません。 ここの値に 0 を設定すると列数には初期設定の値が使われます。
At the bottom of the dialog are a set of buttons, which mostly match the entries in the Palette Editor menu, accessible by right-clicking a color in the palette display area. Here are the buttons:
-
色の変更
-
For more information on this button please refer to below.
-
現在の描画色を追加
-
このアイコンボタンについては (後述する) 脈絡メニューの 描画色でエントリーを追加 をご覧ください。
-
色の削除
-
このアイコンボタンについては (後述する) 脈絡メニューの 色の削除 をご覧ください。
-
表示倍率を下げて縮小表示
-
このアイコンボタンについては (後述する) 脈絡メニューの 縮小表示 をご覧ください。
-
表示倍率を上げて拡大表示
-
このアイコンボタンについては (後述する) 脈絡メニューの 拡大表示 をご覧ください。
-
すべて表示されるように表示倍率を調整
-
このアイコンボタンについては (後述する) 脈絡メニューの すべてを表示 をご覧ください。
パレットエディターダイアログの脈絡メニューを呼び出すにはパレットエディターダイアログのパレット表示部を クリックするか、 このダイアログのタブメニューの最初の項目を進んでください。 このメニューでできる操作はパレットエディターダイアログの底部に並ぶアイコンボタンからも起用できます。
- 色の変更
-
「Edit Color」 brings up a color editor that allows you to modify the color of the selected palette entry. If the palette is one that you are not allowed to edit (that is, one supplied by GIMP when it is installed), then the menu entry will be disabled.
- 描画色でエントリーを追加; 背景色でエントリーを追加
-
これらのコマンドはいずれもパレットに新しい色項目を作り、 (ツールボックスの色標識の領域に表示されている) 現在の GIMP の描画色や背景色をその新項目の色に使います。
- 色の削除
-
「Delete Color」 removes the selected color entry from the palette. If the palette is one that you are not allowed to edit, then the menu entry will be disabled.
- 表示倍率を下げて縮小表示
-
はパレット表示部の升目を低くします。
- 表示倍率を上げて拡大表示
-
はパレット表示部の升目の高さを増します。
- すべて表示されるように表示倍率を調整
-
はすべての色項目が表示部に収まるようにパレット表示部の升目の高さを調節します。
- アクティブなパレットを編集します
-
このオプションを有効に (初期設定は有効です) したときは、 パレットダイアログの一覧表で他のパレットをクリックするだけでそのパレットをパレットエディターダイアログに読み込みます。

 縮小表示
縮小表示 拡大表示
拡大表示 すべてを表示


