I GIMP kan kvart lag ha sin eigen storleik uavhengig av storleiken på dei andre laga. Denne kommandoen endrar storleiken på laget, men skalerer ikkje innhaldet.
![[Notat]](images/note.png)
|
Notat |
|---|---|
|
Som standard vert teikning utanfor lagkantane ignorert. Du an likevel slå på innstillingane for Utvid laga i innstillingane for teikneverktøya. Dette vil automatisk utvida storleiken på laget opp til storleiken på lerretet når du teiknar nær ein av kantane. |
-
Du har tilgang til denne oppføringa i hovudmenyen via → .
-
Du har tilgang til det frå lagdialogvindauget ved å velja i sprettoppmenyen som kjem fram når du høgreklikkar.
- Mal
-
Du kan velja ein biletstorleik frå nedtrekkslista med tilgjengelege malar. For meir informasjon om malar, sjå Laga eit nytt bilete eller Dialogvindauget «Malar».
Når du vel ein mal med ei anna utskriftsoppløysing (ppi) enn biletet, kjem det opp to knappar som du kan bruka for å justera dette.
vil setja malen til den same oppløysinga som biletet. vil setja biletet til den same oppløysinga som malen.
- Lagstorleik
-
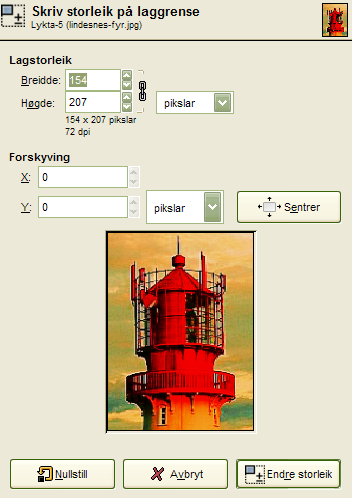
- Breidd, Høgd
-
Når dialogvindauget er synleg vert dimensjonane for laget vist. Du kan skriva inn nye verdiar i tekstboksane etter behov. Dersom boksane er lenkja saman, dvs. at lenkjesymbolet
 er ubrote, vert forholdet mellom breidd og høgd det same som før. Dersom du bryt lenkja ved å klikka på symbolet, kan du skriva individuelle verdiar i dei to boksane.
 - Einingar for måling
-
Dersom du ønskjer ei anna måleeining enn pikslar, brukar du nedtrekksmenyen.
- Forskyving
-
- X, Y
-
Desse koordinata er relative til laget, ikkje til biletet. Dei vert brukte for å flytta ei ramme som bestemmer kva del av laginnhaldet som skal merkast for å endra storleiken. I eksempelet har laget og innhaldet den same storleiken og du har difor sjølvsagt inga ramme å flytta på. Dersom du reduserer Breidd og Høgd , vert ramma for laget som er endra vist i førehandsvisinga.
- Ei førehandsvising av laget inne i ramma for lerretet
-
Ved sida av lagstorleiken er det ei førehandsvising av laget med ramma til det endra laget. Du kan flytta denne ramma ved og bruke X- og Y-forskyvinga eller ved å dra den korsforma peikaren som kjem fram når musepeikaren er over lagområdet.
- Senter
-
Med knappen kan du plassera ramma i sentrum av laget.
- Fyll med
-
Her vel du korleis bakgrunnen til laget skal fyllast når du aukar storleiken. Du har dei same innstillingane her som i dialogvindauget Opprett eit nytt vindauge.
- Auka storleiken på eit lag
-
Du kan ikkje gjera eit lag større enn biletlerretet.
Dersom laget er mindre enn biletet, kan du gjera Breidd og/eller Høgd større. Dersom du vil setja laget til same storleik som biletet, kan du enklare bruka Laga til biletformatet.
- Redusera storleiken på eit lag
-
Visss du ønskjer å fjerna ubrukte delar i eit lag, kan du redusera storleiken på laget.
Figur 16.117. Eksempel
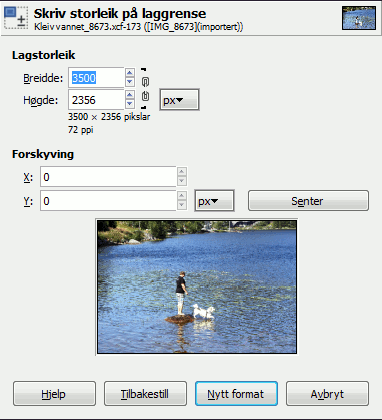
Laget som skal få ny storleik er merkt
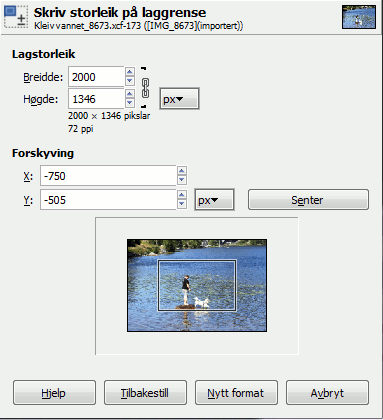
Ramma viser den nye lagstorleiken. Ho er plassert i midten av laget med knappen .
Dersom biletet berre har eitt lag, er det betre å bruka beskjeringsverktøyet.