Baneverktøyet vert helst brukt for å laga komplekse utval kalla Bézierkurver, noko liknande frihandsutvalet, men med alle eigenskapane til vektorkurver, Du kan redigera bézierkurvene, teikna med dei og både lagra, eksportera og importera dei. Du kan også bruka baneverktøyet for å laga geometriske figurar. Baneverktøyet har sitt eige dialogvindauge. (Eigentleg kunne dette verktøyet like gjerne heitt «kurveverktøyet»).
Sjå konseptet Bane.
Du kan slå på verktøyet på mange måtar:
-
Frå hovudmenyen via → .
-
Ved å klikka på verktøysymbolet
 i verktøykassa.
 -
Med tastatursnarvegen B.
![[Notat]](images/note.png)
|
Notat |
|---|---|
|
Legg merke til at det dukkar opp hjelptekstar nedst i biletvindauget når du bruker desse tastane. |
- Shift
-
Denne tasten har fleire funksjonar som er avhengige av samanhengen han blir brukt i. Sjå nærare om desse nedanfor under verktøyinnstillingane.
- Ctrl, Alt
-
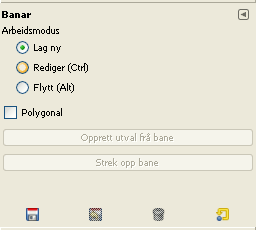
Baneverktøyet kan bli brukt i tre ulike arbeidsmodus: Lag ny, Rediger og Flytt. Ctrl-tasten bytter mellom Lag ny og Rediger. Alt-tasten (eller Ctrl+Alt) bytter mellom Lag ny og Flytt.
Normalt vert innstillingane for det valde verktøyet vist under verktøykassa så snart som du slår på verktøyet. Dersom dette ikkje er tilfelle, kan du få tilgang til dei frå biletmenyen via → → som vil opna verktøyinnstillingane for det valde verktøyet.
- Redigeringsmodus
-
- Utforming
-
Dette er normalmodus for baneverktøyet. Du teiknar banen ved å klikka der du vil ha kontrollpunkta. Du kan flytte kontrollpunkta ved å klikka på dei og dra dei dit du vil. Mellom kontrollpunkta finn du segmenta.

Tala viser stega for å teikne ein rett bane med to segment.
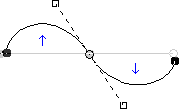
Det er lett å laga boga segment ved å dra eit segment eller eit kontrollpunkt (ein node). (Kurva er på biletet indikert med blå piler). Det kjem også fram to «handtak» som du tar tak i når du vil bøye kurva.
![[Tips]](images/tip.png)
Tips For raskt å lukka kurva, klikk på det første kontrollpunktet. Viss du ønskjer å setja startnoden ein annan stad, hald nede Shift og klikk for å fjerna markeringa av sluttnoden og flytt så startnoden.
Du kan bruka knappen eller
 knappen Bane til utval i ddialogvindauget for banar for å omforma banen til eit utval.
Tips Når du har to handtak vil dei normalt arbeide symetrisk. Slepp opp museknappen for å flytte handtaka kvar for seg. Trykk ned Shift-tasten for å få dei til å arbeida symmetrisk igjen.
Fleire funksjonar er tilgjengelege når du brukar utformingsmodus:
Setja inn ein ny node: Når du trykkje inn Ctrl og held musepeikaren over den gjeldande banen, endrar musepeikaren seg til ein «+». Klikkar du, vert det sett inn ein ny node der musepeikaren er på banen.
Flytt ein eller fleire noder: Modus vert markert ved at musemarkøren har form som eit kors av fire piler. Du kan klikke og dra med dette verktøyet. Ved å halda nede Shift-tasten, kan du velja fleire noder ved å klikka på dei og flytta dei ved klikk og dra. Held du nede tastekombinasjonen Ctrl+Alt, kan du flytta heile banen i eitt stykke.
Endra handtaka: Du må først ha redigert ein node for å få fram handtaket. Dra i handtaket for å bøya kurva. Hald nede Shift-tasten for å få fram symmetriske handtak.
Endra segment: Når musepeikaren er over eit segment (linja mellom punkta), vil musemarkøren endra utsjånad til 4-pilskrossen. Klikk og dra for å bøya segmentet. Så snart du byrjar å flytta markøren, vil handtaka dukke opp i begge endar av segmentet. Held du nede Shift-tasten vert handtaka symmetriske.
Leggja til ny underbane: Når du trykkjer Shift og held musepeikaren på utsida av den gjeldande banen viser musepeikaren eit kvadrat. Klikkar du nå, vert det laga ein ny bane som ikkje er kopla til andre banar, men vert sett på som ein del av banen.
- Rediger (Ctrl)
-
Rediger utfører funksjonar som ikkje er tilgjengelege når du er i Lag-ny-modus. Du kan berre redigera på banar som finst. Kjem peikaren utanfor banen, vert utsjånaden endra til eit «forbodsskilt». Du kan ikkje gjera noko som helst med banen.
Legg til eit segment mellom to noder: Klikk på ein node for å gjera banen till den gjeldande. Musemarkøren vil endra seg til eit unionsymbol. Klikk på ein annan node for å lenkja desse saman. Dette kan vere nyttig når du skal lenkja saman opne (ikkje lukka) komponentar.
Fjerna eit segment frå banen: Hald nede tastekombinasjonen Shift+Ctrl medan du peikar på eit segment. Musemarkøren endrar seg til «-». Klikk for å fjerna segmentet.
Legg til ein node i ein bane: Peik på eit segment. Musepeikaren endrar utsjånad til «+». Klikk der du vil ha den nye noden.
Fjern ein node: Held du nede tastane Shift+Ctrl medan du peikar på ein node, vil musepeikaren skifta til «-». Klikk for å fjerna noden.
Legg handtak til ein node: Peik på noden. Peikaren skifter til ei lita hand. Flytt på noden og handtaka dukkar opp. Shift-tasten skifter mellom symmetriske handtak eller ikkje.
Fjerna eit handtak frå ein node: Hald nede Shift+Ctrl medan du peikar på eit handtak. Peikaren skifter ikkje til det venta minusteiknet, men er framleis ei lita hand. Klikk på handtaket for å fjerna det.
![[Obs]](images/caution.png)
Obs Du får ingen åtvaringar før du fjernar ein node, eit segment eller eit handtak.
- Flytt (Alt)
-
Når du er i Flyttemodus kan du flytte ein del av banen eller alle delane i ein bane ved å klikke og dra.
Har du fleire element, vert berre dei markerte elementa flytta på. Klikkar og dreg du utanfor ein bane, vert alle elementa flytte. Shift-tasten skiftar mellom å flytta alle eller berre utvalde element.
- Polygonal
-
Med dette valet er alle segmenta lineære. Det blir ikkje sett til handtak, og segmenta blir rette sjølv om du flyttar på dei.
- Opprett utval frå bane
-
Denne knappen let deg laga eit utvag som er basert på banen slik han er no. Dette utvalet er merkt med «marsjerande maur». Merk at banen framleis er der: det gjeldande verktøyet er framleis baneverktøyet og du kan endra denne banen utan å endra utvalet som no er blitt uavhengig. Byter du verktøy, vert banen usynleg, men er framleis til stades i Banedialogvindauget og du kan slå han på på nytt.
Dersom banen ikkje er lukka vil GIMP lukke banen med ei rett linje mellom endepunkta.
Som snakkebobla for hjelp seier, viss du held du nede Shift-tasten medan du trykkje på knappen, vert det nye utvalet lagt til eit eventuelt eksisterande utval. Held du nede Ctrl-tasten vert det nye utvalet trekt i frå den eksisterande, og held du nede begge tastane samstundes, vert resultatet eit snitt mellom det gamle og det nye utvalet.
- Fyll banen
-
Dette gjer at ein lukka bane vert fylt einsfarga eller med eit mønster.
- Strek opp bane
Når du klikkar på eit baneelement som anker eller segment, kjem det opp ein sprettoppmeny med eit innhald som er avhengig av kva du klikka på. Du kan finna kommandoane nedanfor i sprettoppmenyen.
- Slett anker
-
Denne kommandoen slettar det merkte ankeret og koplar saman elementa framføre og etter ankeret.
- Skift start
-
Denne kommandoen flyttar startankeret til det valae ankeret. Startankeret er staden der strekinga byrjar og det har ei spiss side som indikerer strekretninga. Dette kan vera nyttig når du ønsker å omslutta tekst langs ein bane.
Å flytta startankeret på opne strekar kan føra til at det vert sett inn eit nytt segment som koplar saman dei tidlegare endepunkta, samstundes som segmentet som går inn i det nye startankeret vert fjerna.
- Set inn anker
-
Denne kommandoen set inn eit nytt anker på det valde punktet på segmentet.
- Slett segment
-
Denne kommandoen slettar det valde segmentet. Dette vil laga ein opning i banen.
- Reverser strok
-
Dette reverserer retninga på stroka. Forma på startankeret vil visa retninga på stroket. Peikarsida vil vise retninga på stroket.


