Инструмент «Контуры» позволяет создавать сложные выделения, называемые кривыми Безье, почти как «Лассо», только с гибкостью векторных кривых. Кривую можно редактировать, сохранять, импортировать, экспортировать; с её помощью можно рисовать и создавать геометрические фигуры. У контуров есть свой диалог.
Ознакомьтесь с концепцией контуров в главе «Контуры».
Есть несколько способов активации инструмента:
-
через главное меню → ,
-
нажав на значок инструмента
на панели инструментов.
-
нажатием клавиши быстрого доступа B.
![[Примечание]](images/note.png)
|
Примечание |
|---|---|
|
Краткая справка по использованию этих клавиш появляется внизу окна изображения. |
- Shift
-
У этой клавиши несколько функций в зависимости от контекста. За подробностями обратитесь к описанию параметров.
- Ctrl ; Alt
-
У инструмента «Контуры» три режима: Создание, Правка и Перемещение. Клавиша Ctrl переключает режимы между Созданием и Правкой. Клавиша Alt (а также Ctrl+Alt) переключает режимы между Созданием и Перемещением.
Обычно параметры инструмента отображаются в панели, присоединённой к панели инструментов, как только вы активируете его. Если их там нет, вы можете перейти к этой панели, выбрав в меню пункт → → .
- Режим правки
-
- Режим создания
-
По умолчанию этот инструмент находится в режиме Создание. Контур создаётся последовательными щелчками по точкам изображения. Создаваемые контрольные точки (узлы) можно передвигать, предварительно щёлкнув по ним. Между узлами находятся сегменты контура.

Числа — это шаги создания прямого контура из двух сегментов.

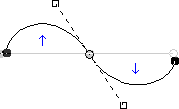
Кривые сегменты легко строить, двигая сегменты или узлы. Голубые стрелки обозначают кривую. Два маленьких рычага позволяют искривлять кривую смещением их положения.
![[Подсказка]](images/tip.png)
Подсказка Чтобы быстро замкнуть кривую, щёлкните по начальной контрольной точке. Если необходимо изменить положение начального узла, удерживайте клавишу Shift и щёлкните, чтобы отменить выбор конечного узла, а затем переместите начальный узел.
Можно использовать кнопку или
кнопку Контур в выделение в диалоге контуров для преобразования контура в выделение.
![[Подсказка]](images/tip.png)
Подсказка Два рычага по умолчанию расположены симметрично. Отпустите кнопку мыши, чтобы перемещать рычаги по отдельности. Клавиша Shift возвращает рычагам симметричность.
Функции, доступные в режиме создания:
Вставка нового узла: удерживая Ctrl и наведя курсор мыши на уже существующий контур, можно увидеть, что курсор принимает форму знака «+». Щелчок создаст новый узел контура в той точке, над которой удерживался курсор.
Перемещение одного или нескольких узлов: при расположении на узле, курсор принимает форму крестика с четырьмя стрелками. Этот крестик можно перемещать. Сразу несколько узлов можно выбрать, нажав клавишу Shift и перетаскивая узлы обычным образом. Нажатие сочетания Ctrl+Alt даёт возможность перемещения всего контура как выделения.
Изменение рычагов: перед этим нужно изменить узел. Будет показан рычаг. Тащите этот крестик, чтобы согнуть кривую. Нажатие Shift переключает симметричность рычагов.
Изменение сегмента: при наведении курсора мыши на сегмент курсор принимает форму крестика с четырьмя стрелками. Потащите этот крестик, чтобы искривить сегмент. Сразу после начала перетаскивания по его обеим сторонам появляются рычаги. Нажатие Shift переключает симметричность рычагов.
Добавление вторичного контура: удерживая клавишу Ctrl и переместив курсор мыши за пределы существующего контура, можно увидеть, что курсор превратился в квадратик. Щелчок создаст вторичный контур, не связанный с другими кривыми, но считающийся частью контура.
- Режим правки (Ctrl)
-
Правка выполняет функции, которые не доступны в режиме Создания. В этом режиме можно работать только над существующим контуром. Вне контура (или по всему изображению, если нет контура) курсор становится маленьким перечёркнутым кругом и редактирование невозможно.
Добавление сегмента между двумя узлами: щелчком активируйте узел с одного конца контура. Значок указателя мыши примет форму двух объединённых пустых окружностей, означающую объединение узлов. Щёлкните по второму узлу, чтобы связать их. Это полезно для соединения незамкнутых компонентов.
Удаление сегмента из контура: нажимая комбинацию клавиш Shift+Ctrl, укажите на сегмент. Курсор превратится в знак «-». Щёлкните, чтобы удалить сегмент.
Добавление узла к контуру: укажите на сегмент. Значок указателя мыши сменится на «+». Щёлкните по точке, в которую хотите добавить узел.
Удаление узла: нажимая комбинацию клавиш Shift+Ctrl, укажите на узел. Курсор превратится в «-». Щёлкните, чтобы удалить узел.
Добавление рычага к узлу: укажите на узел. Значок указателя мыши примет форму руки. При перетаскивании узла появится рычаг. Нажатие клавиши Shift делает рычаги симметричными.
Удаление рычага из узла: удерживая нажатыми клавиши Shift+Ctrl, переместите указатель мыши к точке над рычагом. Значок указателя сменится на ожидаемый символ минуса. Щёлкните для удаления рычага.
![[Внимание]](images/caution.png)
Внимание Перед удалением узла, сегмента или рычага не появляется никакого предупреждения.
- Режим перемещения (Alt)
-
Режим Перемещение позволяет перемещать компоненты контура по одному или все разом. Просто щёлкните по контуру и перетащите его.
Если у контура несколько компонентов, перемещён будет только выбранный. При щелчке и перетаскивании вне контура передвигаются все компоненты. Клавиша Shift также включает перемещение всех компонентов.
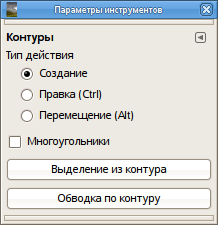
- Многоугольники
-
При выборе этого параметра сегменты становятся только прямыми. Рычаги не отображаются, а сегменты не гнутся при их перемещении.
- Выделение из контура
-
Эта кнопка создаёт выделение, основанное на текущем контуре и отображаемое с помощью «муравьиной дорожки». Заметьте, что контур остаётся нетронутым: активный инструмент — всё ещё «Контуры», так что этот контур можно изменять, не меняя выделение, ставшее независимым. Если выбрать другой инструмент, контур станет невидимым, он останется в диалоге контуров, и его можно активировать снова.
Если контур не замкнут, GIMP замкнёт его прямой линией.
Как сказано во всплывающей подсказке, нажатие клавиши Shift добавит новое выделение к уже существующему, нажатие клавиши Ctrl вычтет новое выделение из существующего, а комбинация клавиш Shift+Ctrl оставит пересечение выделений.
- Заливка контура
-
Позволяет залить замкнутый контур сплошным цветом или текстурой.
- Обводка по контуру
При щелчке правой кнопкой мыши по элементам контура, таким как узлы или сегменты, появляется контекстное меню, содержимое которого зависит от выбранного элемента. В контекстном меню могут отображаться следующие команды.
- Удалить узел
-
Эта команда удаляет выбранный узел и соединяет сегменты перед ним и после него.
- Сместить начало
-
Эта команда перемещает начальный узел к выбранному узлу. Начальный узел — это место, где начинается обводка. Начальный узел имеет заострённую сторону, указывающую направление обводки. Это может быть полезно, когда необходимо разместить Текст по контуру.
Сдвиг начального узла на открытых обводках может вставлять новый сегмент, соединяющий предыдущие конечные точки, и удаляет сегмент, ведущий к к новому начальному узлу.
- Вставить узел
-
Эта команда добавляет новый узел в выбранном месте сегмента.
- Удалить сегмент
-
Эта команда удаляет выбранный сегмент. Это создаст отверстие в вашем контуре.
- Обратная обводка
-
Эта команда изменяет направление обводки. Форма начального узла будет отражать направление обводки. Острая сторона — это направление, в котором будет двигаться обводка.


