Диалог «Контуры» позволяет управлять контурами, создавать и удалять их, сохранять и преобразовывать в выделения и из выделений и т. д. Подробнее о контурах см. Раздел 4, « Контуры ».
Этот диалог можно прикрепить на панель. Более подробно об этом написано в разделе Раздел 2.3, «Диалоговые окна и стыкуемые панели».
Его можно открыть следующими способами:
-
через главное меню: → → ;
-
через меню вкладок любого стыкуемого диалога, нажав
 и выбрав → .
В меню есть список откреплённых окон, который существует только пока открыт хотя бы один диалог. В этом случае диалог «Контуры» можно вызвать из главного меню: → .
- Общая информация
-
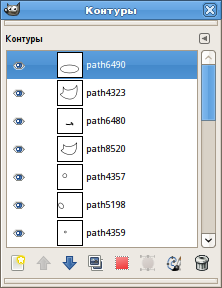
В этом диалоговом окне отображается список всех контуров, присутствующих в текущем изображении. Для каждого контура можно установить атрибуты, как описано ниже, и выполнить определённые действия с помощью кнопок в нижней части диалога или с помощью контекстного меню.
В многооконном режиме можно показать имя активного изображения в верхней части панели, выбрав пункт «Показать список изображений» из меню вкладок. Это позволит сразу увидеть, к какому изображению относятся контуры, с которыми вы работаете.
Если список контуров не пуст, то обязательно один из контуров является активным, и все операции, касающиеся контуров, будут производиться именно с ним. Активный контур выделяется подсветкой. Чтобы сделать контур активным, просто нажмите на его строке левой кнопкой мыши.
Нажатием правой кнопкой мыши на любом элементе списка вызывается меню контуров. Кроме того, вы можете открыть это меню с помощью меню вкладок.
- Выбор нескольких контуров
-
GIMP позволяет выбрать несколько контуров и выполнить действия с ними, например, обводку или заливку. Выбор нескольких контуров осуществляется с помощью мыши и клавиши Shift, чтобы добавить диапазон контуров или клавиши Ctrl, чтобы добавить или удалить выделенный контур.
- Заголовок списка контуров
-
Непосредственно над списком контуров находится строка заголовка. Слева расположены значки, которые показывают, какой столбец используется для видимости и блокировки. Посередине находится текстовая надпись, указывающая, сколько контуров выбрано в данный момент, если их больше одного.
- Атрибуты контура
-
Каждый отображаемый в списке контур имеет свои атрибуты, которые очень похожи на атрибуты слоёв:
-
 Видимость контура
-
По умолчанию контуры не видны. Этот значок отображается, когда контур становится видимым. При нажатии на него происходит переключение между видимым и невидимым. Когда контур становится «видимым», на изображении рисуется граница для каждого сегмента. При этом фактические пиксельные данные изображения не изменяются. Щелчок по значку при нажатой Shift скрывает другие контуры.
-
 Атрибуты запрета изменения контура
-
Каждый контур имеет атрибуты запрета изменения. Если задан один из атрибутов, то перед миниатюрой появится соответствующий значок замка.
Если задано несколько атрибутов, здесь будет отображаться двойной значок замка. Щёлкнув в этом столбце, можно изменить эти атрибуты.
-
 Запретить изменение контура
-
Этот значок отображается, когда параметр «Запретить изменение контура» включён для текущего пути. Когда эта опция включена, путь блокируется для любого действия, которое его изменяет. Это означает, что изменения в этом пути невозможны. Щелчок по значку переключает режим между включённым и выключенным.
-
 Запретить изменение положения и размера
-
Этот значок отображается, когда параметр «Запретить изменения положения контура» включён для текущего контура. Если этот параметр включён, контур блокируется для любого действия, которое изменяет его положение. Щелчок по значку включает или отключает параметр.
-
 Запретить изменение видимости
-
Эта кнопка переключения управляет параметром «Запретить изменения» для видимости контура. Если она включена, видимость контура не может быть изменена, пока вы не отключите блокировку.
-
- Миниатюра
-
Небольшой значок с миниатюрой представляет эффект контура. Эта миниатюру можно увеличить, удерживая на ней левую кнопку мыши. Если перетащить миниатюру в диалоговое окно «Слои», то будет создан новый слой с растровой копией контура.
- Имя контура
-
Название контура, которое, среди названий остальных контуров одного изображения должно быть уникальным. Чтобы изменить имя контура, дважды щёлкните на нём. Если такое имя уже существует в списке, то к нему автоматически будет добавлен порядковый номер (например, #1).
-
- Управление контурами
-
Панель кнопок внизу предлагает следующие функции:
Эти кнопки соответствуют пунктам контекстного меню (вызывается щелчком правой кнопки мыши по пункту в списке), но некоторые из них имеют дополнительные опции, которые можно получить, удерживая клавиши-модификаторы при нажатии кнопки.
-
 Создать контур
-
См. раздел
-
 Поднять контур
-
См. раздел Поднять контур. Удерживание клавиши Shift перемещает выбранные контуры наверх списка.
-
 Опустить контур
-
См. раздел Опустить контур. Удерживание клавиши Shift перемещает выбранные пути вниз списка.
-
 Создать копию контура
-
Смотрите раздел Создать копию контура.
-
 Контуры в выделение
-
Преобразует контуры в выделение; см. Контуры в выделение для полного объяснения. Можно использовать клавиши-модификаторы, чтобы задать способ взаимодействия нового выделения с существующим:
Модификаторы Действие Нет Замещение существующего выделения Shift Добавление к существующему выделению Ctrl Вычитание из существующего выделения Shift+Ctrl Пересечение с существующим выделением -
 Выделенная область в контур
-
Нажатие этой кнопки при нажатой Shift вызывает диалог расширенных параметров, позволяющий настроить преобразование выделения в контур.
-
 Рисовать по контурам
-
См. раздел Обвести по контуру. Удержание клавиши Shift обводит контуры исходя из последних использованных значений, не открывая диалоговое окно «Обвести по контуру».
-
 Удалить контур
-
С помощью этой кнопки можно удалить выбранный контур.
-
Это меню вызывается нажатием правой кнопкой мыши на любой строке контура в диалоге. Кроме того, это меню можно открыть, воспользовавшись меню вкладок диалога контуров (самый первый пункт, «Меню контуров»). С помощью этого меню осуществляется доступ к большинству операций с контурами.
- Изменить контур
-
Изменить контур — это альтернативный способ активировать
- Правка атрибутов контура
-
При выборе этого пункта меню открывается диалог, в котором можно изменить имя контура. Имя контура можно также изменить, дважды щёлкнув на нем в окне диалога контуров.
- Цветовые метки
-
Цветовые метки вызывает подменю, подобное тому, что находится в диалоговом окне слоёв, которое позволяет выбрать цветовую метку для выбранных контуров.
- Создать контур
-
Создать контур создаёт новый контур, добавляет его в список в диалоговом окне «Контуры» и делает его активным контуром для изображения. При этом появляется диалог, позволяющий задать имя контуру. Новый контур создаётся без опорных точек, поэтому вам будет необходимо использовать инструмент «Контур», чтобы задать для него опорные точки, прежде чем использовать его.
- Поднять контур
-
Поднять контур перемещает выбранные контуры на один слот выше в списке диалогового окна «Контуры».
Положение контура в списке не имеет функционального значения, так что это просто удобно для сохранения порядка.
- Опустить контур
-
Опустить контур перемещает выбранные контуры на один слот ниже в списке диалогового окна «Контуры».
Положение контура в списке не имеет функционального значения, так что это просто удобно для сохранения порядка.
- Создать копию контура
-
Создать копию контура создаёт копию выбранных контуров, присваивает им уникальные имена, добавляет их в список в диалоговом окне «Контуры» и делает их выбранными контурами для изображения. Копии будут видны только в том случае, если были видны оригинальные контуры.
- Удалить контур
-
С помощью этой кнопки можно удалить выбранный контур.
- Объединить видимые контуры
-
Эта функция объединяет все видимые на данный момент контуры в один. Подобное действие может понадобиться, например, в том случае, если вы хотите обвести все контуры с одинаковыми параметрами обводки.
- Контуры в выделение, Добавить контуры к выделению, Вычесть контуры из выделения, Пересечь контуры с выделением
-
Все эти команды преобразуют активные контуры в выделение, а затем объединяют его с существующим выделением указанными способами. (Контуры в выделение отбрасывает существующее выделение и заменяет его выделением, сформированным из контура). При необходимости все незамкнутые компоненты контура замыкаются путём соединения последней опорной точки с первой опорной точкой прямой линией. «Муравьиная дорожка» для получаемого выделения должна точно соответствовать контуру, но не ожидайте идеального соответствия.
- Выделенная область в контур
-
Эту функцию можно вызвать несколькими способами:
-
Из главного меню: →
-
Из меню диалога контуров: .
-
С помощью кнопки Выделение в контур
в нижней части диалогового окна «Контуры».
Выделение в контур создаёт новый контур из выделения изображения. В большинстве случаев получаемый контур будет близко соответствовать «муравьиной дорожке» выделения, но, как правило, соответствие не будет идеальным.
Преобразование двумерной маски выделения в одномерный контур включает в себя несколько довольно хитрых алгоритмов: вы можете изменить способ, которым это делается, с помощью расширенных параметров, доступ к которым осуществляется путём удерживая нажатой клавишу Shift при нажатии кнопки Выделение в контур
в нижней части диалогового окна «Контуры». Это вызовет окно дополнительных параметров, которое позволяет установить множество различных параметров. В общем, Выделение в контур будет делать то, что вы от него ожидаете, без необходимости настраивать дополнительные параметры. -
- Залить контуры
-
Эту функцию можно вызвать несколькими способами:
-
Из главного меню: →
-
Из меню диалога «Контуры»: .
-
С помощью кнопки Залить контуры, которая находится в диалоге параметров для инструмента «Контур».
Залить контуры заполняет все области, ограниченные выбранными контурами, текущим цветом переднего плана или текущей выбранной текстурой. См. раздел о
-
- Обвести по контуру…
-
Эту функцию можно вызвать несколькими способами:
-
Из главного меню: → .
-
Из меню диалога «Контуры»: .
-
С помощью кнопки Рисовать по контурам
в нижней части диалога «Контуры». -
С помощью кнопки Обвести по контуру, которая находится в диалоге параметров для инструмента «Контуры».
Обвести по контуру отображает выбранные контуры на активном слое изображения, позволяя использовать широкий спектр стилей линий и вариантов обводки. См. разделы об
-
- Скопировать контуры
-
Скопировать контуры копирует выбранные контуры в буфер обмена, что позволяет вставить их в другое изображение.
![[Подсказка]](images/tip.png)
Подсказка Также можно копировать и вставлять контуры, перетаскивая их значок из диалогового окна «Контуры» в область целевого изображения.
![[Примечание]](images/note.png)
Примечание При копировании контура в изображение он не виден. Его можно сделать видимым в диалоге контуров.
- Вставить контур
-
Вставить контур создаёт новый контур из содержимого буфера обмена, добавляет его в список в диалоговом окне «Контуры» и делает его активным контуром для изображения. Если ранее в буфер обмена не был скопирован ни один контур, этот пункт меню будет неактивен.
- Экспортировать контур
-
Экспортировать контур... позволяет сохранить контур в файл: откроется диалог сохранения файла, в котором можно указать имя и местоположение файла. Впоследствии вы можете добавить этот контур к любому изображению GIMP с помощью функции Импортировать путь. Форматом, используемым для сохранения контуров, является SVG: это означает, что программы векторной графики, такие как Inkscape, также смогут импортировать сохраняемые вами контуры. См. раздел
- Импортировать контур
-
Импортировать контур... создаёт новый контур из файла SVG: появляется диалог выбора файла, позволяющий перейти к нему. См. раздел


