In this section, you will learn how to create simple objects in GIMP.
Ας ξεκινήσουμε σχεδιάζοντας μια ευθεία γραμμή. Ο πιο απλός τρόπος για δημιουργία μιας ευθείας γραμμής είναι χρησιμοποιώντας το αγαπημένο σας πινέλο, το ποντίκι και το πληκτρολόγιο.
-
Create a New Image
Create a new image.
-
Choose a Tool
Select a brush tool from the Toolbox, for example the
 Pencil tool or the
 Paintbrush tool.
-
Select a Color
Select a foreground color, but be sure that the foreground and background colors are different.
-
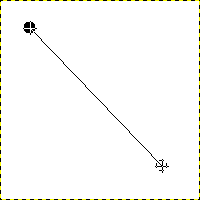
Create a Starting Point
Σχήμα 7.32. Η αρχή της ευθείας γραμμής

Ο διάλογος εμφανίζει μια νέα εικόνα, με την πρώτη κουκκίδα που δείχνει την αρχή της ευθείας γραμμής. Η κουκκίδα έχει μαύρο χρώμα προσκηνίου.
The size of this dot represents the current brush size, which you can change in the Brush Dialog.
Δημιουργείστε ένα αρχικό σημείο πατώντας στην περιοχή εμφάνιση εικόνας με το πλήκτρο του αριστερού ποντικιού. Ο καμβάς θα πρέπει να δείχνει παρόμοιος με Σχήμα 7.31, «Νέα εικόνα».
-
Draw the Line
Σχήμα 7.33. Η γραμμή βοήθειας
Το στιγμιότυπο εμφανίζει τη γραμμή βοήθειας που δείχνει πώς θα φαίνεται η τελική γραμμή.
Now, hold down the
 Shift key on your
keyboard and move the mouse away from the starting point you
created. You'll see a thin line indicating how the line will
look.
Shift key on your
keyboard and move the mouse away from the starting point you
created. You'll see a thin line indicating how the line will
look.
-
Finish the Line
Σχήμα 7.34. Η γραμμή μετά το δεύτερο κλικ

Η δημιουργημένη γραμμή εμφανίζεται στο παράθυρο εικόνας μετά τη σχεδίαση του δεύτερου (ή τελικού) σημείου, ενώ το πλήκτρο Shift είναι ακόμα πατημένο.
If you're satisfied with the direction and length of the line, click the left mouse button again to finish the line. The last step is to let go of the Shift key. GIMP displays a straight line now.

Σχήμα 7.35. Example I
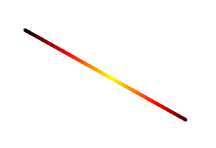
Set Dynamics to «Color From Gradient» and set Color Options to «Incandescent». Under Fade Options, set Repeat to «Truncate». Depending on the size of your underlying image, you might want to change the Fade length as well.

Select the Clone tool and set the source to «Maple Leaves» pattern.
Σχήμα 7.36. Example II
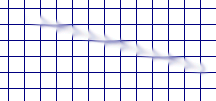
Use → → → to create a grid. Use the Smudge Tool to draw a line with a slightly larger brush.
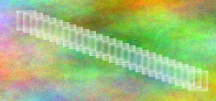
Use → → → to create the cool plasma cloud. Use the Erase Tool with a square brush to draw a line.
Σχήμα 7.37. Example III

Use the rectangle select tool to select a rectangle, and then fill the selection with a light blue color. Select the Dodge/Burn tool. Set the type to Dodge and paint along the top and left side using an appropriately sized brush. Set the type to Burn and paint along the right and bottom.


