De efterfølgende dialoger lader dig kontrollere og manipulere billedstrukturer såsom lag, kanaler eller kurver.
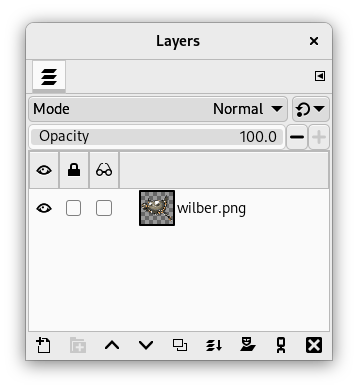
Dialogen “Lag” er hovedgrænsefladen til at redigere, ændre og administrere dine lag.
Dialogen kan dokkes. Se hvordan i afsnittet Afsnit 2.3, “Dialoger og dokning”.
Du kan tilgå den:
-
gennem hovedmenuen: → →
-
fra fanebladsmenuen i enhver dokbar dialog ved at klikke på fanebladsmenuknappen
 og vælge →
 -
eller med tastaturgenvejen Ctrl+L.
I menuen er der en liste over frigjorte vinduer, som kun findes, hvis mindst én dialog forbliver åben. I dette tilfælde kan du åbne dialogen “Lag” i hovedmenuen: → .
- Overblik
-
Hvert lag vises i dialogen i form af en miniature. Når et billede har flere lag som komponenter, vises de som en liste. Det øverste lag på listen er det første synlige, og det nederste lag er det sidste synlige (baggrunden). Oven over listen kan man finde egenskaber, der er relateret individuelt til hvert lag. Under listen kan man finde knapper til håndtering af laglisten. Et højreklik på en lagminiature åbner lagets genvejsmenu.
- Vælg flere lag
-
GIMP giver dig mulighed for at vælge flere lag og udføre handlinger på dem. Du kan f.eks. flytte dem til en anden placering i lagstakken, skalere dem osv. Man vælger flere lag ved at bruge musen og Skift for at tilføje en række lag eller Ctrl for at tilføje eller fjerne det lag, man har klikket på.
Vær opmærksom på, at visse handlinger kun kan udføres på et enkelt lag. Hvis du prøver at bruge en sådan handling, f.eks. med penslen, kommer der en advarsel om, at det ikke kan lade sig gøre, og at du er nødt til at vælge et enkelt lag.
- Laglistens overskriftslinje
-
Lige over laglisten er overskriftslinjen. Til venstre er der tre ikoner, som viser, hvilken kolonne der bruges til synlighed, lås og lagereffekter. I midten fortæller en tekstetiket, hvor mange lag der er valgt i øjeblikket, hvis det er mere end ét. Til højre ser du et søgeikon. Hvis du klikker på det, åbnes en søgedialog, hvor du kan søge efter lag.
-
 Søg efter lag og gemte søgninger
-
Det kan være nyttigt at søge efter lag, hvis du har mange lag i dit projekt. Så snart du begynder at skrive i søgefeltet, vil den begynde at finde lag, der matcher din søgning, og vælge dem. Flere lag vil blive valgt, hvis de alle matcher.
Under søgefeltet ser du et plus-ikon. Hvis du klikker på det, kan du tilføje den aktuelle søgning som et nyt navngivet sæt. Denne søgning og tidligere definerede søgninger vises under søgefeltet. Hvis du klikker på en af disse gemte søgninger, vælges alle de lag, der matcher søgeordet. Hver gemte søgning har et lukke-ikon i højre hjørne, som kan bruges til at fjerne den gemte søgning.
-
- Lagegenskaber
-
Hvert lag vises i listen med dets egne egenskaber:
-
 Synlighed af laget
-
Ved at klikke på ikonet skifter du, om laget er synligt eller ej. (Skift-klik på ikonet får alle andre lag på samme niveau til at blive vist eller skjult på skift. Alt-klik på ikonet får alle andre markerede lag på samme niveau til at blive vist eller skjult på skift).
-
 Lås
Lås
-
Ved at klikke på det tomme afkrydsningsfelt i låsekolonnen for et lag åbnes en menu med følgende muligheder. (Skift-klik på et ikon får alle andre lag på samme niveau til at blive låst eller låst op på skift. Alt-klik på et ikon får alle andre markerede lag på samme niveau til at blive låst eller låst op på skift).
-
 Lås pixels
-
Når knappen er aktiveret, kan du ikke bruge noget penselbaseret værktøj (Pensel, Blyant, Viskelæder osv.), Airbrush- eller Blæk-værktøjet på det valgte lag. På den måde kan de beskyttes mod uønskede ændringer.
-
 Lås placering og størrelse
-
Denne knap aktiverer og deaktiverer beskyttelse af lag mod at blive flyttet eller transformeret. Når knappen er aktiveret, kan du ikke bruge noget transformeringsværktøj (Rotation, Vridning, Perspektiv og andre) eller flytte det.
-
 Lås synlighed
-
Denne knap styrer indstillingen “Lås” for lagets synlighed. Hvis den er aktiveret, kan lagets synlighed ikke ændres, førend låsen er deaktiveret.
-
 Lås alfakanal
-
Denne knap styrer indstillingen “Lås” for lagets gennemsigtighed. Hvis den er aktiveret, er lagets alfakanal låst, og ingen manipulation har nogen effekt på den. Især vil intet, du gør ved en gennemsigtig del af laget, have nogen effekt.
Figur 15.2. Eksempel på låst alfakanal

Det aktive lag har tre vandrette, uigennemsigtige, grønne striber på en gennemsigtig baggrund. Vi maler en lodret rød stribe. “Lås” ikke markeret: Uigennemsigtige og gennemsigtige områder af det aktive lag males med rødt.

“Lås” aktiveret: Kun uigennemsigtige områder af det aktive lag males med rødt. Gennemsigtige områder bevares.
![[Vink]](images/tip.png)
Vink Hvis lagets navn i dialogen Lag er skrevet med fed skrift, har dette lag ingen alfakanal.
-
-
 Lageffekter
-
Når dette ikon er synligt, er der lageffekter til stede for dette lag. Hvis du klikker på det, åbnes en dialog, hvor du kan se en liste over alle effekter, der er føjet til dette lag. For hver effekt kan du ændre synligheden, rækkefølgen af effekterne, flette alle effekter med laget eller fjerne dem.
Lageffekter er filtre, der ændrer laget ikkedestruktivt, dvs. at de kan tilføjes, fjernes eller ændres uden at ændre selve laget. De tilføjer i stedet effekter oven på laget.
See Using Layer Effects for more details.
Mange af GEGL-filtrene i menuerne Farver og Filtre kan bruges på denne måde. Dialogen Lageffekt består af følgende dele:
- Liste over lageffekter
-
Øverst er der en liste over alle lageffekter, som er blevet tilføjet til dette lag. Bemærk, at effekterne anvendes oven på laget, idet der startes med effekten nederst på listen.
Til venstre for hver effekt er der et øjeikon, som du kan klikke på for at skjule eller vise den specifikke effekt. Ved siden af er ikonet for filtereffekt.
- Knapper
-
Knapbjælken i bunden tilbyder følgende funktioner:
-
Lageffekters synlighed
-
Denne knap styrer indstillingen af “synlighed” for alle lagets effekter. Som standard er alle effekter synlige. Hvis du klikker på den, skjules effekterne, så du kan se lagets faktiske pixelindhold.
-
 Redigér det valgte filter
-
Med denne knap kan du åbne dialogen for den valgte lageffekt og foretage ændringer i dens indstillinger. Alternativt kan du også dobbeltklikke på lageffekten på listen for at åbne dialogen.
-
 Hæv lageffekt
-
Her kan du flytte lageffekten op på listen.
-
 Sænk lageffekt
-
Her kan du flytte lageffekten ned på listen.
-
 Sammenlæg alle aktve filtre
-
Med denne knap kan du sammenlægge alle aktive (synlige) lageffekter med lagets indhold. Dette fjerner lageffekterne fra laget, efter at effekterne er blevet anvendt på laget.
-
 Fjern det valgte filter
-
Denne knap fjerner den valgte lageffekt.
-
- Lagminiature
-
Lagets indhold repræsenteres af en miniature. Hvis du holder venstre museknap nede i et sekund på miniaturen, bliver det større. Farven på lagets kant afhænger af, om laget er aktivt eller inaktivt.
- Lagnavn
-
Du kan ændre lagets navne ved at dobbeltklikke på det. Du kan også bruge dialogen “Redigér lagegenskaber”, som du finder i den genvejsmenu, du får ved at højreklikke på laget.
![[Bemærk]](images/note.png)
Bemærk Når man arbejder på en animation, kan lagets navn bruges til at angive visse parametre. Se eksport af animationer for flere oplysninger.
-
- Lagkarakteristika
-
Over laglisten er det muligt at angive nogle egenskaber for de valgte lag. De aktive lag er fremhævet. Egenskaberne er:
- Tilstand
-
Lagtilstanden bestemmer, hvordan laget interagerer med de andre lag. I kombinationsboksen får du adgang til alle de tilstande, som GIMP tilbyder. Lagtilstandene er udførligt beskrevet i Afsnit 2, “Lagtilstande”.
- Uigennemsigtighed
-
Ved at flytte skyderen bliver laget mere eller mindre uigennemsigtigt. Med en værdi på 0 er laget gennemsigtigt og helt usynligt. Forveksl ikke dette med en lagmaske, som indstiller gennemsigtigheden pixel for pixel.
- Håndtering af lag
-
Under laglisten er der et sæt knapper, som giver dig mulighed for at udføre nogle grundlæggende handlinger på laglisten.
-
 Opret nyt lag
-
Her kan du oprette et nyt lag. Der åbnes en dialog, som er beskrevet i Nyt lag.
Tryk på tasten Skift for at åbne et nyt lag med de sidst anvendte værdier.
-
 Opret ny laggruppe
-
Her kan du oprette en ny laggruppe. Der oprettes et nyt lag, hvor du kan lægge lag ind i.
Laggrupper er beskrevet i Laggrupper.
-
Hæv lag
-
Her kan du flytte laget et niveau op på listen. Tryk på tasten Skift for at flytte laget til toppen af listen.
-
Sænk lag
-
Her kan du flytte laget et niveau ned på listen. Tryk på tasten Skift for at flytte laget til bunden af listen.
Vink For at flytte et lag nederst på listen kan det være nødvendigt først at tilføje en gennemsigtighedskanal (også kaldet alfakanal) til baggrundslaget. For at gøre dette skal du højreklikke på baggrundslaget og vælge Tilføj alfakanal i menuen.
-
 Duplikér lag
-
Her kan du oprette en kopi af de valgte lag. Navnet på det nye lag er efterfulgt af “kopi”.
-
Sammenlæg lag
 Forankr lag
-
Knappen er kun synlig, når der er en flydende markering. Den forankrer den flydende markering til det forrige aktive lag.
Når der ikke er nogen flydende markering, vises -ikonet
med flere muligheder: -
Læg disse lag sammen med det første synlige underliggende lag.
-
Tryk på Skift: Læg laggruppens lag sammen til ét normalt lag.
-
Tryk på Ctrl: Læg alle synlige lag sammen til ét lag.
-
Tryk på Skift+Ctrl: Læg alle synlige lag sammen med de sidst anvendte værdier.
-
-
 Tilføj masker til lag
-
Tilføj masker til markerede lag.
-
Slet lag
-
Her kan du slette de valgte lag.
-
- Funktioner til flytning af lag
-
Andre funktioner vedrørende lagstørrelse er tilgængelige i Lagets genvejsmenu, som du får ved at højreklikke på dialogen Lag. Du kan også finde dem i undermenuen i hovedmenuen.
Du finder funktioner til sammenlægning af lag i billedets hovedmenu.
- Klik-og-træk lag
-
Klik og hold på lagets miniature eller dets navn: Miniaturen forstørres, og du kan flytte den ved at trække med musen. Det er også muligt at vælge flere lag og flytte dem.
-
Så du kan placere dette eller disse lag et andet sted i laglisten.
-
Du kan også slippe laget i Værktøjskassen: Der oprettes et nyt billede, som kun indeholder dette lag. Det virker ikke, hvis flere lag er valgt.
-
Endelig kan du slippe laget på et andet billede: Dette lag vil blive føjet til laglisten oven over eksisterende lag.
-
Ved at højreklikke i dialogen Lag, eller ved at åbne i fanebladsmenuen, åbnes en genvejsmenu for dialogen Lag.
De fleste kommandoer i denne menu er allerede blevet dokumenteret ovenfor eller andre steder:
- Redigér lagegenskaber …
-
Bortset fra Bredde, Højde og Udfyld med er denne dialog den samme som Nyt lag. For information om lagegenskaberne henviser vi derfor til dokumentationen for denne dialog.
- Undermenuen Blanderum
-
Se Blanderum i dialogen Nyt lag.
- Undermenuen Sammensætningsrum
-
Se Sammensætningsrum i dialogen Nyt lag.
- Undermenuen Sammensætningstilstand
-
Se Sammensætningstilstand i dialogen Nyt lag.
- Undermenuen Farvemærkater
-
Se Farvemærkat i dialogen Nyt lag.
- Nyt lag …, Ny laggruppe, Duplikér lag, Sammenlæg nedad, Forankr lag, Slet lag
-
Disse kommandoer er forklaret ovenfor, se lagegenskaber.
- Nyt fra synlig
-
Se dokumentationen til menukommandoen Nyt fra synlig.
- Lagets kantstørrelse …
-
Se dokumentationen til menukommandoen Lagets kantstørrelse ….
- Lag til billedstørrelse
-
Se dokumentationen til menukommandoen Lag til billedstørrelse.
- Skalér lag …
-
Se dokumentationen til menukommandoen Skalér lag ….
- Tilføj lagmasker …, Anvend lagmasker, Slet lagmasker, Vis lagmasker, Redigér lagmaske, Deaktivér lagmasker, Masker til markering
-
Se dokumentationen til undermenuen Lagmaske.
- Tilføj alfakanal, Fjern alfakanal
-
Kun én af disse vil være aktiveret. Hvis det aktuelle lag ikke har en alfakanal, kan du tilføje en. Hvis det har, kan du fjerne alfakanalen.
- Alfa til markering
-
Se dokumentationen til menukommandoen Alfa til markering.
- Sammenlæg synlige lag
-
Denne kommando lægger alle synlige lag sammen til ét lag.
- Sammenlæg billedets lag (fjern gennemsigtighed)
-
Denne kommando lægger alle lag sammen til ét lag og fjerner gennemsigtigheden.
- Overblik
-
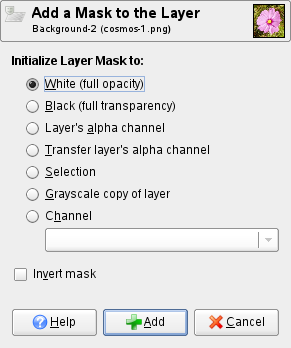
Der kan tilføjes en gennemsigtighedsmaske til hvert lag, som definerer, hvilke dele af laget der er gennemsigtige eller uigennemsigtige. Vi kalder dette en lagmaske. En lagmaske har samme størrelse og samme antal pixels som det lag, den er knyttet til. Hver pixel i masken kan så kobles sammen med en pixel på samme sted i laget. Masken er et sæt pixels i gråtoner. Pixlerne med værdien 0 er sorte og giver fuld gennemsigtighed til den koblede pixel i laget. Pixlerne med den maksimale værdi (enten 1,0 eller 255) er hvide og giver fuld uigennemsigtighed til den koblede pixel i laget.
For at oprette en lagmaske skal du højreklikke på laget for at åbne genvejsmenuen og vælge i menuen. En dialog vises, hvor du kan initialisere maskens indhold:
-
Hvid (fuld gennemsigtighed): Masken er hvid i dialogen Lag. Så alle lagets pixels er synlige i billedvinduet, da det at male masken med hvid gør lagets pixels fuldt synlige. Du skal male med sort for at gøre lagets pixels gennemsigtige.
-
Sort (fuld gennemsigtighed): Masken er sort i dialogen Lag. Så laget er helt gennemsigtigt, da det at male masken med sort gør lagets pixels gennemsigtige. Hvis du maler med hvid, fjernes masken, og lagets pixels bliver synlige.
-
Lagets alfakanal: Masken initialiseres i henhold til indholdet af lagets alfakanal.
-
Overfør lagets alfakanal: Gør det samme som den forrige mulighed, bortset fra at den også nulstiller lagets alfakanal til fuld uigennemsigtighed.
-
Markering: Masken initialiseres i henhold til de pixelværdier, der findes i den aktuelle markering.
-
Gråtonekopi af lag: Masken initialiseres i henhold til en gråtonerepræsentation af lagets pixelværdier.
-
Kanal: Lagmasken initialiseres med en markeringsmaske, du har oprettet tidligere, og som er gemt i dialogen Kanaler.
-
Invertér maske: Dette afkrydsningsfelt giver dig mulighed for at invertere masken: sort bliver til hvid, og hvid bliver til sort.
Når masken er oprettet, vises den som en miniature ved siden af selve laget. Du kan vælge laget eller masken til redigering ved at klikke på deres respektive miniaturer. Det aktive element har en hvid kant (som måske ikke er helt synlig, når du har en hvid maske).
Når du arbejder med masker, er det en god idé at holde dialogen Lag synlig, fordi du ikke kan se på lærredet, om laget eller masken er aktiv.
Hvis du trykker på Alt (eller Ctrl+Alt og klikker på lagmaskens miniature), svarer det til kommandoen Vis lagmaske: Lagmaskens kant bliver grøn. Hvis du trykker på Ctrl, bliver kanten rød, og resultatet svarer til kommandoen Deaktivér lagmaske. For at vende tilbage til normal visning skal du gentage den sidste handling. Disse muligheder er til for at gøre dit arbejde mere bekvemt.
-
- Eksempel på lagmaske
-
Figur 15.4. Et lag med lagmaske

Original image.

This image has a background layer with a flower and another blue layer, fully opaque. A white layer mask has been added to the blue layer. The blue layer remains visible because a white mask makes layer pixels visible.
Figur 15.5. Mal lagmasken

Foreground color set to black; Resulting image.

The layer mask is active. Painting with black makes the layer transparent: the underlying layer becomes visible.


