The “Brushes” dialog is used to select and manage brushes. These brushes are used by the Paintbrush, Pencil and Airbrush tools. The MyPaint Brush uses its own kind of brushes. GIMP comes with a wide selection of brushes and more can be added easily. You can also create custom brushes using the Brush Editor, or by exporting an image as a brush.
See the Brushes section for basic information on brushes and how they are used in GIMP.
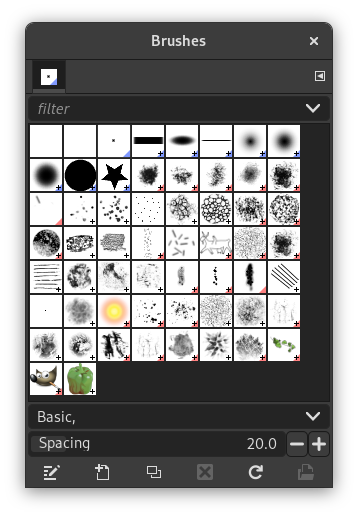
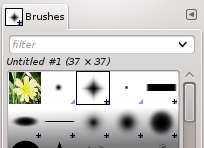
There can be only one brush active at any time. To make a brush active, select it in the list or grid. The name of the currently active brush is shown directly above the list of brushes. The active brush can also be recognized by a selection rectangle around the preview (which can sometimes be difficult to see, depending on your theme). The size, angle, spacing and several other characteristics of a brush can be set in the Tool Options Dialog when one of the relevant paint tools is active.
Este diálogo es un diálogo acoplable; consulte la Sección 2.3, “Diálogos y acoplables” para obtener ayuda sobre su uso.
-
From the main menu select → → .
-
From the Tab menu in any dockable dialog click the tab menu button
 and select
→ .
and select
→ .
-
If you enabled the “Show active brush, pattern & gradient” option in the Toolbox Preferences, you can click on the active brush icon in the Brush, Pattern, Gradient area.
-
From the Tool Options dialog for the Paintbrush, Pencil and Airbrush tools, by clicking on the Brush icon button. This opens a popup with similar functionality that allows you to quickly choose a brush from the list. To open the actual brush dialog click on the button at the bottom right corner of the popup.
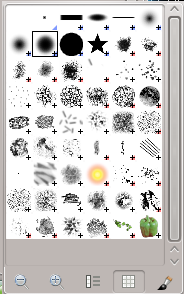
El diálogo “Pinceles” simplificado
The button bar at the bottom offers the following functionality:
-
 Smaller previews
-
 Larger previews
-
 View as list
-
 View as grid
-
 Open the brush selection dialog
Note that, depending on your Preferences, a brush selected with the popup may only apply to the currently active tool, not to other paint tools. See the Paint Options Shared Between Tools section in the Tool Options Preferences for more information.
-
In the Tab menu, you can choose between and . In Grid mode, the brush shapes are laid out in a rectangular array, making it easy to see many at once and find the one you are looking for. In List mode, the shapes are lined up in a list, with the names beside them.
In the Tab menu, the option Preview Size allows you to adjust the size of brush previews to your liking.
- Modo rejilla
-
En la parte superior del diálogo aparece el nombre del pincel seleccionado actualmente, y su tamaño en píxeles.
En el centro aparece una vista en rejilla de todos los pinceles disponibles, con el seleccionado actualmente remarcado.
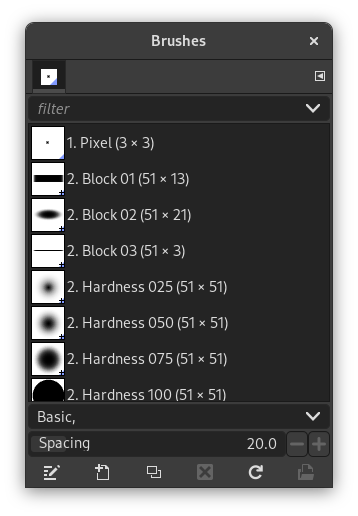
- Modo de lista
-
En su mayoría, el diálogo trabaja de la misma manera en modo de lista que en modo de rejilla, con una excepción:
Si hace una doble pulsación sobre el nombre de un pincel, puede editarlo. Tenga en cuenta, sin embargo, que sólo se le permite cambiar los nombres de los pinceles que haya creado o instalado personalmente, no los que vienen preinstalados con GIMP. Si intenta renombrar un pincel preinstalado, podrá editar su nombre, pero tan pronto como presione «Intro» o en otro lugar, el nombre volverá a su valor original. Como regla general, no puede alterar los recursos que GIMP proporciona: pinceles, patrones, degradados, etc; sólo los que ha creado.
When you click on a brush preview, it becomes the active brush that will be used when using one of the relevant painting tools. Double-clicking a brush preview, activates the Brush Editor.
Brushes can be managed in several ways using the buttons at the bottom of the dialog or the right-click context menu.
Meaning of the symbols at the bottom right corner of a brush preview
-
A plus sign indicates that the brush preview is shown at a reduced size. To preview the normal size, left click and hold the preview.
-
A blue corner indicates the brush is a parametric brush, created with the Brush Editor.
-
A red corner indicates this is an animated brush. To preview the animation, left click and hold the preview.
On the right side, next to the filter selection, there is a
![]() Use theme colors for preview button.
Use theme colors for preview button.
By default, brushes and fonts show a white background for each preview. If you prefer the background to be more in line with your theme, you can toggle that by clicking this button. GIMP will then use the background color as set by your theme.
The “filter” drop-down allows you to select one or more tags to filter and reduce the number of brushes shown. The “tags” can be managed below the preview area. For more information on tagging see Sección 3.7, “Etiquetado”.
Este deslizador le permite establecer la distancia entre las marcas consecutivas del pincel cuando traza una pincelada con el puntero del ratón. El espaciado es un porcentaje de la anchura del pincel.
The button bar at the bottom offers the following functionality:
-
 Editar el pincel
-
This activates the Brush Editor. Pressing the button will open the Editor for any brush. It only works, however, for parametric brushes, which can be recognized by the blue bottom right corner in the preview. For other types of brushes the Editor will show you a preview, but not allow you to make any changes.
-
 Pincel nuevo
-
This creates a new parametric brush, initializes it with a small fuzzy round shape, and opens the Brush Editor so that you can modify it. The new brush is automatically saved in your personal Brushes Folder.
-
 Duplicar el pincel
-
This button is only enabled if the currently selected brush is a parametric brush. If so, the brush is duplicated, and the Brush Editor is opened so that you can modify the copy. The result is automatically saved in your personal Brushes Folder.
-
 Eliminar el pincel
-
This option is active for parametric brushes only. This removes all traces of the brush, both from the dialog and the folder where its file is stored, if you have permission to do so. It asks for confirmation before doing anything. The brushes that come with GIMP can not be removed.
-
 Actualizar los pinceles
-
If you add brushes to your personal Brushes Folder or any other folder in your brush search path, by some means other than the Brush Editor, this button causes the list to be reloaded, so that the new entries will be available in the dialog.
-
 Abrir un pincel como una imagen
-
Clicking this, opens the selected brush as a regular image that you can edit. It can be turned back into a brush by copying it and selecting → → , or by exporting it as a brush. This is different from Sección 3.2.3, “Editor de pinceles” that allows you to modify an existing parametric brush.
The functions performed by these buttons can also be accessed from the dialog pop-up menu, activated by right-clicking anywhere in the brush grid/list, or by choosing the top item, , from the tab menu.
Right clicking on a brush preview opens a context menu. Most of the commands of this submenu are described with the Buttons, except for the following.
- Copy Brush Location
-
Copy Brush Location allows you to copy the brush path to the clipboard. After that you can use the → , command, to open the brush as a new image.
- Mostrar en el gestor de archivos
-
Show in File Manager opens the location of the brush in the default File Manager on your system.
- Elliptical, Feathered…, Elliptical…, Rectangular, Feathered…, Rectangular…
-
Options to create elliptical and rectangular brushes. These brushes can be feathered, but they are not parametric brushes.
Figura 15.27. El diálogo del editor de “Pinceles”
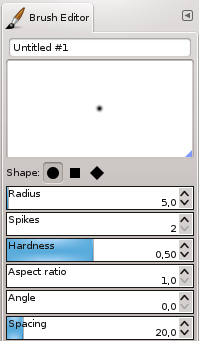
El editor de pinceles, activado para un pincel nuevo.
El editor de pinceles le permite ver los parámetros de un pincel proporcionado por GIMP, y que no puede cambiar. También puede crear un pincel personalizado: pulse en el botón Pincel nuevo para activar las funciones del editor de pinceles; puede seleccionar una forma geométrica, un círculo, un cuadrado, un diamante. Este editor tiene varios elementos:
The dialog bar:
As with all dialog windows, the
tab menu button
![]() opens a menu allowing you to access and set further related options.
opens a menu allowing you to access and set further related options.
La barra de título: para darle un nombre a su pincel.
El área de previsualización: muestra los cambios del pincel en tiempo real.
Ajustes:
- Forma
-
Están disponibles un círculo, un cuadrado y un diamante. Puede modificarlas con las siguientes opciones:
- Radio
-
Es la distancia entre el centro y su borde, en dirección horizontal. Un cuadrado con un radio de 10 píxeles tendrá un lado de 20 píxeles. Un diamante con un radio de 5 píxeles tendrá un ancho de 10 píxeles.
- Púas
-
Este parámetro es útil sólo para las formas cuadrada y diamante. Si se aumentan las púas de un cuadrado éste se convierte en un polígono. Si se hace lo mismo con un diamante se obtiene una estrella.
- Dureza
-
Este parámetro controla el difuminado de los bordes del pincel. Un valor = 1.00 da un pincel con un borde duro (0.00-1.00).
- Proporción de aspecto
-
Este parámetro controla la proporción anchura/altura del pincel. Un diamante con 5 píxeles de radio y una proporción de aspecto = 2, se aplanará con una anchura de 10 píxeles y una altura de 5 píxeles (1.0-20.0).
- Ángulo
-
This angle is the angle between the brush width direction, which is normally horizontal, and the horizontal direction, clock-wise. When this value increases, the brush width turns clock-wise (0° to 180°).
- Espaciado
-
Cuando el pincel dibuja una línea, en realidad se estampa el icono del pincel repetidamente. Si las estampas del pincel están muy próximas, le da la impresión de una línea sólida: lo obtiene con un espaciado = 1 (1.00 a 200.0).
The Brush Editor has a context menu that can be opened with the
tab menu button
![]() and then choosing
. It only has one option.
and then choosing
. It only has one option.
Cuando usa el comando copiar o cortar sobre una imagen o una selección de ella, aparece una copia como un pincel nuevo en la esquina superior izquierda del diálogo de “Pinceles”. Este pincel persistirá hasta que use el comando copiar otra vez. Desaparece al cerrar GIMP.
![[Nota]](images/note.png)
|
Nota |
|---|---|
|
You can save this clipboard brush with → → as soon as it appears in the “Brushes” dialog. See Sección 3.10.8, “Pegar como pincel nuevo”. |


