This command pastes the clipboard contents. Of course, you must use the “Copy” command before, so that you have something in the clipboard.
There is no way to empty the clipboard.
The submenu offers several ways to paste the clipboard contents:
The command creates a new layer in the active image and pastes the clipboard contents into it.
If the data are not rectangular or square in shape, any regions that do not extend to the edge of the canvas are left transparent (an Alpha channel is automatically created). Of course, you have to copy your selection before you use this command.
The command creates a new layer in the active image and pastes the clipboard contents at exact coordinates the contents was originally copied from.
Esta función está disponible tanto para el portapapeles normal como para los búferes con nombre.
El comando crea una nueva imagen y pega los datos de la papelera sobre ella. Si estos datos no tienen forma rectangular ni cuadrada, las regiones que no se extienden hasta el borde del lienzo se dejan transparentes (se crea un canal alfa automáticamente). Por supuesto, tiene que copiar su selección antes de emplear este comando, y así obtener una imagen con las dimensiones justas para contener a la selección.
Este comando tiene el mismo efecto que el comando: → → .
The command creates a floating selection in the active image and pastes the clipboard contents into it.
If the data are not rectangular or square in shape, any regions that do not extend to the edge of the canvas are left transparent (an Alpha channel is automatically created). Of course, you have to copy your selection before you use this command.
![[Nota]](images/note.png)
|
Nota |
|---|---|
|
Sólo puede tener una selección flotante a la vez. No puede trabajar con otra capa mientras hay una selección flotante; tiene que anclarla o quitarla. |
The command creates a floating selection in the active image and pastes the clipboard contents into it at the exact location the contents was originally copied from.
If the data are not rectangular or square in shape, any regions that do not extend to the edge of the canvas are left transparent (an Alpha channel is automatically created). Of course, you have to copy your selection before you use this command.
![[Nota]](images/note.png)
|
Nota |
|---|---|
|
Sólo puede tener una selección flotante a la vez. No puede trabajar con otra capa mientras hay una selección flotante; tiene que anclarla o quitarla. |
The command replaces the contents of the current selection with the contents of the clipboard and turns it into a floating selection.
The clipboard data is clipped by the selection, but the image data in it can still be moved if it extends outside the selection.
If no selection exists, the “Paste as Floating Data Into Selection” command places the data from the clipboard into the center of the canvas, as the “Paste” command does.
![[Nota]](images/note.png)
|
Nota |
|---|---|
|
Sólo puede tener una selección flotante a la vez. No puede trabajar con otra capa mientras hay una selección flotante; tiene que anclarla o quitarla. |
The command replaces the contents of the current selection with the contents of the clipboard, at the exact coordinates the contents was originally copied from, and turns it into a floating selection.
The clipboard data is clipped by the selection, but the image data in it can still be moved if it extends outside the selection.
If no selection exists, the “Paste as Floating Data Into Selection In Place” command places the data from the clipboard into the center of the canvas, as the “Paste” command does.
![[Nota]](images/note.png)
|
Nota |
|---|---|
|
Sólo puede tener una selección flotante a la vez. No puede trabajar con otra capa mientras hay una selección flotante; tiene que anclarla o quitarla. |
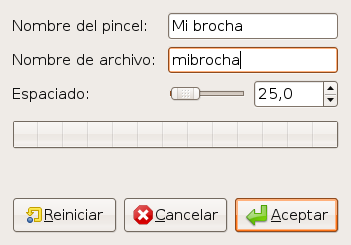
Este comando abre un diálogo que permite nombrar la brocha nueva. La brocha aparece en el diálogo de brochas.
- Nombre del pincel
-
El nombre del pincel es el nombre con el que estará en el diálogo de pinceles.
- Nombre de archivo
-
El pincel nuevo se guarda con el nombre de archivo (con la extensión
.gbr) en la carpeta personal depinceles. - Espaciado
-
Espaciado: Cuando el pincel dibuja una línea, se estampa el icono del pincel repetidamente. Si la estampación de cada icono es muy próxima, da la impresión de una línea sólida.
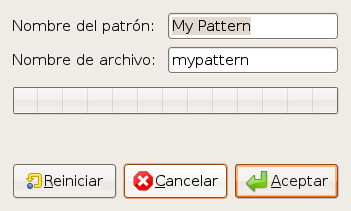
Este comando abre un diálogo que le permite nombrar un patrón nuevo. El patrón aparece en el diálogo de patrones.
- Nombre del patrón
-
Pattern name is the name as it will be in the Patterns Dialog.
- Nombre de archivo
-
El patrón nuevo se guarda con el nombre de archivo (con la extensión
.pat) en la carpeta personal depatrones.


