Denne kommandoen limer inn innhaldet frå utklipstavla. Sjølvsagt må du bruka kommandoen «Kopier» først slik at du har noko å lima inn.
Det er ikkje råd å tøma utklippstavla.
Undermenyen inneheld mange måtar å lima inn innhaldet i utklippstavla på:
Kommandoen opprettar eit nytt biletlag i det gjeldande biletet og limar det som måtte finnast i utklippstavla inn i dette.
Dersom utklippet ikkje er firkanta, vert alle områda som ikkje rekk ut til kanten av lerretet gjort gjennomsiktige (det vert automatisk laga ein alfakanal). Du må sjølvsagt kopiera utvalet før du brukar denne kommandoen.
Kommandoen opprettar eit nytt lag i det gjeldande biletet og limar inn innhaldet i utklippstavla med nøyaktig dei same koordinata det hadde der det vart kopier frå.
Denne eigenskapen gjeld både for den vanlege utklippstavla og for namngjevne bufferar.
Kommandoen opprettar eit nytt biletvindauge og limer det som måtte finnast i utklippstavla inn i dette. Dersom utklippet ikkje er firkanta, vert alle områda som ikkje rekk ut til ramma merkte som gjennomsiktige. Det vert om nødvendig lagt til ein alfakanal automatisk. Du må sjølvsagt kopiera utvalet før du brukar denne kommandoen slik at du får eit bilete med same dimensjonane som utvalet.
Denne menyoppføringa er den same som menyvalet → → .
Kommandoen opprettar eit flytande utval i det gjeldande biletet og limar inn innhaldet i utklippstavla der.
Dersom utklippet ikkje er firkanta, vert alle områda som ikkje rekk ut til kanten av lerretet gjort gjennomsiktige (det vert automatisk laga ein alfakanal). Du må sjølvsagt kopiera utvalet før du brukar denne kommandoen.
![[Notat]](images/note.png)
|
Notat |
|---|---|
|
Du kan berre ha eitt flytande utval i biletet. Du kan heller ikkje arbeida på andre lag før du har forankra eller fjerna det flytande utvalet. |
Kommandoen opprettar eit flytande utval i det gjeldande biletet og limar inn innhaldet i utklippstavla med nøyaktig same plasseringa som det hadde der det vart kopier frå.
Dersom utklippet ikkje er firkanta, vert alle områda som ikkje rekk ut til kanten av lerretet gjort gjennomsiktige (det vert automatisk laga ein alfakanal). Du må sjølvsagt kopiera utvalet før du brukar denne kommandoen.
![[Notat]](images/note.png)
|
Notat |
|---|---|
|
Du kan berre ha eitt flytande utval i biletet. Du kan heller ikkje arbeida på andre lag før du har forankra eller fjerna det flytande utvalet. |
Kommandoen bytar ut innhaldet i det gjeldande utvalet med innhaldet i utklippstavla og gjer det om til eit flytande utval.
Dataa på utklippstavla vert klipte av utvalet, men biletdataa kan framleis flyttast viss dei går utanfor utvalet.
Dersom det ikkje finst noko utval i biletet, vil «Lim inn som flytande data i utvalet» plassera utklippet sentrert på lerretet på same måten som kommandoen «Lim inn» gjer det.
![[Notat]](images/note.png)
|
Notat |
|---|---|
|
Du kan berre ha eitt flytande utval i biletet. Du kan heller ikkje arbeida på andre lag før du har forankra eller fjerna det flytande utvalet. |
Kommandoen bytar ut innhaldet i det gjeldande utvalet med innhaldet i utklippstavla på nøyaktig same staden som der det vart kopiert frå og gjer det om til eit flytande utval.
Dataa på utklippstavla vert klipte av utvalet, men biletdataa kan framleis flyttast viss dei går utanfor utvalet.
Dersom det ikkje finst noko utval i biletet, vil «Lim inn som flytande data i utvalet på plass» plassera utklippet sentrert på lerretet på same måten som kommandoen «Lim inn» gjer det.
![[Notat]](images/note.png)
|
Notat |
|---|---|
|
Du kan berre ha eitt flytande utval i biletet. Du kan heller ikkje arbeida på andre lag før du har forankra eller fjerna det flytande utvalet. |
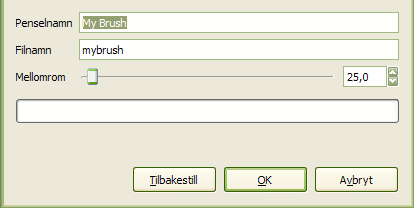
Denne kommandoen opnar eit dialogvindauge slik at du kan gje den nye penselen eit namn. Penselen vert synleg i penseldialogvindauget.
- Penselnamn
-
Penselnamn er det namnet som vert brukt på penselen i penseldialogvindauget.
- Filnamn
-
Den nye penselen vert lagra som File name (med filutvidinga
.gbr) i den personlegebrushes-mappa di. - Mellomrom
-
Mellomrom: Når penselen teiknar ei linje vert dette eigentleg gjort ved å setja av penselavtrykk eitt for eitt. Mellomrommet er avstanden mellom desse avtrykka. Vert mellomromma tette nok, vert linja heiltrukke.
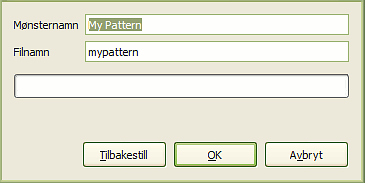
Kommandoen opnar eit dialogvindauge slik at du kan setja namn på mønsterelementet. Det er dette namnet som vert vist i mønsterdialogvindauget.
- Mønsternamn
-
Mønsternamnet er namnet slik det vert synleg i «Mønsterdialogvindauget».
- Filnamn
-
Det nye mønsterlementet vert lagra som Filnamn (med utvidinga
.pat) i den personlegepatterns-mappa di.


