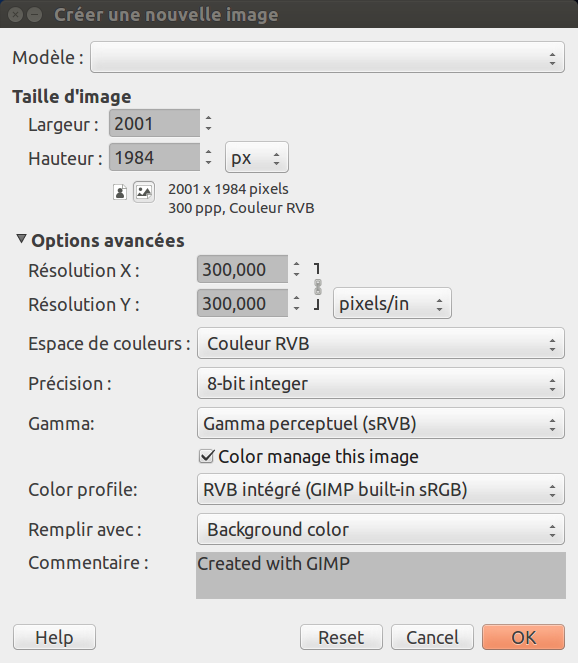
Cette fenêtre de dialogue vous permet de créer une nouvelle fenêtre d’image, vide, en précisant ses caractéristiques. Vous pouvez avoir plusieurs images sur votre écran.
-
You can access this command from the main menu through → ,
-
ou encore par le raccourci clavier Ctrl+N. Le nom anglais de cette commande est « New ».
- Modèle
-
La liste déroulante vous permet de choisir un modèle, essentiellement un format de page ou de résolution. NTSC est la résolution TV aux États-Unis. Vous pouvez créer un modèle pour un format que vous utilisez souvent grâce au dialogue Modèles.
- Taille de l’image
-
Largeur et Hauteur peuvent être définies, à l’aide des boîtes de saisie, en pixels ou dans l’unité de mesure de votre choix. Notez que la taille du pixel résultant dépend de la résolution X et Y que vous pouvez fixer dans les Options avancées, et du réglage « Point-pour-point » du menu .
Si aucune image n’est ouverte, la nouvelle image s’ouvre dans la fenêtre d’image vide, avec la taille par défaut définie dans Édition/Préférences/Image par défaut. Si vous ouvrez la nouvelle image alors qu’une autre est déjà ouverte, ou a été ouverte précédemment, la nouvelle image s’ouvrira dans une nouvelle fenêtre, avec la taille de l’image précédente.
- Boutons Portrait/Paysage
-
These buttons toggle between Portrait and Landscape mode. Their effect is to exchange the values for Width and Height. If the X and Y resolutions are different (in Advanced Options), then these values are also exchanged. On the right, image size, image resolution and color space are displayed.
The Advanced Options are mostly of interest to more advanced GIMP users. You can display these options by clicking on the small triangle on the lower edge of the dialog window. Note that you will need to scroll down to see all the available options.
- Résolution X et Y
-
Ces valeurs n’entrent vraiment en jeu que pour l’impression ; elles n’affectent pas la taille de l’image en pixels, mais elles déterminent sa taille sur le papier une fois imprimée. Elles peuvent néanmoins affecter la façon dont l’image est affichée à l’écran.
![[Astuce]](images/tip.png)
Astuce If you want to display the image on the screen at the correct dimensions, select → . Set the zoom factor to 100% to see the image at its true screen size. The calibration of the screen size is normally done when GIMP is installed, but if the image does not display at the correct size, you may have to adjust the screen parameters in GIMP. You can do this in the Preferences dialog.
- Color space
-
Vous pouvez créer une nouvelle image dans différents modes de couleurs, tels que RVB ou Niveaux de gris.
- Couleur RVB
-
L’image est créée dans le système de couleurs Rouge,Vert, Bleu utilisé par votre moniteur et votre télévision.
- Niveaux de gris
-
The image is created in black and white, with various shades of gray. Aside from your artistic interests, this type of image may be necessary for some plug-ins. Nevertheless, GIMP allows you to change an RGB image into grayscale, if you would like.
Vous ne pouvez pas créer une image directement en mode indexé. Mais vous pouvez toujours le faire ultérieurement en utilisant la commande → →
- Précision
-
This setting lets you define the encoding used to store pixel information. For more details, please see the Image Encoding section.
Cinq options sont disponibles :
-
8-bit entier
-
16-bit entier
-
32-bit entier
-
16-bit virgule flottante
-
32-bit virgule flottante
If you wonder what the difference is between integer and floating point (in the graphics area): If you have an image with 16-bit integer precision per channel, then you have 65,536 shades of different red, green and blue color tones – all of them equally stepped to each other (equal color distance). If you have it in floating point, then there are no equal-wide steps – so you can distribute the possible color values over selected ranges. For example: if you know that you have a very dark image with many shades of dark red color tones then you would benefit from floating point because you can decrease the importance of the brighter color tones and get most color detail out of only the darker reds.
Figure 16.3. Exemple de précision

L’image de gauche est en 8-bit, celle de droite est en 32-bit. Notez le plus grand nombre de transitions de couleurs dans l’image de droite.
-
- Gamma
-
Here you can choose the channel encoding for your image. Choices are Non-linear and Linear light. For 8-bit integer precision the default is Non-linear, and for 32-bit floating point precision it is Linear light. For more information see which precision options should you choose.
- Color profile
-
Here you can choose a color profile to be used for your image. The default is GIMP's standard color profile based on Color space, Precision, and Gamma. If you prefer to use a different color profile you can select an ICC color profile file from a location on your computer by choosing Select color profile from disk….
- Soft-proofing color profile
-
You can attach a CMYK color profile to the image with this option. This profile will be used to create a soft-proofed display of the image when the Proof Colors option is enabled in the View menu. As with the Color Profile, if you prefer to use a different color profile you can select an ICC color profile file from a location on your computer by choosing Select color profile from disk….
- Soft-proofing rendering intent
-
This option lets you select the rendering intent that will be used to convert the colors from the soft-proofed image to your display device when → → is enabled. The four intents are « Perceptual », « Relative colorimetric », « Saturation » and « Absolute colorimetric ». See Section 6.4, « Color Management » and Section 6.8, « « Color Management » Submenu » for more information.
- Use Black Point Compensation
-
When enabled, the BPC algorithm attempts to adjust the display of darker areas in the image when the Proof Colors option is enabled in the View menu.
- Remplir avec
-
Here, you specify the background color that is used for your new image. It is certainly possible to change the background of an image later, too. You can find more information about doing that in the Layers Dialog.
Plusieurs choix sont possibles :
-
La couleur de Premier plan que vous trouvez dans le Sélecteur de couleurs de la Boîte à outils, en bas à gauche.
Notez que vous pouvez changer la couleur de Premier-plan pendant que la fenêtre de dialogue « Nouvelle image » est ouverte.
-
La couleur d’Arrière-plan que vous trouvez dans le Sélecteur de couleurs de la Boîte à outils, en bas à gauche.
-
Fill the image with Middle Gray (CIELAB). This will create a layer with a gray color that is 50% of perceptual lightness in the selected color mode.
-
Blanc est la couleur le plus souvent utilisée.
-
Fill the image with Transparency. If you choose this option, the image is created with an alpha channel and the background is transparent. The transparent parts of the image are then displayed with a checkered pattern, to indicate the transparency.
-
Fill the image with a Pattern. If you choose this option, the image is filled with the currently active pattern (which you can change while this dialog is open).
-
- Commentaire
-
Vous pouvez ajouter là un commentaire sur l’image. Le texte sera attaché à l’image en tant que « parasite », et sera enregistré avec certains formats d’images (PNG, JPEG, GIF).
![[Note]](images/note.png)
Note Vous pouvez voir et modifier ce commentaire dans l’onglet Commentaire de la fenêtre Propriétés de l’image.


