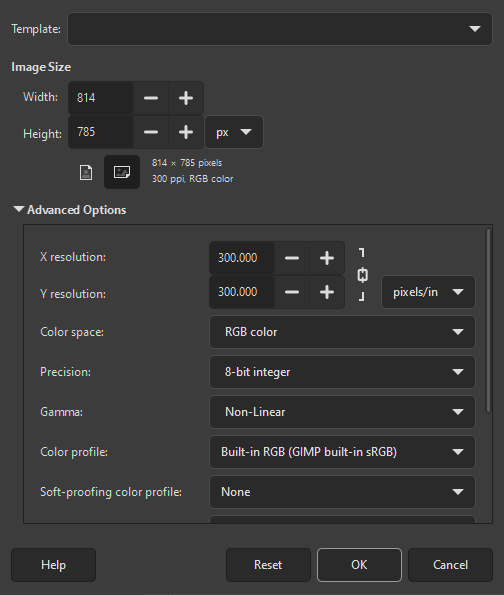
С помощью диалога «Создать новое изображение» можно создать новое пустое изображение и настроить его параметры. Изображение будет показано в новом окне. На экране может одновременно располагаться больше одного изображения.
-
Получить доступ к этой команде можно через меню изображения →
-
или использовав сочетание клавиш Ctrl+N.
- Шаблон
-
Чтобы не вводить все значения вручную, можно выбрать уже заданные значения из меню шаблонов, которые представляют собой часто используемые типы изображений. Шаблоны устанавливают значения для размера, разрешения, комментария, и т. д. Если определённый размер часто используется, но его нет в списке, то можно создать новый шаблон при помощи диалога Шаблоны.
- Размер изображения
-
Здесь настраиваются Ширина и Высота нового изображения. Единицы измерения по умолчанию — пиксели, но в прилегающем меню можно выбрать любые другие. В этом случае обратите внимание, что итоговый размер пикселей определяется разрешением по X и по Y (которые можно изменить в Дополнительных параметрах) и параметром «Точка к точке» в меню .
При отсутствии открытых изображений «Новое» изображение откроется в пустом окне, с указанным размером по умолчанию. Если создать «новое» изображение при уже открытых (или ранее открытых) изображениях, то оно будет открыто в другом окне, имеющем те же размеры, что и первое открытое ранее изображение.
- Кнопки «Портрет/Альбом»
-
С помощью этих двух кнопок выполняется переключение между портретным и альбомным режимами. В сущности, при этом происходит обмен значений Ширины и Высоты. Если разрешения по X и по Y разные (что можно настроить в «Дополнительных параметрах»), то эти значения также меняются местами. Справа от диалога показываются размеры изображения, разрешение экрана и цветовое пространство.
Дополнительные параметры представляют интерес в основном для продвинутых пользователей GIMP. Просмотреть эти параметры можно, нажав на маленький треугольник в нижней части диалогового окна. Чтобы увидеть все доступные параметры, необходимо прокрутить вниз.
- Разрешение по X и Y
-
Значения разрешений по X и по Y относятся в основном к печати: они не влияют на размер изображения в пикселях, но влияют на физический размер изображения при печати. Значения разрешения по X и Y определяют, как точки переводятся в другие единицы измерения, такие, как миллиметры и дюймы.
![[Подсказка]](images/tip.png)
Подсказка При необходимости просмотреть изображение на экране с корректным размерами, выберите пункт меню → . Установите масштаб 100%, чтобы просмотреть изображение в его истинном размере. Калибровка размера экрана обычно выполняется во время установки GIMP, но если изображение не отображается в правильном размере, возможно придётся настроить параметры экрана в GIMP. Это делается в диалоге Параметры.
- Цветовое пространство
-
Изображение можно создать в разных цветовых режимах, таких, например, как RGB или оттенки серого.
- Цвет RGB
-
Изображение создаётся в цветовой системе с основными цветами красный, зелёный и синий, т. е. с теми же цветами, что используются в экранах мониторов или телевизоров.
- Оттенки серого
-
Изображение создаётся чёрно-белым, в разных оттенках серого. Кроме художественного интереса, этот тип изображений может быть необходим для некоторых расширений. Вне зависимости от целей пользователя, GIMP предоставляет возможность при желании преобразовать изображение RGB в оттенки серого.
В этом меню нельзя создать индексированное изображение, но изображение всегда можно преобразовать в индексированное сразу после его создания. Для этого используйте команду → → .
- Точность
-
Этот параметр позволяет определить кодировку, используемую для хранения информации о пикселях. Более подробную информацию см. в разделе Кодировка изображения.
Доступно пять возможностей:
-
8 бит, целочисленное
-
16 бит, целочисленное
-
32 бита, целочисленное
-
16 бит, с плавающей запятой
-
32 бита, с плавающей запятой
Для тех, кому интересна разница между целым числом и числом с плавающей запятой (в области графиков): в имеющемся изображении с целочисленной точностью в 16 бит на канал у нас имеется 65 536 различных оттенков красного, зелёного и синего, и все они одинаково удалены друг от друга (одинаковое цветовое расстояние). Точность с плавающей запятой не имеет шагов с одинаковой шириной, для того, чтобы была возможность распределить возможные значения цвета по выбранным диапазонам. Например: при наличии очень тёмного изображения со многими оттенками тёмно-красного цвета нам очень хорошо подходит плавающая запятая, потому что так можно снизить важность более ярких цветовых тонов и выделить большинство деталей только из тёмно-красных оттенков.
Рисунок 16.3. Пример точности

Изображение слева — 8 бит, справа — 32 бита. Можно видеть, что на правом изображении в переходах от одного цвета к другому присутствует гораздо больше оттенков.
-
- Гамма
-
Здесь можно выбрать кодировку канала для изображения. Варианты: Нелинейная и Линейный свет. Для 8-битной целочисленной точности по умолчанию выбрана нелинейная, а для 32-битной точности с плавающей запятой — линейный свет. Подробнее см. какие варианты точности следует выбрать.
- Цветовой профиль
-
Здесь можно выбрать цветовой профиль, который будет использоваться для изображения. По умолчанию это стандартный цветовой профиль GIMP, основанный на Цветовом пространстве, Точности и Гамма. Если вы предпочитаете использовать другой цветовой профиль, вы можете выбрать файл цветового профиля ICC с компьютера с помощью пункта Выбрать цветовой профиль с диска….
- Профиль для цветопробы
-
С помощью этой опции вы можете привязать цветовой профиль CMYK к изображению. Этот профиль будет использоваться для создания цветопробы, если включён параметр Цветопроба в меню Вид. Как и в случае с Цветовым профилем, если вы предпочитаете использовать другой цветовой профиль, можно выбрать файл цветового профиля ICC на вашем компьютере с помощью пункта Выбрать цветовой профиль с диска….
- Цветопередача цветопробы
-
Этот параметр позволяет выбрать цветопередачу, которая будет использоваться для преобразования цветов цветопробы для показа на мониторе, если включено → → . Есть четыре вида цветопередачи: «Воспринимаемая», «Относительная колориметрическая», «Насыщенная» и «Абсолютная колориметрическая». Подробнее см. Раздел 6.4, «Управление цветом» и Раздел 6.8, «Вложенное меню «Управление цветом»».
- Использовать компенсацию точки чёрного
-
Если включено, алгоритм BPC попытается скорректировать отображение более тёмных областей изображения, если параметр Цветопроба включён в меню Вид.
- Заливка
-
Здесь указывается цвет фона для нового изображения. И, конечно, возможно изменить его позже. Подробности о том, как это сделать, можно найти в разделе Диалог слоёв.
Даётся выбор из нескольких возможностей:
-
Залить изображение текущим Цветом переднего плана с панели инструментов.
Обратите внимание, что цвет переднего плана можно изменить, пока открыто окно «Новое изображение».
-
Залить изображение активным Цветом фона с панели инструментов. (Цвет фона также можно изменять, пока открыто диалоговое окно).
-
Заливка изображения нейтрально-серым (CIELAB). Это создаст слой с серым цветом, который составляет 50% от воспринимаемой светлоты в выбранном цветовом режиме.
-
Залить изображение Белым цветом.
-
Fill the image with Transparency. If you choose this option, the image is created with an alpha channel and the background is transparent. The transparent parts of the image are then displayed with a checkered pattern, to indicate the transparency.
-
Заливка изображения Текстурой. Есть выбрать этот вариант, изображение будет заполнено активной в данный момент текстурой (которую можно изменить, пока открыт этот диалог).
-
- Комментарий
-
Здесь можно написать комментарий для описания изображения. Этот текст будет прикреплён к изображению в качестве паразита и сохранён вместе с изображением в форматах PNG, JPEG, GIF.
![[Примечание]](images/note.png)
Примечание Этот комментарий можно просмотреть и отредактировать в диалоге Свойства изображения


