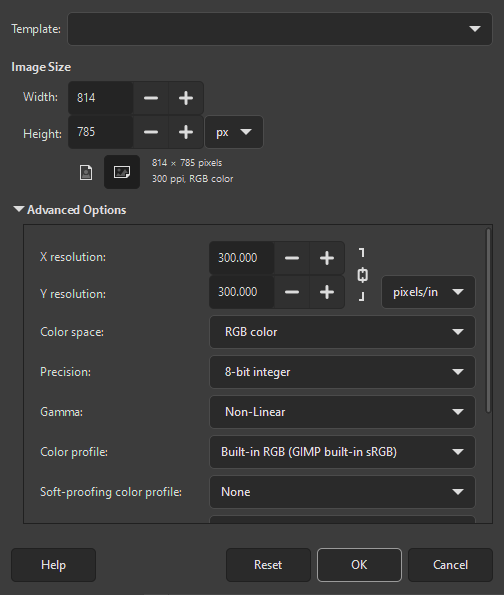
Usando el diálogo , puede crear una imagen nueva vacía y definir sus propiedades. La imagen se muestra en una ventana nueva. Puede tener más de una imagen en su pantalla al mismo tiempo.
-
You can access this command from the main menu through → ,
-
o empleando el atajo de teclado Ctrl+N.
- Plantilla
-
En vez de ingresar todos los valores cada vez, puede seleccionar algunos grupos de valores predefinidos, llamados plantillas. Éstos representan tipos de imágenes que se usan comúnmente. Las plantillas definen valores para el tamaño, la resolución, comentarios, etcétera. Si utiliza cierto tipo de imagen frecuentemente, puede crear una plantilla nueva, mediante el diálogo Plantillas.
- Tamaño de la imagen
-
Aquí puede ajustar la Anchura y la Altura de la imagen nueva. Las unidades predeterminadas son los píxeles, pero puede elegir una unidad diferente si así lo prefiere, empleando el menú adjunto. Si lo hace, tenga en cuenta que el tamaño del píxel resultante queda determinado por la resolución X e Y (que puede cambiar en las Opciones avanzadas), seleccionando “Punto por punto” en el menú .
Si no hay una imagen abierta, la imagen “Nueva” se abre en una ventana de imagen vacía, con el tamaño predeterminado que haya indicado. Si abre una imagen “Nueva” cuando hay otra abierta, entonces se abre en otra ventana, con el mismo tamaño que el de la primera imagen.
- Botones vertical/horizontal
-
These buttons toggle between Portrait and Landscape mode. Their effect is to exchange the values for Width and Height. If the X and Y resolutions are different (in Advanced Options), then these values are also exchanged. On the right, image size, image resolution and color space are displayed.
The Advanced Options are mostly of interest to more advanced GIMP users. You can display these options by clicking on the small triangle on the lower edge of the dialog window. Note that you will need to scroll down to see all the available options.
- Resolución X e Y
-
Los valores en los campos de Resolución X y de Resolución X e Y se relacionan principalmente con la impresión: no afectan al tamaño de la imagen en píxeles, pero pueden determinar su tamaño físico cuando se imprima. Los valores de resolución X e Y pueden determinar el modo en que los píxeles se traducen a otras unidades de medida, tales como milímetros o pulgadas.
![[Sugerencia]](images/tip.png)
Sugerencia If you want to display the image on the screen at the correct dimensions, select → . Set the zoom factor to 100% to see the image at its true screen size. The calibration of the screen size is normally done when GIMP is installed, but if the image does not display at the correct size, you may have to adjust the screen parameters in GIMP. You can do this in the Preferences dialog.
- Color space
-
Puede crear la imagen nueva en diferentes modos de color, ya sea como una imagen RGB o una imagen en escala de grises.
- Color RGB
-
La imagen se crea en el sistema rojo, verde y azul, que es el empleado por su monitor o por su pantalla de TV.
- Escala de grises
-
The image is created in black and white, with various shades of gray. Aside from your artistic interests, this type of image may be necessary for some plug-ins. Nevertheless, GIMP allows you to change an RGB image into grayscale, if you would like.
No puede crear una imagen indexada directamente desde este menú, pero siempre podrá convertir la imagen al modo indexado después de haberla creado. Para ello, use el comando → → .
- Precisión
-
This setting lets you define the encoding used to store pixel information. For more details, please see the Image Encoding section.
Hay cinco opciones disponibles:
-
Entero de 8 bits
-
Entero de 16 bits
-
Entero de 32 bits
-
Coma flotante de 16 bits
-
Coma flotante de 32 bits
If you wonder what the difference is between integer and floating point (in the graphics area): If you have an image with 16-bit integer precision per channel, then you have 65,536 shades of different red, green and blue color tones – all of them equally stepped to each other (equal color distance). If you have it in floating point, then there are no equal-wide steps – so you can distribute the possible color values over selected ranges. For example: if you know that you have a very dark image with many shades of dark red color tones then you would benefit from floating point because you can decrease the importance of the brighter color tones and get most color detail out of only the darker reds.
Figura 16.4. Ejemplo de precisión

La imagen de la izquierda es de 8 bits, la de la derecha es de 32 bits. Puede ver que hay muchos más colores entre transiciones de color en la imagen de la derecha.
-
- Gamma
-
Here you can choose the channel encoding for your image. Choices are Non-linear and Linear light. For 8-bit integer precision the default is Non-linear, and for 32-bit floating point precision it is Linear light. For more information see which precision options should you choose.
- Color profile
-
Here you can choose a color profile to be used for your image. The default is GIMP's standard color profile based on Color space, Precision, and Gamma. If you prefer to use a different color profile you can select an ICC color profile file from a location on your computer by choosing Select color profile from disk….
- Soft-proofing color profile
-
You can attach a CMYK color profile to the image with this option. This profile will be used to create a soft-proofed display of the image when the Proof Colors option is enabled in the View menu. As with the Color Profile, if you prefer to use a different color profile you can select an ICC color profile file from a location on your computer by choosing Select color profile from disk….
- Soft-proofing rendering intent
-
This option lets you select the rendering intent that will be used to convert the colors from the soft-proofed image to your display device when → → is enabled. The four intents are “Perceptual”, “Relative colorimetric”, “Saturation” and “Absolute colorimetric”. See Sección 6.4, “Color Management” and Sección 6.8, ““Color Management” Submenu” for more information.
- Use Black Point Compensation
-
When enabled, the BPC algorithm attempts to adjust the display of darker areas in the image when the Proof Colors option is enabled in the View menu.
- Rellenar con
-
Here, you specify the background color that is used for your new image. It is certainly possible to change the background of an image later, too. You can find more information about doing that in the Layers Dialog.
Hay varias opciones:
-
Rellenar la imagen con el color de primer plano actual, que se muestra en la caja de herramientas.
Tenga en cuenta que puede cambiar el color de primer plano mientras el diálogo “Imagen nueva” esta abierto.
-
Rellenar la imagen con el color de fondo actual, que se muestra en la caja de herramientas. (También puede cambiar el color de fondo, mientras la ventana del diálogo está abierta.)
-
Fill the image with Middle Gray (CIELAB). This will create a layer with a gray color that is 50% of perceptual lightness in the selected color mode.
-
Rellenar la imagen con blanco.
-
Rellenar la imagen con transparencia. Si elige esta opción, la imagen se crea con un canal alfa y con el fondo transparente. Las partes transparentes de la imagen se visualizan con un patrón de cuadrados, para indicar la transparencia.
-
Fill the image with a Pattern. If you choose this option, the image is filled with the currently active pattern (which you can change while this dialog is open).
-
- Comentario
-
Puede escribir una frase que describa la imagen aquí. El texto se adjunta a la imagen como un parásito, y en algunos formatos de archivos se guarda junto con la imagen (PNG, JPEG, GIF).
![[Nota]](images/note.png)
Nota Puede ver y editar este comentario en las propiedades de la imagen.


