Using the 「Create a New Image」 dialog, you can create a new empty image and set its properties. The image is shown in a new image window. You may have more than one image on your screen at the same time.
-
You can access this command from the main menu through → .
-
You can also use the keyboard shortcut Ctrl+N.
- テンプレート
-
全部の値を手で入力しなくても、 テンプレートメニューからどれか定型を選ぶ方法があります。 ここには広く通用する画像の形式がいくつか入っていて、 画像の大きさや解像度などの値やコメントの雛形が利用できます。 画像作成でいつも使う定型設定がこのリストにない場合は、 テンプレート ダイアログを使えば新たに追加できます。
- キャンバスサイズ (画像サイズ)
-
新しい画像については、 ここで 幅 と 高さ が設定できます。 既定の単位はピクセルですが、 すぐ隣りのメニューで他の単位にも切り替えられます。 ちなみにこのとき換算される大きさは X と Y の解像度 (詳細設定 で調節できる) によっても メニューで「ピクセル等倍」を有効にするかどうかによっても違いが出ます。
何も画像が開かれていない状態では無画像ウィンドウで「新しい」画像が開かれます。 何か他の画像を開いているときに (あるいは開いたあとで) 「新しい」画像を開くときは、 その画像の大きさに適した大きさの新たな画像ウィンドウで開かれます。
- 縦長/横長ボタン
-
These buttons toggle between Portrait and Landscape mode. Their effect is to exchange the values for Width and Height. If the X and Y resolutions are different (in Advanced Options), then these values are also exchanged. On the right, image size, image resolution and color space are displayed.
The Advanced Options are mostly of interest to more advanced GIMP users. You can display these options by clicking on the small triangle on the lower edge of the dialog window. Note that you will need to scroll down to see all the available options.
- 水平解像度; 垂直解像度
-
水平解像度 と 垂直解像度 の入力欄に入れた値は主として印刷に関係します。 画像の画素数を変えるのではなく、 印刷したときの実測的な大きさが変わります。 いずれの解像度も画素数からミリメートルやインチなどの距離単位に換算する土台になります。
![[ヒント]](images/tip.png)
ヒント If you want to display the image on the screen at the correct dimensions, select → . Set the zoom factor to 100% to see the image at its true screen size. The calibration of the screen size is normally done when GIMP is installed, but if the image does not display at the correct size, you may have to adjust the screen parameters in GIMP. You can do this in the Preferences dialog.
- Color space
-
新しい画像は RGB かグレースケールの何れかの 色モード で作成できます。
- RGBカラー
-
お使いのコンピューター画面やテレビ画面でも利用されている赤・緑・青の 3 原色系で画像を作成します。
- グレースケール
-
The image is created in black and white, with various shades of gray. Aside from your artistic interests, this type of image may be necessary for some plug-ins. Nevertheless, GIMP allows you to change an RGB image into grayscale, if you would like.
このメニューから直にインデックス化カラー画像を作ることはできませんが、 もちろん画像を作成したらあとからいつでもその画像をインデックス化モードに変換できます。 画像ウィンドウのメニューより → → と進むと開かれる インデックスカラーに変換 ダイアログで変換しましょう。
- Precision
-
This setting lets you define the encoding used to store pixel information. For more details, please see the Image Encoding section.
Five options are available:
-
8-bit integer
-
16-bit integer
-
32-bit integer
-
16-bit floating point
-
32-bit floating point
If you wonder what the difference is between integer and floating point (in the graphics area): If you have an image with 16-bit integer precision per channel, then you have 65,536 shades of different red, green and blue color tones – all of them equally stepped to each other (equal color distance). If you have it in floating point, then there are no equal-wide steps – so you can distribute the possible color values over selected ranges. For example: if you know that you have a very dark image with many shades of dark red color tones then you would benefit from floating point because you can decrease the importance of the brighter color tones and get most color detail out of only the darker reds.
図16.3 Precision example
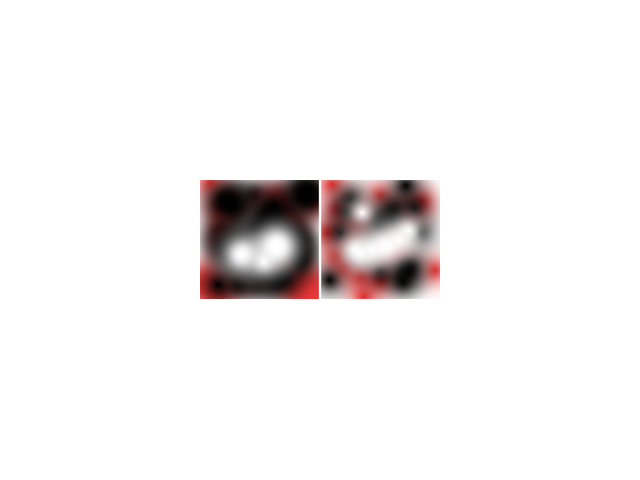
Left image is 8-bit, right is 32-bit. You can see that there are much more available colors between color transitions on the right image.
-
- Gamma
-
Here you can choose the channel encoding for your image. Choices are Non-linear and Linear light. For 8-bit integer precision the default is Non-linear, and for 32-bit floating point precision it is Linear light. For more information see which precision options should you choose.
- Color profile
-
Here you can choose a color profile to be used for your image. The default is GIMP's standard color profile based on Color space, Precision, and Gamma. If you prefer to use a different color profile you can select an ICC color profile file from a location on your computer by choosing Select color profile from disk….
- Soft-proofing color profile
-
You can attach a CMYK color profile to the image with this option. This profile will be used to create a soft-proofed display of the image when the Proof Colors option is enabled in the View menu. As with the Color Profile, if you prefer to use a different color profile you can select an ICC color profile file from a location on your computer by choosing Select color profile from disk….
- Soft-proofing rendering intent
-
This option lets you select the rendering intent that will be used to convert the colors from the soft-proofed image to your display device when → → is enabled. The four intents are 「Perceptual」, 「Relative colorimetric」, 「Saturation」 and 「Absolute colorimetric」. See 「Color Management」 and 「「Color Management」 Submenu」 for more information.
- Use Black Point Compensation
-
When enabled, the BPC algorithm attempts to adjust the display of darker areas in the image when the Proof Colors option is enabled in the View menu.
- Fill with
-
Here, you specify the background color that is used for your new image. It is certainly possible to change the background of an image later, too. You can find more information about doing that in the Layers Dialog.
つぎのようにさまざまな方法があります。
-
ツールボックスに示されている現在の で画像を塗りつぶします。
ちなみにこの描画色は「新しい画像を作成」ダイアログを開いている間も変更できます。
-
ツールボックスに示されている現在の で画像を塗りつぶします。 (背景色も同様に「新しい画像を作成」ダイアログを開いている最中でも変更できます。)
-
Fill the image with Middle Gray (CIELAB). This will create a layer with a gray color that is 50% of perceptual lightness in the selected color mode.
-
画像を で塗りつぶします。
-
Fill the image with Transparency. If you choose this option, the image is created with an alpha channel and the background is transparent. The transparent parts of the image are then displayed with a checkered pattern, to indicate the transparency.
-
Fill the image with a Pattern. If you choose this option, the image is filled with the currently active pattern (which you can change while this dialog is open).
-
- コメント
-
説明的な付記がここで書き込めます。 この文章は画像に パラサイト として埋め込まれ、 [XCF はもちろん] PNG や JPEG や GIF といったファイル形式で保存する場合に画像内に保存されます。 [PNG や GIF など一部のファイル形式はマルチバイト文字に対応していません。 このような形式で日本語文字を含んだ文を保存すると何の警告もなくコメント全文が削除されます。]
![[注記]](images/note.png)
注記 このコメントは 画像の情報 ダイアログで閲覧と編集が可能です。


