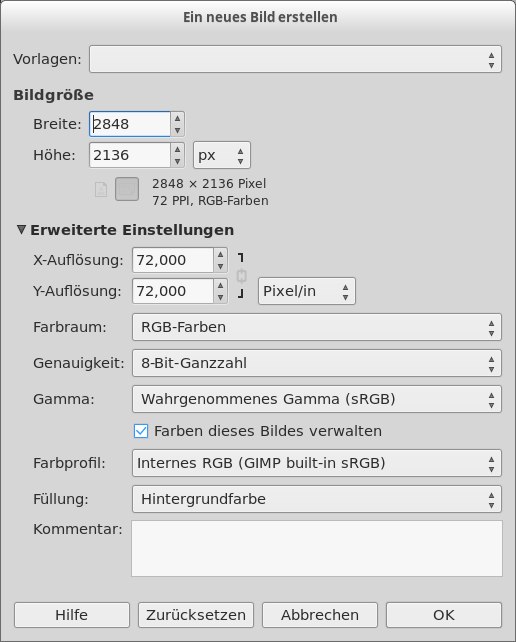
In diesem Dialog können Sie in GIMP ein neues Bild erstellen und dessen Eigenschaften festlegen. Das Bild wird in einem neuen Bildfenster angezeigt. Sie können mehrere Bilder gleichzeitig auf Ihrem Bildschirm haben.
-
You can access this command from the main menu through → ,
-
oder über das Tastenkürzel Strg+N.
- Vorlage
-
Anstatt alle Werte manuell einzugeben, können Sie einige vordefinierte Werte für Ihr Bild aus einem Vorlagenmenü wählen, in welchem Sie einige Bildtypen finden, die häufig verwendet werden. Diese Vorlagen sind Bilder, bei denen Bildgröße und -auflösung, Bildart, Füllart sowie Bildkommentar bereits voreingestellt sind. Wenn Sie einen bestimmten Bildtyp häufig verwenden, dieser aber in der Liste nicht enthalten ist, können Sie im Dialog Vorlagen eine neue Vorlage erstellen.
- Bildgröße
-
Hier können Sie die Breite und Höhe des neuen Bildes angeben. In der Voreinstellung geben Sie die Werte in Pixel an, können aber auch eine von Ihnen bevorzugte Maßeinheit im Menü auswählen. Wenn Sie das tun, dann sollten sie beachten, dass die sich ergebende Größe in Pixel von der X- und Y-Auflösung abhängt (die Sie in den Erweiterten Einstellungen ändern können), und durch die Einstellung »Punkt für Punkt« im Menü .
Wenn kein Bild geöffnet ist, wird das neue Bild mit den von Ihnen festgelegten Standardeigenschaften im leeren Bildfenster geöffnet. Falls Sie ein weiteres neues Bild öffnen, wird dieses in der gleichen Größe wie das erste Bild in einem neuen Bildfenster geöffnet.
- Knöpfe Hoch- und Querformat
-
These buttons toggle between Portrait and Landscape mode. Their effect is to exchange the values for Width and Height. If the X and Y resolutions are different (in Advanced Options), then these values are also exchanged. On the right, image size, image resolution and color space are displayed.
The Advanced Options are mostly of interest to more advanced GIMP users. You can display these options by clicking on the small triangle on the lower edge of the dialog window. Note that you will need to scroll down to see all the available options.
- X- und Y-Auflösung
-
Diese Einstellungen spielen hauptsächlich dann eine Rolle, wenn Sie ein Bild für den Druck erstellen möchten. Mit ihnen können Sie nicht die Größe des Bildes in Pixeln einstellen, wohl aber die »Druckauflösung«, d.h. die Größe, wenn das Bild gedruckt wird: Sie legen mit dieser Einstellung fest, wie die Maßeinheit Pixel in die verschiedenen Längenmaße wie Millimeter oder Zoll umgerechnet werden.
![[Tipp]](images/tip.png)
Tipp If you want to display the image on the screen at the correct dimensions, select → . Set the zoom factor to 100% to see the image at its true screen size. The calibration of the screen size is normally done when GIMP is installed, but if the image does not display at the correct size, you may have to adjust the screen parameters in GIMP. You can do this in the Preferences dialog.
- Color space
-
Sie können ein Bild in zwei verschiedenen Farbräumen erstellen, RGB oder Graustufen.
- RGB-Farben
-
Das Bild wird im Rot-Grün-Blau-Farbsystem erstellt, so wie es Ihr Monitor oder Ihr Fernseher machen.
- Graustufen
-
The image is created in black and white, with various shades of gray. Aside from your artistic interests, this type of image may be necessary for some plug-ins. Nevertheless, GIMP allows you to change an RGB image into grayscale, if you would like.
Ein Bild im indizierten Modus können Sie mit diesem Menü nicht erstellen, aber natürlich können Sie, wie bereits erwähnt, ein Bild nachträglich in diesen Modus umwandeln: → → .
- Genauigkeit
-
This setting lets you define the encoding used to store pixel information. For more details, please see the Image Encoding section.
Die folgenden fünf Optionen stehen zur Verfügung:
-
8-Bit-Ganzzahl
-
16-Bit-Ganzzahl
-
32-Bit-Ganzzahl
-
16-Bit-Fließkommazahl
-
32-Bit-Fließkommazahl
If you wonder what the difference is between integer and floating point (in the graphics area): If you have an image with 16-bit integer precision per channel, then you have 65,536 shades of different red, green and blue color tones – all of them equally stepped to each other (equal color distance). If you have it in floating point, then there are no equal-wide steps – so you can distribute the possible color values over selected ranges. For example: if you know that you have a very dark image with many shades of dark red color tones then you would benefit from floating point because you can decrease the importance of the brighter color tones and get most color detail out of only the darker reds.
Abbildung 16.3. Beispiel für die Genauigkeit

Linkes Bild in 8-bit, rechtes in 32-bit. Sie sehen, dass auf dem rechten Bild viel mehr Farben in den Farbübergängen sichtbar sind.
-
- Gamma
-
Here you can choose the channel encoding for your image. Choices are Non-linear and Linear light. For 8-bit integer precision the default is Non-linear, and for 32-bit floating point precision it is Linear light. For more information see which precision options should you choose.
- Color profile
-
Here you can choose a color profile to be used for your image. The default is GIMP's standard color profile based on Color space, Precision, and Gamma. If you prefer to use a different color profile you can select an ICC color profile file from a location on your computer by choosing Select color profile from disk….
- Soft-proofing color profile
-
You can attach a CMYK color profile to the image with this option. This profile will be used to create a soft-proofed display of the image when the Proof Colors option is enabled in the View menu. As with the Color Profile, if you prefer to use a different color profile you can select an ICC color profile file from a location on your computer by choosing Select color profile from disk….
- Soft-proofing rendering intent
-
This option lets you select the rendering intent that will be used to convert the colors from the soft-proofed image to your display device when → → is enabled. The four intents are „Perceptual“, „Relative colorimetric“, „Saturation“ and „Absolute colorimetric“. See Abschnitt 6.4, „Color Management“ and Abschnitt 6.8, „„Color Management“ Submenu“ for more information.
- Use Black Point Compensation
-
When enabled, the BPC algorithm attempts to adjust the display of darker areas in the image when the Proof Colors option is enabled in the View menu.
- Füllen mit
-
Here, you specify the background color that is used for your new image. It is certainly possible to change the background of an image later, too. You can find more information about doing that in the Layers Dialog.
Folgende Möglichkeiten stehen zur Auswahl:
-
Es wird mit der aktuellen Vordergrundfarbe gefüllt, wie sie im Werkzeugkasten angezeigt wird.
Sie können die Vordergrundfarbe ändern, während das Dialogfenster »Neues Bild« geöffnet ist.
-
Es wird mit der aktuellen Hintergrundfarbe gefüllt, wie sie im Werkzeugkasten angezeigt wird. (Auch die Hintergrundfarbe kann bei geöffnetem Dialogfenster geändert werden.)
-
Fill the image with Middle Gray (CIELAB). This will create a layer with a gray color that is 50% of perceptual lightness in the selected color mode.
-
Es wird mit Weißer Farbe gefüllt.
-
Fill the image with Transparency. If you choose this option, the image is created with an alpha channel and the background is transparent. The transparent parts of the image are then displayed with a checkered pattern, to indicate the transparency.
-
Fill the image with a Pattern. If you choose this option, the image is filled with the currently active pattern (which you can change while this dialog is open).
-
- Kommentar
-
Sie können das Bild mit einem Kommentar versehen. Der Text wird zum Bild als Parasit hinzugefügt und beim Speichern des Bildes in einige Bildformate hinzugefügt (PNG, JPEG, GIF).
![[Anmerkung]](images/note.png)
Anmerkung Sie können diesen Kommentar über das Dialogfenster Bildeigenschaften einsehen und bearbeiten.


