GIMP には充実したツールボックスがあり、 選択範囲をとったりパスをひいたりするような基本的な操作を素早くこなせます。 ここでは GIMP のツールボックスに載っているたくさんのツールについて吟味します。
(知識欲旺盛な方向け: GIMP の用語法ではツールとはディスプレイ表示を通して画像を扱う方法のうち、 マウスポインターを画面上で動かして意図を示す必要のあるものと、 加工の効果を見ながら行えるものを指します。 しかしツールをのこぎりに、 画像を一種の材木と捉えて考えてみても、 話はそんなにひどくはならないと思います。)
![[注記]](images/note.png)
|
注記 |
|---|---|
|
ツールボックスの概観とその内容については、 主なウィンドウ - ツールボックス をご覧ください。 |
GIMP has a diverse assortment of tools that let you perform a large variety of tasks. The tools can be thought of as falling into the following categories:
-
画像を加工する前にその対象となる部分を指定し調整するための 選択ツール
-
画像を部分的に着色し、 あるいは色を変える 描画ツール
-
画像を幾何学的に変形する 変形ツール
-
Color tools, which alter the colors in the image as a whole;
-
Other tools, which don't fall into the other categories.
Most tools can be activated by clicking on an icon in the Toolbox. By default, some tools are accessible only via the menus. Every tool can be activated from the menu (or the menu for some color tools). Most tools can also be activated from the keyboard using an accelerator key.
In the default setup, created when GIMP is first installed, not all tools show icons in the Toolbox: some tools are omitted. You can customize the set of tools that are shown in the Toolbox in the Toolbox Preferences.
There are two reasons you might want to do this: first, if you only rarely use a tool, it might be easier to find the tools you want if the distracting icon is removed; second, if you use tools that are not found in the toolbox by default, you might find it convenient to have icons for them easily available. In any case, you can always access any tool at any time using the or menu from the main menu.
Tool icons are grouped by default. Tool groups are marked with a small dark triangle at the bottom right corner of the icon. The group icon displayed is the last used tool in the group. Right click on the group icon to display the list of tools in the group.
You can get all tools displayed by unchecking the Use tool groups option in 「ツールボックス」.
By default, the shape of the pointer changes when it is inside an image, to a shape that indicates which tool is active. You can change this behavior in the Pointers section of the Input Devices settings.
図14.2 Foreground/Background Colors Area in the Toolbox
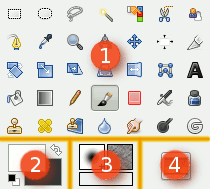
The Foreground/Background Colors area, marked with (3)
- 色の区画
-
The color area shows GIMP's current foreground and background colors, which are used for painting, filling, and many other operations. Clicking on either one of them brings up a color selector dialog that allows you to change to a different color.
- 描画色と背景色をリセット
-
Clicking on the small symbol in the lower left corner resets the foreground and background colors to black and white. Pressing the D key has the same effect.
- Swap Foreground/Background colors
-
Clicking on the double-headed arrow symbol swaps the foreground and background colors. Pressing the X key has the same effect.
![[ヒント]](images/tip.png)
ヒント これらの色見本をクリックしてレイヤー上までドラッグして放ってみましょう。 するとレイヤー全体が塗りつぶされます。
図14.3 Active Brush, Pattern and Gradient Area in the Toolbox
The Active Brush, Pattern and Gradient area, marked with (4)
By default, this area is not displayed. You can add this area through → → : 「ツールボックス」.
ツールボックスのこの部分では現在使われているブラシ、 パターン、 グラデーションが表示されています。 いずれもクリックすればその選択を変更できます。
By default, this area is not displayed. You can add this area through → → : 「ツールボックス」.
A thumbnail of the active image is displayed in this area. If you click on this thumbnail, the Images dialog is opened. This can be useful if you have many images on your screen.
If you use GIMP on a Unix-like operating system with the X Window System, you can also drag and drop the thumbnail to an enabled XDS file manager to directly save the corresponding image.
ほとんど皆がしているような設定にしておれば、 ツールを起用したときにツールボックスの下にツールオプションダイアログが現れます。 違う設定をされていた方もおそらくそうなるようにせざるを得なくなるでしょう。 オプションを操作できない状態でツールを使いこなすのは大変難しいことです。
|
|
ヒント |
|---|---|
|
The Tool Options appear beneath the Toolbox in the default setup. If you lose it somehow, you can get it back by creating a new Tool Options dialog using → → and then docking it below the Toolbox. Alternatively you can double-click any tool button in the Toolbox as a quick way to open the Tool Options. If it appears in a different dock than the one you want, you can drag it to your preferred dock. See the section on Dialogs and Docking if you need help moving the Tool Options. |
ツールはそれぞれに定められるオプションがあります。 選んだオプションは変更するまでは作業中もひきつづき有効です。 具体的には、 前の作業で使ったオプションが次の作業にひきつがれるのです。 このような作業間のツールオプションの継続性はしばしば迷惑な事態をひきおこします。 あるツールが非常に奇妙な動作をするのですが、 理由がなかなか判りません。 ようやく気付いたのは、 2 週間前の作業でこのツールのオプションに並はずれた値を設定していたことだった、 などという事態です。
ツールオプションダイアログの底部には 4 つのボタンがあります。
-
 Save Tool Preset…
-
This button allows you to save the settings for the current tool, so that you can restore them later. It brings up the 「ツールプリセットダイアログ」 allowing you to give a name for the new preset. When you Restore options, only saved presets for the active tool are shown, so you need not worry about including the name of the tool when you assign a name here.
-
 Restore Tool Preset…
-
This button allows you to restore a previously saved preset of options for the active tool. If no presets have ever been saved for the active tool, the button will be disabled. Otherwise, clicking it will bring up a menu showing the names of all saved option sets: choosing a menu entry will apply those settings.
-
 Delete Tool Preset
-
このボタンは保存してあった現在使用中のツールに関連のあるプリセットを削除します。 まだ一件も現在使用中のツールのプリセットを保存していない場合、 このボタンは単にツール名を繰り返します。 逆に有効になっているときクリックすると、 保存されているすべてのプリセットの名前が並ぶメニューが出てきます。 選んだプリセットが削除されます。
-
 Reset to default values
-
This button resets the options for the active tool to their default values. If you hold the Shift key while pressing the Reset button, the options for all tools will be reset to their default values.
In addition to the commands for the above buttons, the Tool Options tab menu has an extra submenu:
- Edit Tool Preset
-
This submenu shows a list of presets for the active tool that you can edit. Selecting one of them will open the Tool Presets Editor with that tool preset loaded. From there you can edit the preset, unless it is one of the default presets that come with GIMP.
Below we will explain the interaction with sliders and the mouse scroll-wheel.
- 新しくなったスライダー
-
You can use multiple modifiers with either left-click or mouse wheel scrolling:
表14.1 Interaction with the Slider Widget
Mouse / key combination
Action 
Change the value to what's under the pointer 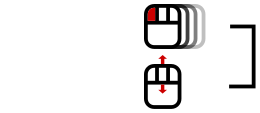
Change the value using the default increment 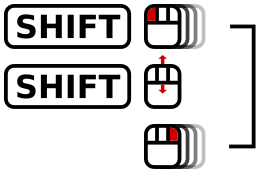
Shift + or
Change the value using smaller increment 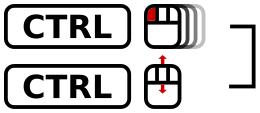
Ctrl +
Change the value using larger increment 
Enter numeric input mode, do not select the value 
Enter numeric input mode, select the value Hint: Any left-click interaction enables numeric input mode.
ポインターを動かして凡その値を定めたあと、 スライダー右端の小さな上下矢印ボタンをクリックしても精密に数値を決定できます。
スライダー枠内は数値記入欄にもなります。 数値を書き込んだり貼り付ければ値を直ちに設定できます。
For some options, you can drag the pointer outside the tool dialog. For example with the size slider, you can get the maximum value (10000) so.
- Mouse Scroll-Wheel actions on canvas
-
When using tools, you can use the mouse scroll-wheel, in combination with various modifiers, to do useful things with the tool options of the selected tool:
-
Alt + Mouse-wheel: increase/decrease opacity
-
Shift+Primary + Mouse-wheel: increase/decrease aspect ratio
-
Shift+Alt + Mouse-wheel: increase/decrease angle
-
Primary+Alt + Mouse-wheel: increase/decrease size
-
Shift+Primary+Alt + Mouse-wheel: increase/decrease spacing
Note: the Primary modifier is usually Ctrl or Cmd, depending on your platform.
-


