Elipsinio pažymėjimo įrankis yra skirtas pažymėti apskritas ir elipsines paveikslėlio sritis, jeigu pageidaujate – naudojant kraštų glotninimą. Norėdami sužinoti daugiau apie pažymėjimus ir kaip jie naudojami programoje GIMP, žr. Pažymėjimai, norėdami gauti daugiau informacijos apie visiems pažymėjo įrankiams bendras funkcijas, žr. Pažymėjimo įrankiai.
This tool is also used for rendering a circle or ellipse on an image. To render a filled ellipse, create an elliptical selection, and then fill it using the Bucket Fill tool. To create an elliptical outline, the simplest and most flexible approach is to create an elliptical selection and then stroke it. However, the quality of anti-aliasing with this approach is rather crude. A higher quality outline can be obtained by creating two elliptical selections with different sizes, subtracting the inner one from the outer one; however this is not always easy to get right. The command → makes it easy.
There are different possibilities to activate the tool:
-
From the main menu: → → .
-
By clicking the tool icon
 in the Toolbox.
-
By pressing the E keyboard shortcut.
![[Pastaba]](images/note.png)
|
Pastaba |
|---|---|
|
Daugiau informacijos apie modifikavimo klavišus, vienodai veikiančius visus žymėjimo įrankius, galite rasti sekcijoje Žymėjimo įrankiai. Čia aprašytos tik specifinės šio įrankio parinktys. |
- Ctrl
-
Pressing the key after starting your selection, and holding it down until you are finished, causes your starting point to be used as the center of the selected ellipse, instead of a corner of the rectangle that may contain it. Note that if you press the Ctrl key before starting to make the selection, the resulting selection will be subtracted from the existing selection.
- Shift
-
Pressing the Shift key after starting your selection, and holding it down until you are finished, constrains the selection to be a circle. Note that if you press the Shift key before starting to make the selection, the resulting selection will be added to the existing selection.
- Ctrl+Shift
-
Spustelėjus abu klavišus apjungiami abu efektai, leidžiantys nubrėžti apskritą pažymėjimą, kurio centras yra jūsų pradžios taške.
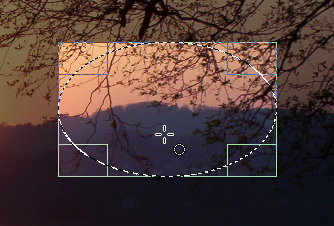
When this tool is selected the mouse pointer comes with a circle icon as soon as it is over the image. A drag-and-drop allows you to get an ellipse (or a circle) within a rectangular box. When the mouse button is relaxed, a dotted line („marching ants“) outlines the elliptic selection. It's not necessary to adjust the selection with care; you can resize it easily later.
Velkant žymiklį matomojoje srityje, keičiasi žymiklis ir pažymėjimo proporcijos. Pažymėjimo dydį galite pakeisti naudodami rankenėles. Daugiau informacijos galite rasti stačiakampio žymėjimo sekcijoje Įrankio valdymas.
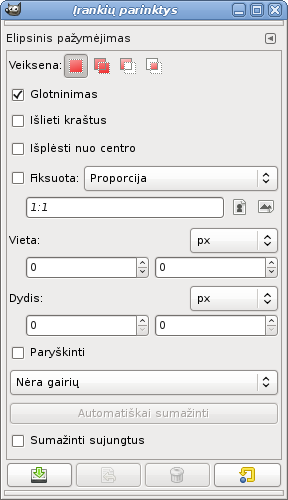
Normally, tool options are displayed in a window attached under the Toolbox as soon as you activate a tool. If they are not, you can access them from the main menu through → → which opens the option window of the selected tool. The available tool options can also be accessed by double clicking the corresponding tool icon in the Toolbox.
- Veiksena, Antialiasing, Feather edges
-
Pastaba See Selection Tools Options for help with options that are common to all these tools. Only options that are specific to this tool are explained here.
- Expand from center, Fixed, Position, Dydis, Paryškinti, Gairės, Auto Shrink, Shrink merged
-
These options work exactly the same way they are described for the Rectangle Selection tool. See Skyrius 2.2.4, „Parinktys“ for details.


