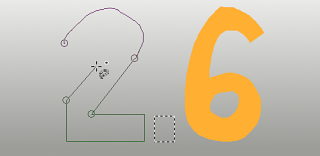
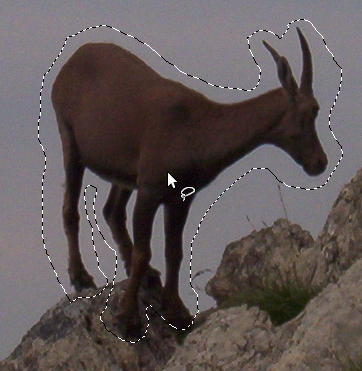
Het gereedschap Vrije selectie laat u een selectie maken door die met de muisaanwijzer te tekenen.
U kunt dit gereedschap gebruiken op twee manieren. Als eerste om het beginpunt te maken door te klikken op uw afbeelding. Daarna:
-
Houd de muisknop ingedrukt (d.i. klik-en-sleep), sleep om een vrije hand-selectie te tekenen. Als het eindpunt bovenop het beginpunt ligt, laat de muisknop los om de selectie te sluiten.
Als u klikt op het eindpunt, wijzigt het en laat een kruis voor verplaatsen zien. Dan vergroot slepen de vorm.
-
Of laat de muisknop los en sleep om een veelhoekige selectie te tekenen. Als het eindpunt bovenop het beginpunt ligt, klik om de selectie te sluiten.
Druk de Ctrl--toets in en klik op het eindpunt: verplaatsen van de muisaanwijzer forceert om te verplaatsen in hoeken van 15°; u kunt dus gemakkelijk horizontale of verticale lijnen tekenen.
In beide gevallen sluit dubbelklikken op het eindpunt de selectie met een rechte lijn.
In de modus Loodrecht is deze selectie een voorlopige selectie; er zijn marcherende mieren, maar de kleine gele cirkel is nog steeds aanwezig: u kunt de selectie kopiëren en, door te drukken op de Backspace-toets, keert u terug naar de vorige stap van de selectie (de vorm opnieuw openen) en kunt u de selectie bewerken.
Druk op Enter of dubbelklik ergens in de vorm om de selectie vast te leggen..
Drukken op en loslaten van de muisaanwijzer stelt u in staat om segmenten van vrije hand en loodrechte segmenten te mixen. U mag buiten de rand van de weergave van de afbeelding gaan en daarin terugkomen als u dat wilt.
Vrije selectie is vaak een goed gereedschap om te gebruiken voor een “ruwe” selectie; het is niet zo goed voor precies definiëren. Ervaren gebruikers vinden dat het vaak handig is om te beginnen met het gereedschap Vrije selectie, maar schakelen dan over naar de modus Snelmasker voor gedetailleerd werk.
Voor informatie over selecties en hoe zij worden gebruikt in GIMP, bekijk Selecties. Voor informatie over mogelijkheden die gemeenschappelijk zijn voor alle gereedschappen Selectie, bekijk Gereedschap Selectie.
![[Opmerking]](images/note.png)
|
Opmerking |
|---|---|
|
Het vrije selectie gereedschap is veel gemakkelijker te gebruiken met een tablet dan met een muis. |
U kunt het gereedschap op verschillende manieren activeren:
-
Vanuit het hoofdmenu: → → ,
-
Door te klikken op het pictogram van het gereedschap
in de Gereedschapskist.
-
Door te drukken op de sneltoets F.
Het gereedschap Vrije selectie heeft hulptoetsen die alle gereedschappen voor Selectie op dezelfde manier beïnvloeden. Bekijk Gereedschap Selectie voor hulp daarmee.
Backspace keert terug naar de vorige selectiestap (verwijdert het laatste selectiesegment), Escape annuleert alle selectiesegmenten.
Als u de selectie wilt verplaatsen raadpleegt u Selecties verplaatsen.
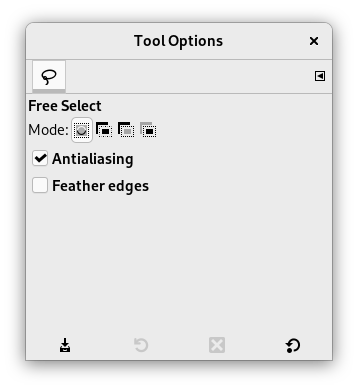
Normaal gesproken worden gereedschapsopties weergegeven in een venster dat is gekoppeld onder de Gereedschapskist, zodra u een gereedschap activeert. Als dat niet zo is, kunt u er toegang toe krijgen vanuit het hoofdmenu met → → , dat het venster met de gereedschapsopties voor het geselecteerde gereedschap opent. De beschikbare gereedschapsopties kunnen ook worden bereikt door te dubbelklikken op het corresponderende pictogram van het gereedschap in de Gereedschapskist.
- Modus, Randen glad maken, Randen verzachten
-
![[Opmerking]](images/note.png)
Opmerking Bekijk Gereedschapsopties Selectie voor hulp met opties die voor al deze gereedschappen gemeenschappelijk zijn. Alleen opties die specifiek voor dit gereedschap zijn, worden hier uitgelegd.
Marcherende mieren hebben een doorlopende lijn, wat betekent dat de selectie nog niet is vastgelegd en dat u nog steeds de vorm van de selectie kunt wijzigen (muisaanwijzer heeft nog het pictogram Verplaatsen). Maar u kunt nog niet (ingedrukt houden) Shift, Ctrl gebruiken. U moet op de Enter-toets drukken. Daarna kunt u (ingedrukt houden) Shift gebruiken om een selectie toe te voegen, Ctrl gebruiken om een selectie af te trekken, Shift + Ctrl gebruiken om twee selecties te doorsnijden. Wanneer u tevreden bent met uw wijzigingen, druk op de Enter-toets om de selectie vast te leggen.


