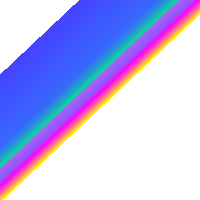
Dette verktøyet fyller det valde området som standard med ein fargeovergang frå forgrunnsfargen til bakgrunnsfargen, men det er mange alternativ. For å laga ein fargeovergang, dra markøren i den retningen du vil at fargeovergangen skal gå og slepp museknappen når du føler at du har rett plassering og storleik på fargeovergangen. Kor mjuk fargeovergangen vert er avhengig av kor langt du dreg markøren. Dess kortare du dreg, dess skarpare vert fargeovergangen.
Viss du klikkar og dreg utføre utvalet vil berre ein del av fargeovergangen vera synleg i utvalet.
Ved første augnekast kan dette verktøyet synast heilt overveldande, men les dette kapitlet og prøv deg fram med ulike innstillingar og du vil finna at det eigentleg er nokså enkelt. Dei to viktigaste innstillingane er «Fargeovergang» og «Form». Klikkar du på knappen «Fargeovergang» kjem det opp eit vindauge der du kan velja mellom fleire fargeovergangar som vert leverte saman med GIMP. Du kan også laga og lagra dine eigne fargeovergangar. Du kan finna meir om fargeovergangar i Del 6, «Fargeovergangar» og Del 3.5, «Dialogvindauget for fargeovergangar».
Du har 11 ulike former å velja mellom: Lineær, bilineær, radial, firkanta, konisk (symmetrisk), konisk (usymmetrisk), formfyll (vinkla), formfyll (sfærisk), formfyll (krusa), spiral (med klokka) og endeleg spiral (mot klokka). Av desse er kanskje formene «formfyll» dei mest interessante. Desse vil følgja kantane til det markerte området, same kor intrikate dei måtte vere. I motsetnad til dei andre formene, der fargeovergangane er avhengige av kvar du klikkar og kor langt og i kva retning du drar markøren, er formfyll uavhengig av desse. Du kan klikka og dra kvar som helst på markeringa for å starta prosessen.
![[Tips]](images/tip.png)
|
Tips |
|---|---|
|
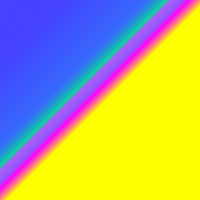
Prøv valet «differanse» i modusmenyen. Sjølv med full dekkevne vil du kunne oppnå fantastiske resultat, ulike for kvart forsøk. |
Det er fleire måtar å slå på verktøyet på:
-
Frå hovudmenyen via → → .
-
Ved å klikka på verktøysymbolet
 i verktøykassen.
 -
Ved å trykkja tasten G.
Normalt vert innstillingane for det valde verktøyet vist under verktøykassa så snart som du slår på verktøyet. Dersom dette ikkje er tilfelle, kan du få tilgang til dei frå biletmenyen via → → som vil opna verktøyinnstillingane for det valde verktøyet. Du kan også opna verktøyinnstillingane ved å dobbeltklikka på det tilsvarande verktøyikonet i verktøykassen.
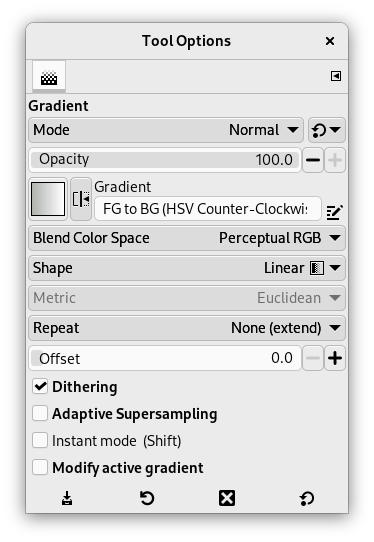
- Modus, Dekkevne
- Du finn ei beskriving av innstillingar som gjeld mange eller alle teikneverktøya under felles innstillingar for teikneverktøya.
- Fargeovergang
-
Du kan her henta fram og velja mellom mange ulike fargeovergangar i nedtrekkslista. Verktøyet lagar eit skuggemønster som går frå forgrunnsfargen til bakgrunnsfargen, eller andre fargar, i den retninga brukaren bestemmer ved å teikna ei linje på biletet i ønskt retning. Krysser du av for Revers vert retninga for fargeovergangen omsnudd t.d. slik at forgrunns- og bakgrunnsfargane byter plass.
Til høgre ein knapp for å opna dialogvindauget for å redigera fargeovergangar.
- Bland fargemrommet
-
-
Perseptuell RGB: Når denne er merkt, vert fargerommet for blanding sRGB, som er standard.
-
Lineær RGB: Når dette alternativet er vald, er blandefargerommet linearisert sRGB (definert av sRGB-primærane og ei lineær tonegjengjevingskurve). Dette resulterer i fargeovergangar som liknar den fysiske oppførselen til lys. Dette alternativet bør brukast viss fargen, målt med et kolorimeter, skal endrast lineært med avstanden frå fargestoppa innanfor fargeovergangen.
-
CIE Lab: Når dette alternativet er vald, er blandefargerommet CIE L*a*b*. Dette sanselege, einsarta fargerommet vert brukt til å modellera menneskeleg oppfatting av fargeblanding.
-
- Form
-
I GIMP har du 11 ulike former for fargeovergangar å velja mellom. Desse er nærare omtalte nedanfor.
- Lineær
-
Denne overgangen byrjar med forgrunnsfargen der den teikna linja di byrjar, og går gradvis over til full bakgrunnsfarge der linja sluttar.
- Bilineær
-
Som lineær, men går i begge retningane ut frå startpunktet. Avstanden er bestemt av stoppunktet. Kan vera nyttig når du for eksempel skal farga ein sylinder.
- Radial
-
Denne gjev ein sirkel med forgrunnsfargen i midten og bakgrunnsfargen utanfor sirkelen. Kan minna om ei kule utan retningslys.
- Firkanta, Forma
-
Dette er fire former som alle er variantar av kvadratet. Det er Firkanta, Formfyll (vinkla), Formfyll (sfærisk), og Formfyll (krusa). Alle desse formene legg forgrunnsfargen i sentrum av ein firkant som har senteret der du starta teiknelinja. Lengda på teiknelinja vert halve diagonalen i kvadratet. Dei fire vala med dei noko merkelege namna er ulike måtar å rekna ut fargegraderinga på. Den beste måten å lære skilnadane mellom desse, er rett og slett å prøve alle formene etter tur.
- Konisk (symmetrisk), Konisk (asymmetrisk)
-
Konisk (symmetrisk) gjev ei kjensle av å sjå ned på toppen av ein kon som vert opplyst med bakgrunnsfargen i ei retning som vert bestemt av retninga på teiknelinja.
Konisk (asymmetrisk) er svært lik Konisk (symmetrisk), men konen får ein rygg der linja vert teikna.
- Spiral (med klokka), Spiral (mot klokka)
-
Lager ein spiral med ei breidd bestemt av lengda på teiknelinja.
- Gjenta
-
-
Ingen som standard.
-
Ingen (avkort): områda før og etter endepunkta vert avkorta.
-
Sagtann-bølgje: Sagtannmønsteret vert laga ved å byrja med forgrunnsfargen og går gradvis over til bakgrunnsfargen for så å byrja på nytt med forgrunnsfargen igjen.

-
Triangulær bølgje: byrjar med forgrunnen og går mot bakgrunnen og deretter tilbake til forgrunnen.
-
- Forskyving
-
Denne skyvebrytaren bestemmer kor «bratt» fargeovergangen mellom to fargar skal vere. Talet på brytaren bestemmer kor langt frå klikkpunktet fargeovergangen skal byrja.
- Utjamning
-
Utjamning er ein måte å glatta ut overgangane på. Sjå meir om dette i ordlista
- Adaptiv utjamning
-
Dette er ein meir sofistikert måte for å jamne ut «taggane» som kjem langs ei skrå eller kurva linje i eit digitalt bilete. For å finna ut kva som er best i kvart tilfelle, må du prøva deg fram.
- Instantmodus
-
![[Åtvaring]](images/warning.png)
Åtvaring Dette valet må vera slått på (også med Shift) før teikninga av fargeovergangen byrjar.
Når det er merkt av for dette alternativet, forsvinn fargeovergangslinja så snart du slepp museknappen. Du kan ikkje redigera fargestopp før du brukar fargeovergangsfyllinga.
- Endra gjeldande fargeovergang
-
Når det er merkt av for dette alternativet, vert ikkje ein tilpassa fargeovergang oppretta automatisk og må difor lagast manuelt. Alternativet kan slåast på før du byrjar å teikna fargeovergangen, eller viss den gjeldande fargeovergangen ikkje er ein tilpassa fargeovergang. Gjer at du kan endra tilpassa fargeovergangar direkte utan å laga ein kopi først.


- Redigering på lerretet
-
Alle funksjonane i dialogvindauget for å redigera fargeovergangar er tilgjengelege direkte på lerretet. Du kan oppretta og sletta fargestopp, velja dei og byta dei, tilordna fargar til fargestopp, endra blanding og farge for segment mellom fargestoppa, laga fargestopp frå midtpunkt.
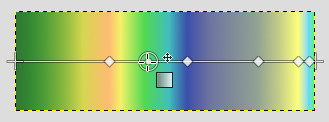
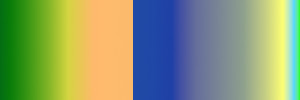
Merk ein fargeovergang i dialogvindauget for fargeovergangar og klikk og dra denne til lerretet. Det vert teikna ei linje og fargeovergangen vert vist. Du kan redigera fargeovergangen ved å dra musepeikaren langs denne linja. Straks du byrjar å redigera ein fargeovergang, vil GIMP oppretta ein tilpassa fargeovergang som er ein kopi av den valde. Han vert den gjeldande fargeovergangen og vert bevart på tvers av øktene. Her brukar me Abstract3-fargeovergangen.
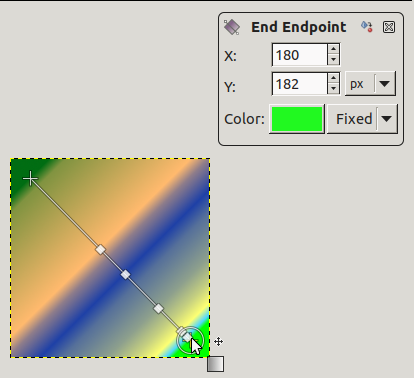
Abstract3-fargeovergangen med endepunkt
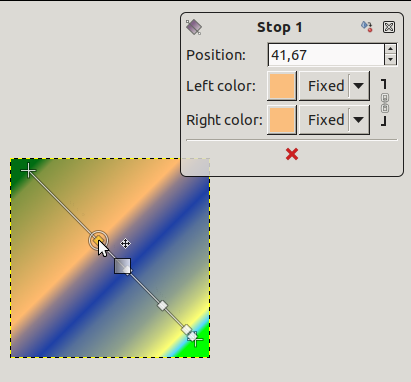
I begge endane kan du sjå eit Start-endepunkt og eit Slutt-endepunkt. Klikk og dra eit endepunkt (musepeikaren får eit flyttekryss) for å flytta det dit du ønskjer. Det kjem opp eit lite vindauge som viser data om det valde endepunktet: posisjonen til musepeikaren (koordinata tek utgangspunkt i det øvre, venstre hjørnet av vindauget eller utvalet), startfargen (venstre) og sluttfargen (høgre) i fargeovergangen.
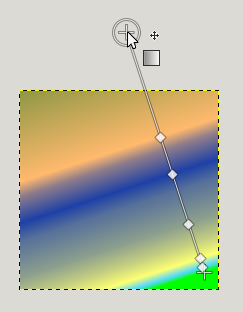
Endepunktet flytt
![[Notat]](images/note.png)
Notat Viss du berre flyttar endepunkta vert den tilpassa fargeovergangen ikkje oppretta.
Du kan sjå nokre kvadrat langs linja. Desse er Stopp som delar fargeovergangen inn i segment. Du kan redigera segmenta kvar for seg. Klikk og dra stoppane for å flytta dei (det gjeldande endepunktet får ein gul farge). Straks du flyttar ein stopp, vert den tilpassa fargeovergangen oppretta. Det vesle datavindauget viser ein knapp du kan bruka for å fjerna den gjeldande stoppen.
Stopp-puktet flytt og datavindauget
Viss du flyttar musepeikaren på linja, kjem det opp eit Midtpunkt. Det velse datavindauget har to knappar:
 for å oppretta ein ny stopp ved midtpunktet og
 for å sentrera midtpunktet.
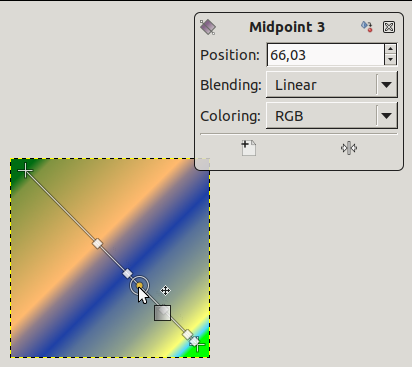
For stopp og midtpunkt referer Posisjon til fargeovergangslinja: 0 er start-endepunktet og 100 er slutt-endepunktet.
Blanding: du kan endra blandingsmodus mellom to stopp ved å bruka nedtrekkslista. Valet Steg lagar ein overgang med hard kant mellom dei to fargestoppa som ligg inntil kvarandre ved midtpunktet
Endra farge: i vindauget for stop og enddataa er det fargeknappar med ei nedtrekksliste. Standardvalet er Fast, noko som betyr at fargevalet er uavhengig av fargane i forgrunnen og bakgrunnen. Trykk på ein fargeknapp for å opna ein fargeveljar.
- Valtastar
-
Ctrl-tasten vert brukt til å laga rette linjer avgrensa til 15º absolutte vinklar.
Alt eller Ctrl+Alt for å flytta heile linja.
- Fargeovergangshandsamaren