Dette verktøyet vert brukt til å skalera, dvs. å forstørra eller forminska lag, utval, banar og bilete alt etter kva innstillingar som er brukte for transformeringa.
Når du trykkjer på biletet med Lupe-verktøyet, vert dialogvindauget for skalering opna slik at du kan endra Breidd og Høgd. Når kjedeikonet
![]() er lukka, vil justering av ein av dei også justera den andre i prosentvis same forhodet. Viss du ikkje ønskjer dette, trykk på kjedeikonet for å slå av denne synkroniseringa. Standard måleeining er pikslar, men du kan endra dette ved å trykkja på nedtrekkslista ved sida av kjedeikonet.
er lukka, vil justering av ein av dei også justera den andre i prosentvis same forhodet. Viss du ikkje ønskjer dette, trykk på kjedeikonet for å slå av denne synkroniseringa. Standard måleeining er pikslar, men du kan endra dette ved å trykkja på nedtrekkslista ved sida av kjedeikonet.
Samstundes vert det lagt ei førehandsvising (med mindre ho er slått av i verktøinnstillingane) på objektet og det vert viste handtak på hjørna og kantane som du kan klikka og dra for å endra storleiken. I midten kan ein firkant med eit kryss inni brukast for å flytta førehandsvisinga.
Du kan slå på verktøyet på fleire måtar:
-
Frå hovudmenyen via → → .
-
Ved å klikka på verktøysymbolet
 i verktøykassen.
 -
Med tastatursnarvegen Shift + S.
- Shift
-
Hald nede Shift-tasten for å slå av og på Fast sideforhold.
- Ctrl
-
Hald nede Ctrl-tasten for å slå av og på >Rundt midten.
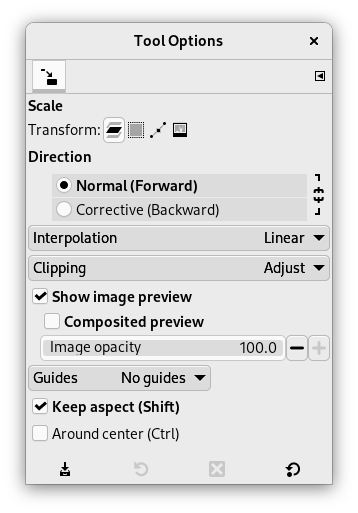
Normalt vert innstillingane for det valde verktøyet vist under verktøykassa så snart som du slår på verktøyet. Dersom dette ikkje er tilfelle, kan du få tilgang til dei frå biletmenyen via → → som vil opna verktøyinnstillingane for det valde verktøyet. Du kan også opna verktøyinnstillingane ved å dobbeltklikka på det tilsvarande verktøyikonet i verktøykassen.
- Transformer, Retning, Interpolering, Klipping, Vis førehandsvising av biletet, Hjelpelinjer
-
![[Notat]](images/note.png)
Notat Transformasjonen verkar berre på det gjeldande laget. Ønskjer du å skalere alle laga, brukar du skaler biletet i staden.
Sjå Transformera banar for å sjå korleis du kan skalera ein bane.
- Uendra proporsjonar (Shift)
-
Dersom denne funksjonen er slått på, vil forholdet mellom breidd og høgd heile tida vere det same som i det opphavlege laget eller utvalet når du flyttar på eit hjørne. Funksjonen verkar ikkje på sidehandtaka. Legg merkje til at funksjonen også påverkar lenkinga
 mellom høgd og breidd i dialogvindauget.
 - Rundt midtpunktet (Ctrl)
-
Når dette valet er slått på, kan du skalera frå midten, radielt viss «Uendra proporsjonar» er slått på, elles vassrett og loddrett.
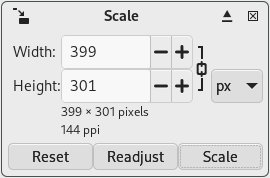
- Breidd, Høgd
-
Her kan du skriva inn breidd og høgd for objektet. Den vanlege måleeininga er pikslar, men dette kan du forandra i nedtrekkslista. Desse verdiane vert automatisk endra når du dreg i handtaka i biletet. Dersom lenka
til høgre for rutene er broten, kan du skriva inn breidd og høgd uavhengig av kvarandre. - Knappen «Justera på nytt»
-
Med denne knappen kan du setja transformeringshandtaka tilbake til den opphavlege forma utan å endra det gjeldande transformerings- og forstørringsnivået. Dette gjer at du kan utføra meir komplekse transformeringar ved å transformera i fleire steg.


