Диалог недавних изображений отображает список документов, которые вы открывали в предыдущие сеансы работы. Он более полный, чем список, который вы получаете выбирая команду «Недавние файлы».
Этот диалог можно прикрепить на панель. Более подробно об этом написано в разделе Раздел 2.3, «Диалоговые окна и стыкуемые панели».
Его можно открыть следующими способами:
-
через главное меню: → → ;
-
через меню вкладок любого стыкуемого диалога, нажав
и выбрав → .
-
через главное меню: → → .
С помощью полосы прокрутки вы можете посмотреть список всех изображений, открывавшихся ранее.
В меню вкладок диалога можно выбрать способ отображения изображений— и . В первом случае изображения располагаются в виде прямоугольной таблицы. Во втором случае они выстроены вертикально, в каждой строке показана миниатюра содержимого изображения, его имя и размер в пикселях.
![[Подсказка]](images/tip.png)
|
Подсказка |
|---|---|
|
Комбинация клавиш Ctrl+F открывает поле поиска. См. В виде списка |
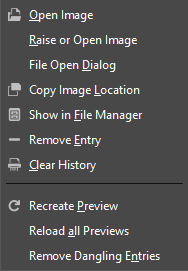
Чтобы открыть выбранное изображение, нажмите кнопку Открыть выбранный элемент
или выберите пункт из контекстного меню диалога. При нажатой клавише Shift окно, содержащее выбранное изображение, будет поднято на передний план. При нажатой клавише Ctrl появится диалог открытия изображения.
Чтобы удалить изображение из списка недавних изображений, нажмите кнопку Удалить выбранный элемент
или выберите пункт из контекстного меню диалога. Изображение также удаляется из недавно открытых. Но само изображение физически не удаляется.
Чтобы удалить все файлы из истории, нажмите кнопку Очистить всю историю файлов
или выберите пункт из контекстного меню диалога.
Чтобы обновить миниатюру в случае изменения, нажмите кнопку Повторно создать миниатюру
или выберите такую же команду из контекстного меню диалога. При нажатой клавише Shift она действует на все миниатюры. При нажатой клавише Ctrl миниатюры, соответствующие файлам, которые не могут быть обнаружены, удаляются.
- Общая информация
-
Вызвать контекстное меню недавних изображений можно, щёлкнув правой кнопкой мыши по файлу в диалоге недавно открывавшихся изображений или нажав кнопку меню вкладок
и открыв подменю . Некоторые из операций также доступны с помощью кнопок в нижней части диалога. Эти операции описаны выше. Остальные перечислены ниже.


