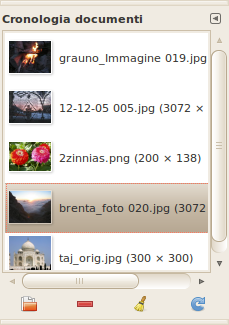
La finestra di dialogo della cronologia dei documenti mostra l'elenco dei documenti aperti nelle sessioni precedenti di GIMP. Questa lista, a differenza di quella visualizzata dal comando «Apri recenti», è completa.
Questa finestra di dialogo è di tipo agganciabile; vedere la sezione sulle Finestre agganciabili per le istruzioni su come gestire questo tipo di finestre.
È accessibile:
-
Dal menu principale: → → .
-
Da un menu scheda di un qualsiasi pannello agganciabile facendo clic su
 e selezionando → .
 -
Dal menu principale: → → .
La barra di scorrimento verticale permette di scorrere tutte le immagini aperte in precedenza.
Nel menu scheda della finestra «cronologia documenti», è possibile scegliere tra e . In modalità griglia, i documenti sono disposti come un insieme regolare rettangolare mentre in modalità elenco, essi sono allineati verticalmente in una colonna: ogni riga mostra una miniatura del contenuto dell'immagine, il suo nome e le sue dimensioni in pixel.
![[Suggerimento]](images/tip.png)
|
Suggerimento |
|---|---|
|
Ctrl+F apre una casella di ricerca. Vedere Mostra come elenco |
Usare il pulsante Apri la voce selezionata
![]() o il comando del menu contestuale della finestra di dialogo per aprire l'immagine selezionata. Con il tasto Maiusc premuto, viene visualizzata un'immagine nascosta dietro le altre. Con il tasto Ctrl premuto, si apre la finestra di dialogo Apri immagine.
o il comando del menu contestuale della finestra di dialogo per aprire l'immagine selezionata. Con il tasto Maiusc premuto, viene visualizzata un'immagine nascosta dietro le altre. Con il tasto Ctrl premuto, si apre la finestra di dialogo Apri immagine.
Usare il pulsante Rimuovi la voce selezionata
![]() o il comando dal menu contestuale della finestra di dialogo per rimuovere un'immagine dalla finestra di dialogo Cronologia. L'immagine viene rimossa anche dall'elenco delle immagini aperte di recente. Tuttavia, l'immagine stessa non viene eliminata.
o il comando dal menu contestuale della finestra di dialogo per rimuovere un'immagine dalla finestra di dialogo Cronologia. L'immagine viene rimossa anche dall'elenco delle immagini aperte di recente. Tuttavia, l'immagine stessa non viene eliminata.
Usare il pulsante Cancella l'intera cronologia dei file
![]() o il comando del menu contestuale della finestra di dialogo per rimuovere tutti i file dalla cronologia.
o il comando del menu contestuale della finestra di dialogo per rimuovere tutti i file dalla cronologia.
Usare il pulsante Ricrea anteprima
![]() o il comando del menu contestuale della finestra di dialogo per aggiornare l'anteprima in caso di modifiche. Premendo il tasto Maiusc, si agisce su tutte le anteprime. Premendo il tasto Ctrl, le anteprime corrispondenti a file che non è possibile trovare vengono eliminate.
o il comando del menu contestuale della finestra di dialogo per aggiornare l'anteprima in caso di modifiche. Premendo il tasto Maiusc, si agisce su tutte le anteprime. Premendo il tasto Ctrl, le anteprime corrispondenti a file che non è possibile trovare vengono eliminate.
- Panoramica
-
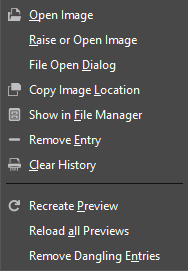
È possibile accedere al menu contestuale della cronologia dei documenti facendo clic con il pulsante destro del mouse su un file nella finestra di dialogo della cronologia dei documenti, oppure facendo clic sul pulsante del menu scheda ???
e aprendo il sottomenu . Molte di queste operazioni sono disponibili anche tramite i pulsanti in fondo alla finestra di dialogo. Tali operazioni sono descritte sopra. Le restanti sono elencate di seguito.


