Tabla de contenidos
- 1. La caja de herramientas
- 2. Herramientas de selección
- 3. Herramientas de pintura
-
- 3.1. Características comunes
- 3.2. Dinámicas
- 3.3. Herramientas de pincel (lápiz, pincel, aerógrafo)
- 3.4. Relleno de cubeta
- 3.5. Degradado
- 3.6. Lápiz
- 3.7. Pincel
- 3.8. Goma de borrar
- 3.9. Aerógrafo
- 3.10. Tinta
- 3.11. Pincel MyPaint
- 3.12. Clonar
- 3.13. Sanear
- 3.14. Clonar con perspectiva
- 3.15. Desenfocar/Enfocar
- 3.16. Emborronar
- 3.17. Blanquear/Ennegrecer
- 4. Herramientas de transformación
- 5. Other Tools
GIMP proporciona una caja de herramientas completa para realizar con rapidez operaciones básicas como hacer selecciones o dibujar rutas. La mayoría de las herramientas contenidas en la caja de herramientas de GIMP se tratan en detalle aquí.
(Si siente curiosidad, en el lenguaje de GIMP una "herramienta" es una manera de actuar sobre una imagen que requiere el acceso a su pantalla, ya sea para que indique lo que quiere hacer moviendo el puntero dentro de la pantalla, o para mostrar interactivamente los resultados de los cambios que ha realizado. Pero si quiere pensar en una herramienta como una sierra, y una imagen como un trozo de madera, probablemente no le hará mucho daño).
![[Nota]](images/note.png)
|
Nota |
|---|---|
|
En Ventanas principales: la caja de herramientas hay una descripción de la caja de herramientas y de sus componentes. |
GIMP has a diverse assortment of tools that let you perform a large variety of tasks. The tools can be thought of as falling into the following categories:
-
Herramientas de selección, que definen o modifican la porción de la imagen que se verá afectada por los cambios posteriores;
-
Herramientas de pintura, que permiten alterar los colores en alguna parte de la imagen;
-
Herramientas de transformación,que alteran la geometría de la imagen;
-
Herramientas de color, que permiten alterar los colores en toda la imagen;
-
Other tools, which don't fall into the other categories.
Most tools can be activated by clicking on an icon in the Toolbox. By default, some tools are accessible only via the menus. Every tool can be activated from the menu (or the menu for some color tools). Most tools can also be activated from the keyboard using an accelerator key.
In the default setup, created when GIMP is first installed, not all tools show icons in the Toolbox: some tools are omitted. You can customize the set of tools that are shown in the Toolbox in the Toolbox Preferences.
There are two reasons you might want to do this: first, if you only rarely use a tool, it might be easier to find the tools you want if the distracting icon is removed; second, if you use tools that are not found in the toolbox by default, you might find it convenient to have icons for them easily available. In any case, you can always access any tool at any time using the or menu from the main menu.
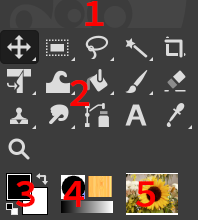
Tool icons are grouped by default. Tool groups are marked with a small dark triangle at the bottom right corner of the icon. The group icon displayed is the last used tool in the group. Right click on the group icon to display the list of tools in the group.
You can get all tools displayed by unchecking the Use tool groups option in Sección 6.13, “Caja de herramientas”.
By default, the shape of the pointer changes when it is inside an image, to a shape that indicates which tool is active. You can change this behavior in the Pointers section of the Input Devices settings.
Figura 14.2. Foreground/Background Colors Area in the Toolbox

The Foreground/Background Colors area, marked with (3)
- Área de colores
-
The color area shows GIMP's current foreground and background colors, which are used for painting, filling, and many other operations. Clicking on either one of them brings up a color selector dialog that allows you to change to a different color.
- Colores predeterminados
-
Clicking on the small symbol in the lower left corner resets the foreground and background colors to black and white. Pressing the D key has the same effect.
- Swap Foreground/Background colors
-
Clicking on the double-headed arrow symbol swaps the foreground and background colors. Pressing the X key has the same effect.
![[Sugerencia]](images/tip.png)
Sugerencia Puede pulsar y arrastrar uno de esos colores directamente dentro de una capa: esto rellenará la capa entera.
Figura 14.3. Active Brush, Pattern and Gradient Area in the Toolbox

The Active Brush, Pattern and Gradient area, marked with (4)
By default, this area is not displayed. You can add this area through → → : Sección 6.13, “Caja de herramientas”.
Esta parte de la caja de herramientas muestra el pincel, el patrón y el degradado seleccionados actualmente. Al pulsar sobre cualquiera de ellos, aparece un diálogo que le permite cambiarlo.
By default, this area is not displayed. You can add this area through → → : Sección 6.13, “Caja de herramientas”.
A thumbnail of the active image is displayed in this area. If you click on this thumbnail, the Images dialog is opened. This can be useful if you have many images on your screen.
If you use GIMP on a Unix-like operating system with the X Window System, you can also drag and drop the thumbnail to an enabled XDS file manager to directly save the corresponding image.
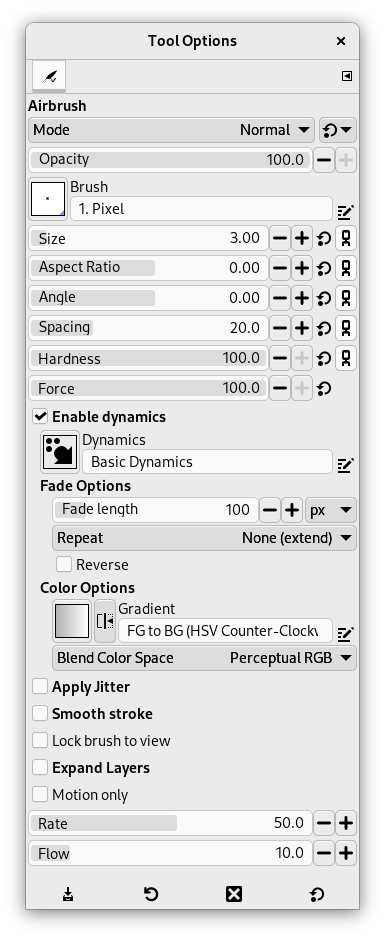
Figura 14.5. Diálogo de opciones de herramienta

El diálogo de opciones de la herramienta de aerógrafo.
Si tiene todo configurado como la mayoría de los usuarios, activar una herramienta provoca que el diálogo de opciones de herramienta aparezca debajo la caja de herramientas. Si no tiene esta configuración, probablemente debería: es muy difícil usar herramientas de forma efectiva sin poder gestionar sus opciones.
![[Sugerencia]](images/tip.png)
|
Sugerencia |
|---|---|
|
The Tool Options appear beneath the Toolbox in the default setup. If you lose it somehow, you can get it back by creating a new Tool Options dialog using → → and then docking it below the Toolbox. Alternatively you can double-click any tool button in the Toolbox as a quick way to open the Tool Options. If it appears in a different dock than the one you want, you can drag it to your preferred dock. See the section on Dialogs and Docking if you need help moving the Tool Options. |
Cada herramienta tiene su propio conjunto de opciones. Los cambios que realice en las opciones se mantendrán a lo largo de la sesión, hasta que las cambie. De hecho, las opciones de las herramientas se conservan de una sesión a otra. La persistencia de las opciones de herramientas a través de las sesiones puede en ocasiones resultar molesta: una herramienta se comporta de manera extraña, y no se imagina el por qué, hasta que recuerda que la usó, con una opción no habitual, la última vez que trabajó con ella, hace dos semanas.
En la parte inferior del diálogo de opciones de herramientas hay cuatro botones:
-
Save Tool Preset…
-
This button allows you to save the settings for the current tool, so that you can restore them later. It brings up the Sección 7.2, “Diálogo de la herramienta de preajustes” allowing you to give a name for the new preset. When you Restore options, only saved presets for the active tool are shown, so you need not worry about including the name of the tool when you assign a name here.
-
Restore Tool Preset…
-
This button allows you to restore a previously saved preset of options for the active tool. If no presets have ever been saved for the active tool, the button will be disabled. Otherwise, clicking it will bring up a menu showing the names of all saved option sets: choosing a menu entry will apply those settings.
-
Eliminar ajuste prefijado de herramienta
-
Este botón le permite eliminar una conjunto de opciones previamente guardado para la herramienta activa. Si no se guardó ningún conjunto de opciones para la herramienta activa, el botón simplemente repetirá el nombre de la herramienta. En otro caso, al pulsar en él aparecerá un menú que muestra los nombres de los conjuntos de opciones guardados: la configuración seleccionada se borrará.
-
Restablecer a los valores predeterminados
-
This button resets the options for the active tool to their default values. If you hold the Shift key while pressing the Reset button, the options for all tools will be reset to their default values.
In addition to the commands for the above buttons, the Tool Options tab menu has an extra submenu:
- Edit Tool Preset
-
This submenu shows a list of presets for the active tool that you can edit. Selecting one of them will open the Tool Presets Editor with that tool preset loaded. From there you can edit the preset, unless it is one of the default presets that come with GIMP.
Below we will explain the interaction with sliders and the mouse scroll-wheel.
- Nuevos deslizadores
-
You can use multiple modifiers with either left-click or mouse wheel scrolling:
Tabla 14.1. Interaction with the Slider Widget
Mouse / key combination
Action 
Change the value to what's under the pointer 
Change the value using the default increment 
Shift + or
Change the value using smaller increment 
Ctrl +
Change the value using larger increment 
Enter numeric input mode, do not select the value 
Enter numeric input mode, select the value Hint: Any left-click interaction enables numeric input mode.
Una vez que haya establecido el valor aproximado, puede ajustarlo de manera precisa usando los dos botones pequeños de flechas a la derecha del deslizador.
El área del valor del deslizador funciona como un editor de texto: puede editar el valor o introducir un valor nuevo directamente.
Para algunas opciones, puede arrastrar el puntero fuera del diálogo de la herramienta. Por ejemplo, con el deslizador del tamaño, puede obtener el valor máximo (10000) de esta manera.
- Acciones de la rueda del ratón en el lienzo
-
Al usar herramientas, puede usar la rueda de desplazamiento del ratón, en combinación con varios modificadores, para hacer cosas útiles con las opciones de herramienta de la herramienta seleccionada:
-
Alt + Mouse-wheel: aumenta/disminuye la opacidad
-
Shift+Primary + Mouse-wheel: aumenta/disminuye la relación de aspecto
-
Shift+Alt + Mouse-wheel: aumenta/disminuye el ángulo
-
Primary+Alt + Mouse-wheel: aumenta/disminuye el tamaño
-
Shift+Primary+Alt + Mouse-wheel: aumenta/disminuye el espaciado
Note: the Primary modifier is usually Ctrl or Cmd, depending on your platform.
-


