Inhaltsverzeichnis
Text is managed with the Text tool. This tool creates a new layer containing the text, above the current layer in the Layers dialog, with the size of the text box. Its name is the beginning of the text.
Abbildung 9.1. Beispiel eines Textelementes

Ein Beispieltext mit gut sichtbarer Textebene (die Schriftart ist Utopia fett)

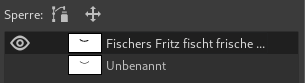
The Layers dialog, with the text layer above the layer which was current.
Text can be edited directly on canvas. A text tool box, which shows up on top of the canvas above the text box, allows you to quickly change some of the text characteristics.
![[Anmerkung]](images/note.png)
|
Anmerkung |
|---|---|
|
The settings you change in this on canvas dialog only apply to the parts of the text that are selected, or any new text you type after the current cursor position. |
When you click on the canvas with the Text tool, an empty text box appears with a semi-transparent dialog above it. The empty text box is where your text will appear when you start typing.
Die Text-Werkzeugeinstellungen sind in Abschnitt 5.3, „Text“ beschrieben.
To enter text start typing. The text box will enlarge gradually. Press Enter to add a new line.
You can also enlarge the text box by click-and-dragging, as you do with selections. While dragging, the size of the text area will be shown in the status bar at the bottom of the image window.

To edit text properties first select the part you want to change by click-and-dragging, or by using Shift+arrow keys. Then use the options of the Abschnitt 1.3, „Text-Werkzeugbox“ to change the selected text.
Zusätzlich zur direkten Bearbeitung auf der Leinwand können Sie auch den Texteditor verwenden, wie in Abschnitt 5.3.3, „Texteditor“ beschrieben.
To move the text on the image use the Move Tool. Note that by default you must click on a visible part of the text to move the text layer.
Sie können Texte nachträglich bearbeiten, wenn die Textebene noch existiert und von keinem anderen Werkzeug verändert wurde (siehe unten). Wählen Sie dazu die Textebene im Ebenendialog sowie das Textwerkzeug aus, und klicken Sie auf den Text im Bildfenster.
It can be useful to enter characters that are not easily available on your keyboard. How you enter these Unicode characters depends on your Operating System.
- Linux
-
You can enter Unicode characters with the keyboard shortcut Ctrl+Shift+U followed by the hexadecimal number of the desired character and then pressing Enter.
- macOS
-
Use the Character Viewer, shortcut Ctrl+Cmd+Space to find and insert symbols, or enable the Unicode Hex Input keyboard in Keyboard settings. With the Unicode Hex Input active, hold the Option key and type the character's hexadecimal code to insert it.
- Windows
-
If you know the number of the character, you can enter that character by pressing and holding the left Alt followed by the number using the numbers on the keypad, and then releasing the Alt key. This only works for a limited set of characters.
Alternatively you can select a character or emoji by opening a dialog using the shortcut Windows-key+.. By default emojis are shown, but you can change that to symbols using the tabs at the top, and then further select a category with the tabs at the bottom.
The third option is by opening the Character Map™ application that is part of Windows and select the desired character from there.
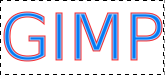
Of course this feature is more useful for entering special (even exotic) characters, provided that the required glyphs for these characters are supplied by the selected font — only few fonts support Klingon. ;-)
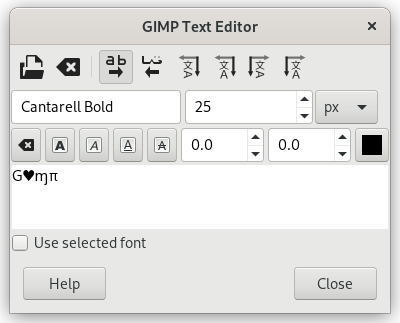
Unicode 0x47 („G“), 0x2665, 0x0271, 0x03C0
Sie können Textebenen auch in ganz normale Ebenen überführen, dann ist es jedoch nicht mehr möglich, den Text als solches zu verändern. Sie müssten dann alle Veränderungen auf Pixelebene vornehmen.
Um die Eigenheiten des Umganges mit Text in GIMP besser zu verstehen, hilft es möglicherweise, sich vor Augen zu halten, dass Textebenen ganz andere Informationen beinhalten als normale Ebenen, welche ausschließlich aus Pixeln zusammengesetzt sind. In Textebenen muss zusätzlich der Text im Textformat, zusammen mit all den Informationen über Schriftart, Größe, Ausrichtung und so weiter, verwaltet werden. Sie können dies im Texteditor sehen, welcher sich öffnet, wenn Sie das Textwerkzeug benutzen. Jedes Mal, wenn Sie den Text verändern, wird die Bildebene neu gezeichnet, um Ihre Änderungen widerzuspiegeln.
Nehmen wir einmal an, Sie erzeugen eine Textebene und bearbeiten die Ebene dann auf eine Weise, die nichts mit dem Text zu tun hat. Beispielsweise könnten Sie die Ebene drehen. Wenn Sie nun wiederum den Text der Ebene bearbeiten, so wird dieser neu in die Ebene gezeichnet und zerstört das Ergebnis der in der Zwischenzeit durchgeführten Bearbeitungsschritte.
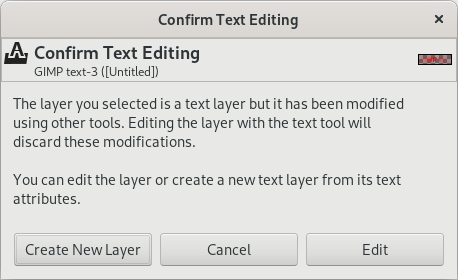
Da diese Gefahr nicht offensichtlich ist, versucht das Textwerkzeug, Sie davor zur beschützen. Wenn Sie auf einer Textebene arbeiten und später versuchen, den Text weiter zu bearbeiten, öffnet sich ein Dialogfenster, das Sie warnt und Ihnen folgende drei Möglichkeiten anbietet:
-
Den Text trotzdem zu bearbeiten
-
Die Aktion abzubrechen
-
Eine neue Textebene mit dem Text der bereits vorhandenen Textebene anzulegen und diese unverändert zu belassen.
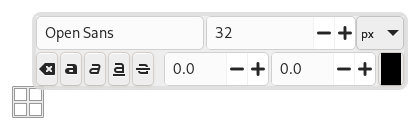
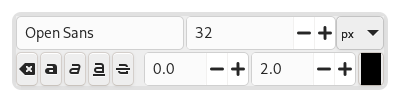
An on-canvas text toolbar appears when you click on the canvas with the Text Tool, right above the location where you type your text. It allows you to change most common text settings directly on canvas. The toolbar can be moved to a different position if it is in the way.
Besides the usual text formatting features like font family, size, style and text color, you get control over baseline offset and kerning.
|
|
Anmerkung |
|---|---|
|
Beware that all the settings on this toolbar only work on the currently selected text. That way you can use different styles for different parts of your text. |
-
The
 icon on the left side shows the area on the toolbar that you can
grab to drag the toolbar to a different location.
icon on the left side shows the area on the toolbar that you can
grab to drag the toolbar to a different location.
-
When the toolbar has been moved from its original location, it can be restored to that location by using the
 icon on the top right side of the toolbar. This icon is only visible
if the toolbar has been moved.
icon on the top right side of the toolbar. This icon is only visible
if the toolbar has been moved.
-
Schriftart der Textauswahl ändern: Sobald Sie anfangen, die voreingestellte Schriftart zu bearbeiten, erscheint eine Auswahlliste, über die Sie die gewünschte Schrift auswählen können.
-
Change size of selected text: changes the font size of the selected text. The unit drop-down next to it can be used to change the type of unit used for the text size.
-
 Clear style of selected text:
use this to remove all text styling that was applied to the
selected text.
Clear style of selected text:
use this to remove all text styling that was applied to the
selected text.
-
Bold, Italic, Underline, Strikethrough: toggles the markup for the selected text.
While editing, shortcut keys can be used for Bold (Ctrl+B), Italic (Ctrl+I) and Underline Ctrl+U.
-
Change baseline of selected text: „In European typography and penmanship, baseline is the line upon which most letters "sit" and below which descenders extend“ (Wikipedia). In HTML, there are several kinds of baselines (alphabetic, ideographic, bottom…). Here, consider that baseline is "bottom" and determines the place for descenders. The default baseline "0" gives place for descenders. You can use it to increase space between two lines only, while „Adjust line spacing“ in tool options increases space between all lines.
Abbildung 9.4. Voreingestellte Grundlinie
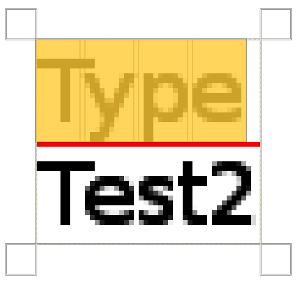
Die voreingestellte Grundlinie ist durch eine rote Linie hervorgehoben.
-
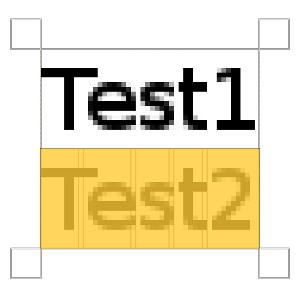
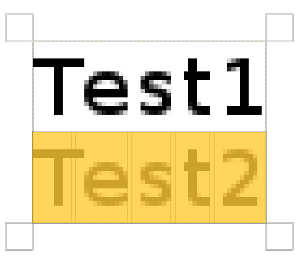
Change kerning of selected text: „In typography, kerning… is the process of adjusting the spacing between characters in a proportional font.“ (Wikipedia). You can use this setting to adjust letter spacing of a selected part of text.
Sehen wir uns den ausgewählten Text an (zur Veranschaulichung 800fach vergrößert):
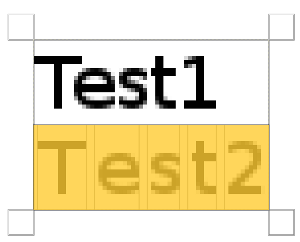
Wir erkennen, dass die Sans-Schriftart eine Proportionalschrift ist: Die Buchstabenbreiten sind unterschiedlich, und die „T“-Glyphe überlappt mit „e“. Die Buchstabenbreiten sind durch dünne, vertikale Linien gekennzeichnet. Der Abstand zwischen zwei angrenzenden Buchstaben beträgt 1 Pixel. Jetzt setzen wir die Unterschneidung auf 2 Pixel:
Leerräume von 2 Pixeln werden zwischen den ausgewählten Buchstaben hinzugefügt. Die Buchstabenbreiten werden beibehalten. Wenn kein Text ausgewählt ist, wird ein Leerraum an der Position des Mauszeigers zwischen zwei Buchstaben hinzugefügt.
Here is a comparison with the Adjust letter spacing option of the Text tool:
Die Einstellung gilt für den gesamten Text, nicht nur die Auswahl. Leerräume werden in die Buchstabenbreiten eingefügt; auf die Breiten wird keine Rücksicht genommen.
-
Sie können auch Alt+Pfeiltasten verwenden, um den Versatz von der Grundlinie und das Kerning anzupassen.
-
Farbe des ausgewählten Texts ändern: Dieser Befehl öffnet einen Farbdialog, über den Sie die Farbe des ausgewählten Texts wählen können.

The context menu can be brought up by right-clicking on text. It is somewhat different from that of the Text Editor dialog.
The context menu offers the following options:
-
Cut, Copy, Paste, Delete: these commands work with selected text. Except for Paste, they are disabled as long as no text is selected. Paste is enabled when the clipboard contains text.
-
Paste unformatted text: paste text from the clipboard without any markup.
-
Restore On-Canvas Editor Position: changes the position of the On-Canvas Editor to its original location. This is disabled when it already is in the original location.
-
Open text file…: this command opens a file dialog where you can select a text file. The contents of this file will be opened in the current text layer.
-
Löschen: Dieser Befehl löscht den gesamten Text, egal ob ausgewählt oder nicht.
-
Text to Path: this command creates a path from the outlines of the current text. The result is not evident. You have to open the Paths dialog and make path visible. Then select the Path tool and click on the text. Every letter is now surrounded with a path component. So you can modify the shape of letters by moving path control points.
Dieser Befehl ähnelt → .
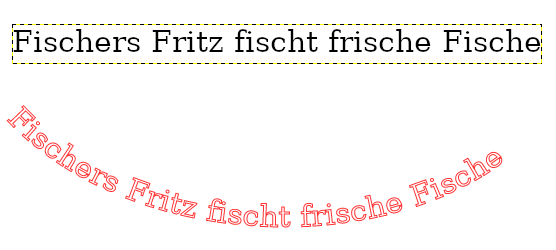
Abbildung 9.9. Pfad als sichtbar eingestellt
Pfad im Pfaddialog als sichtbar eingestellt. Der Pfad erscheint als roter Rand um den Text.
-
This option is enabled only if a path exists. When your text is created, then create or import a path and make it active. If you create your path before the text, the path becomes invisible and you have to make it visible in the Paths dialog.
The Text along path command is also available from the menu in the main menu.
The commands , , and only appear in the menu if a text layer is selected.
Select the option. The text is wrapped along the path. Letters are represented with their outline. Each of them is a component of the new path that appears in the Paths dialog.
Anmerkung You can change the direction that the text is wrapped around the path by reversing the stroke direction when editing the path with the Path Tool. In the same way you can change at which anchor stroking starts.
By converting a text item to a selection or a path, you can fill it, stroke the outlines, transform it, or generally apply the whole panoply of GIMP tools to get interesting effects.
-
From left to right, From right to left, Vertical, right to left (mixed orientation), Vertical, right to left (upright orientation), Vertical, left to right (mixed orientation), Vertical, left to right (upright orientation): These commands let you adjust the writing direction of the text.