Tabla de contenidos
Text is managed with the Text tool. This tool creates a new layer containing the text, above the current layer in the Layers dialog, with the size of the text box. Its name is the beginning of the text.
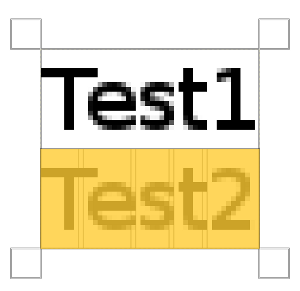
Figura 9.1. Ejemplo de un elemento de texto
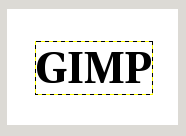
Ejemplo de un elemento de texto, mostrando los contornos de la capa de texto. (Tipografía: Utopia Bold.)
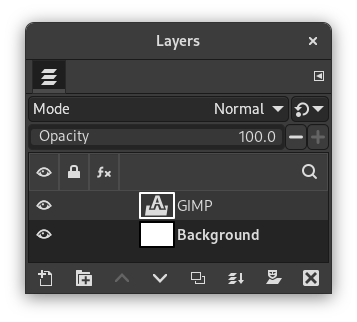
The Layers dialog, with the text layer above the layer which was current.
Text can be edited directly on canvas. A text tool box, which shows up on top of the canvas above the text box, allows you to quickly change some of the text characteristics.
![[Nota]](images/note.png)
|
Nota |
|---|---|
|
The settings you change in this on canvas dialog only apply to the parts of the text that are selected, or any new text you type after the current cursor position. |
When you click on the canvas with the Text tool, an empty text box appears with a semi-transparent dialog above it. The empty text box is where your text will appear when you start typing.
Las opciones de la herramienta de texto se describen en la Sección 5.3, “Texto”.
To enter text start typing. The text box will enlarge gradually. Press Enter to add a new line.
You can also enlarge the text box by click-and-dragging, as you do with selections. While dragging, the size of the text area will be shown in the status bar at the bottom of the image window.

To edit text properties first select the part you want to change by click-and-dragging, or by using Shift+arrow keys. Then use the options of the Sección 1.3, “Caja de herramientas de texto” to change the selected text.
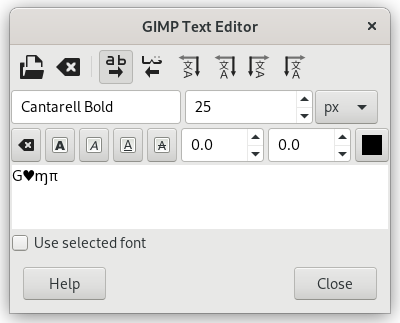
En lugar de usar el editar de texto del lienzo, puede usar la el diálogo del editor de texto descrito en la Sección 5.3.3, “Editor de texto”.
To move the text on the image use the Move Tool. Note that by default you must click on a visible part of the text to move the text layer.
Puede editar texto después, si la capa de texto aún existe y no se ha modificado con otra herramienta (ver más abajo): haga la capa de texto activa en el diálogo de capas, seleccione la herramienta de texto y pulse en el texto en la ventana de la imagen.
It can be useful to enter characters that are not easily available on your keyboard. How you enter these Unicode characters depends on your Operating System.
- Linux
-
You can enter Unicode characters with the keyboard shortcut Ctrl+Shift+U followed by the hexadecimal number of the desired character and then pressing Enter.
- macOS
-
Use the Character Viewer, shortcut Ctrl+Cmd+Space to find and insert symbols, or enable the Unicode Hex Input keyboard in Keyboard settings. With the Unicode Hex Input active, hold the Option key and type the character's hexadecimal code to insert it.
- Windows
-
If you know the number of the character, you can enter that character by pressing and holding the left Alt followed by the number using the numbers on the keypad, and then releasing the Alt key. This only works for a limited set of characters.
Alternatively you can select a character or emoji by opening a dialog using the shortcut Windows-key+.. By default emojis are shown, but you can change that to symbols using the tabs at the top, and then further select a category with the tabs at the bottom.
The third option is by opening the Character Map™ application that is part of Windows and select the desired character from there.
Of course this feature is more useful for entering special (even exotic) characters, provided that the required glyphs for these characters are supplied by the selected font — only few fonts support Klingon. ;-)
Unicode 0x47 (“G”), 0x2665, 0x0271, 0x03C0
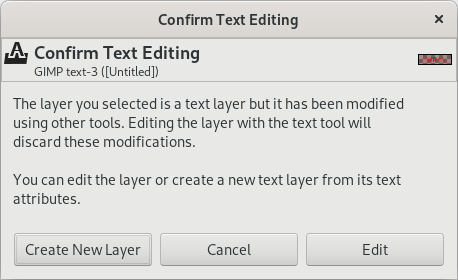
Puede operar sobre una capa de texto de la misma forma en que opera sobre cualquier otra capa, pero al hacerlo es posible que pierda la capacidad de editar su texto sin que se pierdan los resultados de su trabajo.
Para comprender algunas de las idiosincracias de la manipulación de texto, puede ayudar saber que una capa de texto contiene más información que los datos de píxeles que muestra: también contiene una representación del texto en un formato del editor de texto. Puede verlo en la ventana del editor de texto que aparece cuando usa la herramienta de texto. Cada vez que altere el texto, la capa de la imagen que lo contiene se vuelve a dibujar para reflejar sus cambios.
Ahora suponga que crea una capa de texto, y luego realiza operaciones sobre ella que no implican a la herramienta de texto, como por ejemplo rotarla. Suponga que vuelve para editarla con la herramienta de texto. Tan pronto como edita el texto, la herramienta de texto vuelve a dibujar la capa, reemplazando las modificaciones que ha hecho mientras tanto.
Dado que este peligro no es obvio, la herramienta de texto le advierte de lo que va a suceder. Si modifica la capa de texto y luego intenta editar el texto, aparece un mensaje avisando que se desharán los cambios, y ofreciendo tres opciones:
-
editar el texto de todos modos;
-
cancelar;
-
crear una capa nueva de texto con el mismo texto que la capa existente, manteniendo la capa existente como está.
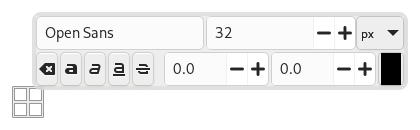
An on-canvas text toolbar appears when you click on the canvas with the Text Tool, right above the location where you type your text. It allows you to change most common text settings directly on canvas. The toolbar can be moved to a different position if it is in the way.
Besides the usual text formatting features like font family, size, style and text color, you get control over baseline offset and kerning.
|
|
Nota |
|---|---|
|
Beware that all the settings on this toolbar only work on the currently selected text. That way you can use different styles for different parts of your text. |
-
The
 icon on the left side shows the area on the toolbar that you can
grab to drag the toolbar to a different location.
icon on the left side shows the area on the toolbar that you can
grab to drag the toolbar to a different location.
-
When the toolbar has been moved from its original location, it can be restored to that location by using the
 icon on the top right side of the toolbar. This icon is only visible
if the toolbar has been moved.
icon on the top right side of the toolbar. This icon is only visible
if the toolbar has been moved.
-
Cambiar la tipografía ddel texto seleccionado: cuando empiece a editar el nombre de la tipografía predeterminada, aparecerá una lista desplegable permitiéndole seleccionar una tipografía.
-
Change size of selected text: changes the font size of the selected text. The unit drop-down next to it can be used to change the type of unit used for the text size.
-
 Clear style of selected text:
use this to remove all text styling that was applied to the
selected text.
Clear style of selected text:
use this to remove all text styling that was applied to the
selected text.
-
Bold, Italic, Underline, Strikethrough: toggles the markup for the selected text.
While editing, shortcut keys can be used for Bold (Ctrl+B), Italic (Ctrl+I) and Underline Ctrl+U.
-
Change baseline of selected text: “In European typography and penmanship, baseline is the line upon which most letters "sit" and below which descenders extend” (Wikipedia). In HTML, there are several kinds of baselines (alphabetic, ideographic, bottom…). Here, consider that baseline is "bottom" and determines the place for descenders. The default baseline "0" gives place for descenders. You can use it to increase space between two lines only, while “Adjust line spacing” in tool options increases space between all lines.
-
Change kerning of selected text: “In typography, kerning… is the process of adjusting the spacing between characters in a proportional font.” (Wikipedia). You can use this setting to adjust letter spacing of a selected part of text.
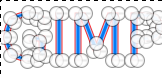
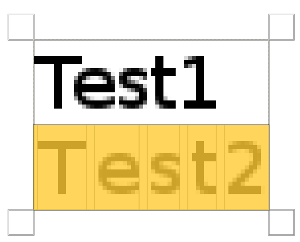
Veamos un texto seleccionado (aumentado x800 para ver los píxeles):
Podemos ver que la tipografía Sans es una tipografía proporcional: los anchos de las letras son diferentes y el glifo “T” aparece sobre la “e”. Los anchos de las letras están marcados con líneas verticales delgadas y los bordes izquierdos de la anchura de la letra cubren las letras anteriores en un píxel. Ahora establecemos “Cambiar interletraje del texto seleccionado” a 2 píxeles:
Se agregan espacios en blanco, de 2 píxeles de anchura, entre todos los caracteres seleccionados y se conservan los anchos de las letras. Si no se selecciona texto, se agrega un espacio en blanco en el lugar del puntero del ratón entre dos caracteres.
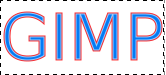
Here is a comparison with the Adjust letter spacing option of the Text tool:
La opción se aplica a todo el texto, no solo al texto seleccionado. Se agregan espacios en blanco dentro de la anchura de las letras y no se respetan las anchura de las letras.
-
También puede usar Alt+flechas del teclado para cambiar el desplazamiento de la línea base y el interletraje.
-
Cambiar el color del texto seleccionado: este comando abre un diálogo de color donde puede elegir un color para el texto seleccionado.


The context menu can be brought up by right-clicking on text. It is somewhat different from that of the Text Editor dialog.
The context menu offers the following options:
-
Cut, Copy, Paste, Delete: these commands work with selected text. Except for Paste, they are disabled as long as no text is selected. Paste is enabled when the clipboard contains text.
-
Paste unformatted text: paste text from the clipboard without any markup.
-
Restore On-Canvas Editor Position: changes the position of the On-Canvas Editor to its original location. This is disabled when it already is in the original location.
-
Open text file…: this command opens a file dialog where you can select a text file. The contents of this file will be opened in the current text layer.
-
Limpiar: este comando elimina todo el texto, seleccionado o no.
-
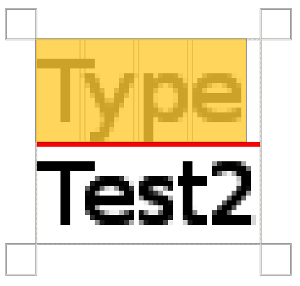
Text to Path: this command creates a path from the outlines of the current text. The result is not evident. You have to open the Paths dialog and make path visible. Then select the Path tool and click on the text. Every letter is now surrounded with a path component. So you can modify the shape of letters by moving path control points.
Este comando es similar a → .
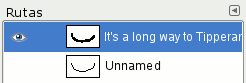
Figura 9.9. Ruta hecha visible
Ruta hecha visible en la pestaña Ruta. La ruta aparece como un borde rojo alrededor del texto.
-
This option is enabled only if a path exists. When your text is created, then create or import a path and make it active. If you create your path before the text, the path becomes invisible and you have to make it visible in the Paths dialog.
The Text along path command is also available from the menu in the main menu.
The commands , , and only appear in the menu if a text layer is selected.
Select the option. The text is wrapped along the path. Letters are represented with their outline. Each of them is a component of the new path that appears in the Paths dialog.
Nota You can change the direction that the text is wrapped around the path by reversing the stroke direction when editing the path with the Path Tool. In the same way you can change at which anchor stroking starts.
By converting a text item to a selection or a path, you can fill it, stroke the outlines, transform it, or generally apply the whole panoply of GIMP tools to get interesting effects.
-
From left to right, From right to left, Vertical, right to left (mixed orientation), Vertical, right to left (upright orientation), Vertical, left to right (mixed orientation), Vertical, left to right (upright orientation): These commands let you adjust the writing direction of the text.