Sisällys
Text is managed with the Text tool. This tool creates a new layer containing the text, above the current layer in the Layers dialog, with the size of the text box. Its name is the beginning of the text.
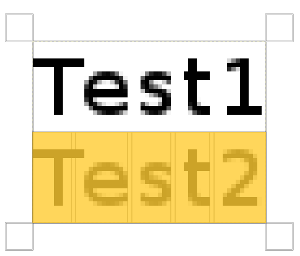
Kuva 9.1. Esimerkki tekstiesineestä
Esimerkki tekstistä, joka osoittaa tekstikerroksen rajan. (Fontti: Utopia Bold)
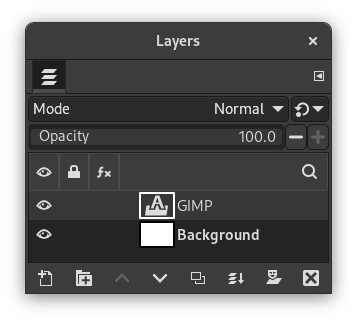
The Layers dialog, with the text layer above the layer which was current.
Text can be edited directly on canvas. A text tool box, which shows up on top of the canvas above the text box, allows you to quickly change some of the text characteristics.
![[Huomaa]](images/note.png)
|
Huomaa |
|---|---|
|
The settings you change in this on canvas dialog only apply to the parts of the text that are selected, or any new text you type after the current cursor position. |
When you click on the canvas with the Text tool, an empty text box appears with a semi-transparent dialog above it. The empty text box is where your text will appear when you start typing.
Tekstityökalu vaihtoehdot on kuvattu Kohta 5.3, ”Text”.
To enter text start typing. The text box will enlarge gradually. Press Enter to add a new line.
You can also enlarge the text box by click-and-dragging, as you do with selections. While dragging, the size of the text area will be shown in the status bar at the bottom of the image window.

To edit text properties first select the part you want to change by click-and-dragging, or by using Shift+arrow keys. Then use the options of the Kohta 1.3, ”Teksti työkalupakki” to change the selected text.
Kankaalle tekstin editoimisen sijaan voit käyttää tekstieditori dialogia kuten kuvataan Kohta 5.3.3, ”Text Editor”.
To move the text on the image use the Move Tool. Note that by default you must click on a visible part of the text to move the text layer.
Voit editoida tekstiä myöhemmin, jos tekstikerros on vielä olemassa ja sitä ei olla muokattu toisella työkalulla (katso alla): saat tekstikerroksen aktiiviseksi Kerros dialogista, valitse tekstityökalu ja klikkaa kuvaikkunasta tekstiä.
It can be useful to enter characters that are not easily available on your keyboard. How you enter these Unicode characters depends on your Operating System.
- Linux
-
You can enter Unicode characters with the keyboard shortcut Ctrl+Shift+U followed by the hexadecimal number of the desired character and then pressing Enter.
- macOS
-
Use the Character Viewer, shortcut Ctrl+Cmd+Space to find and insert symbols, or enable the Unicode Hex Input keyboard in Keyboard settings. With the Unicode Hex Input active, hold the Option key and type the character's hexadecimal code to insert it.
- Windows
-
If you know the number of the character, you can enter that character by pressing and holding the left Alt followed by the number using the numbers on the keypad, and then releasing the Alt key. This only works for a limited set of characters.
Alternatively you can select a character or emoji by opening a dialog using the shortcut Windows-key+.. By default emojis are shown, but you can change that to symbols using the tabs at the top, and then further select a category with the tabs at the bottom.
The third option is by opening the Character Map™ application that is part of Windows and select the desired character from there.
Of course this feature is more useful for entering special (even exotic) characters, provided that the required glyphs for these characters are supplied by the selected font — only few fonts support Klingon. ;-)
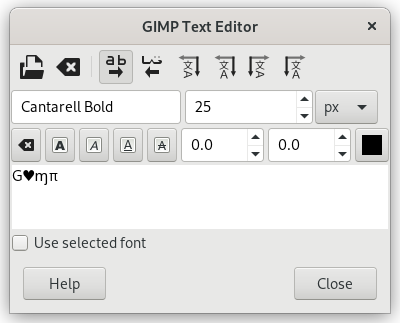
Unicode 0x47 (”G”), 0x2665, 0x0271, 0x03C0
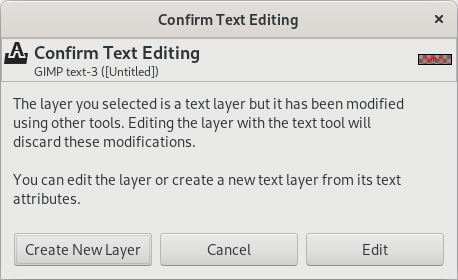
Voit vaikuttaa tekstitasoon samalla tavalla kuin muillekin kerroksille, mutta sen tekeminen usein tarkoittaa sitä, että et voi enää muokata tekstiä menettämättä tekemääsi työtä.
Jotta voidaan ymmärtää tekstinkäsittelyn ominaispiirteitä on hyvä huomata, että tekstikerros sisältää enemmän tietoa kuin näkemäsi kuvapiste: se sisältää tämän lisäksi kuvauksen tekstistä tekstieditori formaatissa. Voit nähdä tämän tekstieditori ikkunassa, joka tulee esiin kun käytät tekstityökalua. Joka kerta kun muokkaat tekstiä uusi kuvakerros piirretään uudelleen kuvaamaan tekemiäsi muutoksia.
Oletetaan, että luot tekstikerroksen ja sitten vaikutat siihen jollain tavalla, joka ei käytä tekstityökalua: kierrät sitä, esimerkiksi. Oletetaan sitten, että tulet takaisin ja yrität muokata sitä tekstityökalulla. Heti kun muokkaat tekstiä, tekstityökalu piirtää kerroksen uudelleen pyyhkien sillä aikaa tekemiesi toimintojen muutokset pois.
Koska tämä vaara ei ole ilmeinen, Tekstityökalu yrittää suojella sinua siltä. Jos muokkaat tekstitasoa ja sitten myöhemmin yrität muokata tekstiä saat ilmoituksen, jossa varoitetaan, että tekemäsi muutokset voivat kumoutua ja saat kolme vaihtoehtoa:
-
voit muokata tekstiä, joka tapauksessa;
-
voit olla muokkaamatta;
-
voit luoda uuden tekstikerroksen, jossa on sama teksti kuin vanhassa, mutta jättäen vanhan kerroksen muuttamatta.
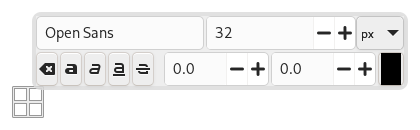
An on-canvas text toolbar appears when you click on the canvas with the Text Tool, right above the location where you type your text. It allows you to change most common text settings directly on canvas. The toolbar can be moved to a different position if it is in the way.
Besides the usual text formatting features like font family, size, style and text color, you get control over baseline offset and kerning.
|
|
Huomaa |
|---|---|
|
Beware that all the settings on this toolbar only work on the currently selected text. That way you can use different styles for different parts of your text. |
-
The
 icon on the left side shows the area on the toolbar that you can
grab to drag the toolbar to a different location.
icon on the left side shows the area on the toolbar that you can
grab to drag the toolbar to a different location.
-
When the toolbar has been moved from its original location, it can be restored to that location by using the
 icon on the top right side of the toolbar. This icon is only visible
if the toolbar has been moved.
icon on the top right side of the toolbar. This icon is only visible
if the toolbar has been moved.
-
Valitun tekstin fontin muuttaminen: heti kun alat editoimaan oletus fontin nimeä ilmestyy pudotusvalikon, josta voit valita fontin.
-
Change size of selected text: changes the font size of the selected text. The unit drop-down next to it can be used to change the type of unit used for the text size.
-
 Clear style of selected text:
use this to remove all text styling that was applied to the
selected text.
Clear style of selected text:
use this to remove all text styling that was applied to the
selected text.
-
Bold, Italic, Underline, Strikethrough: toggles the markup for the selected text.
While editing, shortcut keys can be used for Bold (Ctrl+B), Italic (Ctrl+I) and Underline Ctrl+U.
-
Change baseline of selected text: ”In European typography and penmanship, baseline is the line upon which most letters "sit" and below which descenders extend” (Wikipedia). In HTML, there are several kinds of baselines (alphabetic, ideographic, bottom…). Here, consider that baseline is "bottom" and determines the place for descenders. The default baseline "0" gives place for descenders. You can use it to increase space between two lines only, while ”Adjust line spacing” in tool options increases space between all lines.
-
Change kerning of selected text: ”In typography, kerning… is the process of adjusting the spacing between characters in a proportional font.” (Wikipedia). You can use this setting to adjust letter spacing of a selected part of text.
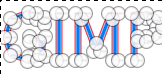
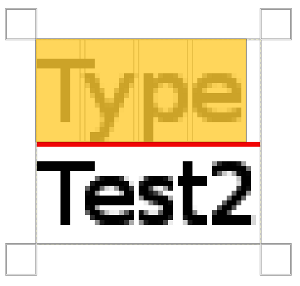
Katsotaanpa valittua tekstiä (tarkennusx800, jotta nähdään kuvapisteet):
Voimme nähdä, että Sans fontti on suhteutettu fontti: kirjainten leveydet eroavat toisistaan ja ”T” merkki tulee ”e” merkin yläpuolelle. Kirjainten leveydet on kuvattu ohuilla pystysuorilla viivoilla ja kirjainten vasemman reunan leveys menee peittää edellisiä kirjaimia yhdellä kuvapisteellä. Nyt me vaihdamme ”Valitun tekstin välistyksen muuttaminen” kahteen kuvapisteeseen:
Lisätään tyhjiä tiloja, jotka ovat 2 kuvapistettä leveitä, jokaisen valitun kirjaimen väliin ja kirjainten leveydet säilytetään. Jos mitään tekstiä ei ole valittu niin tyhjä tila lisätään hiiren osoittimen kohdalle kahden merkin väliin.
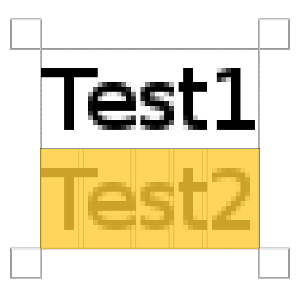
Here is a comparison with the Adjust letter spacing option of the Text tool:
Tämä vaihtoehto vaikuttaa koko tekstiin eikä vain valittuun tekstiin. Tyhjää tilaa lisätään kirjainten leveyksiin ja kirjainleveyttä ei kunnioiteta.
-
Voit myös käyttää Alt+nuolinäppäimet muuttamaan jalkalinjan siirtymää ja välistystä.
-
Valitun tekstin värin muuttaminen: tämä komento aukaisee väri dialogin, josta voit valita valitulle tekstille värin.

The context menu can be brought up by right-clicking on text. It is somewhat different from that of the Text Editor dialog.
The context menu offers the following options:
-
Cut, Copy, Paste, Delete: these commands work with selected text. Except for Paste, they are disabled as long as no text is selected. Paste is enabled when the clipboard contains text.
-
Paste unformatted text: paste text from the clipboard without any markup.
-
Restore On-Canvas Editor Position: changes the position of the On-Canvas Editor to its original location. This is disabled when it already is in the original location.
-
Open text file…: this command opens a file dialog where you can select a text file. The contents of this file will be opened in the current text layer.
-
Tyhjennä: tämä komento poistaa kaiken tekstin olkoon se valittu tai ei.
-
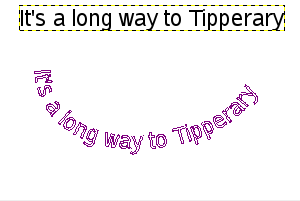
Text to Path: this command creates a path from the outlines of the current text. The result is not evident. You have to open the Paths dialog and make path visible. Then select the Path tool and click on the text. Every letter is now surrounded with a path component. So you can modify the shape of letters by moving path control points.
Tämä komento on samankaltainen komennon → kanssa.
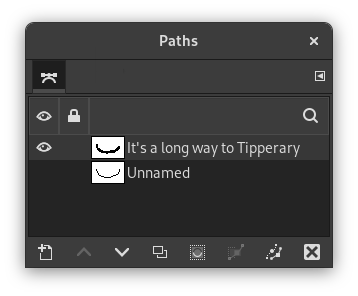
Kuva 9.9. Polku tehty näkyväksi
Polku tehty näkyväksi Polkuvälilehdessä. Polku näkyy punaisena reunana tekstin ympärillä.
-
This option is enabled only if a path exists. When your text is created, then create or import a path and make it active. If you create your path before the text, the path becomes invisible and you have to make it visible in the Paths dialog.
The Text along path command is also available from the menu in the main menu.
The commands , , and only appear in the menu if a text layer is selected.
Select the option. The text is wrapped along the path. Letters are represented with their outline. Each of them is a component of the new path that appears in the Paths dialog.
Huomaa You can change the direction that the text is wrapped around the path by reversing the stroke direction when editing the path with the Path Tool. In the same way you can change at which anchor stroking starts.
By converting a text item to a selection or a path, you can fill it, stroke the outlines, transform it, or generally apply the whole panoply of GIMP tools to get interesting effects.
-
From left to right, From right to left, Vertical, right to left (mixed orientation), Vertical, right to left (upright orientation), Vertical, left to right (mixed orientation), Vertical, left to right (upright orientation): These commands let you adjust the writing direction of the text.