目次
Text is managed with the Text tool. This tool creates a new layer containing the text, above the current layer in the Layers dialog, with the size of the text box. Its name is the beginning of the text.
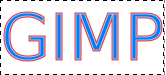
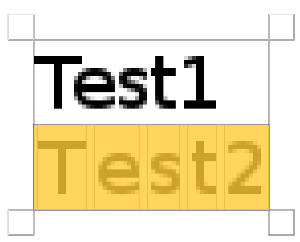
図9.1 テキスト品目の例
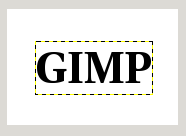
テキスト品目の例、 テキストレイヤーの境界線が見えている。 (フォント名: Utopia Bold)
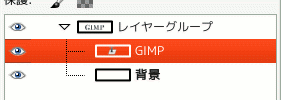
The Layers dialog, with the text layer above the layer which was current.
Text can be edited directly on canvas. A text tool box, which shows up on top of the canvas above the text box, allows you to quickly change some of the text characteristics.
![[注記]](images/note.png)
|
注記 |
|---|---|
|
The settings you change in this on canvas dialog only apply to the parts of the text that are selected, or any new text you type after the current cursor position. |
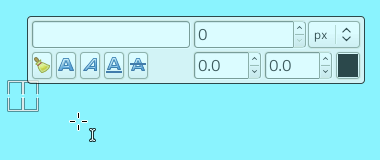
テキストツールで画像をクリックするとただちに閉じたテキストボックスが半透明なツールボックスつきで現れる。
テキストツールのオプションについては 「テキスト」 で説明しています。
You can start typing text at once. The text box will enlarge gradually. Press Enter to add a new line.
You can also enlarge the text box by click-and-dragging, as you do with selections. The box size appears then in the status bar at the bottom of the image:

To edit text, you must, first, select the part you want to edit by click-and-drag, or Shift+arrow keys and then use the options of the 「Text Toolbox」.
文字入れは画像上で直接編集する機能のほかに、 従来の「テキストエディター」ダイアログも利用できます。 「テキストエディター」 をご覧ください。
画像に入れた文字は 「移動」 ツールで移動できます。 ただし文字そのものをクリックせず透過部分をクリックすると背景が動くので注意が要ります。
既に作ったテキストレイヤーは (下記に示す) 他のツールで加工される前であれば後からでも編集できます。 そのテキストレイヤーを レイヤーダイアログ で選んで活性化させ、 テキストツールを呼び出し、 そのテキストレイヤーの文字を画像ウィンドウでクリックします。
It can be useful to enter characters that are not easily available on your keyboard. How you enter these Unicode characters depends on your Operating System.
- Linux
-
You can enter Unicode characters with the keyboard shortcut Ctrl+Shift+U followed by the hexadecimal number of the desired character and then pressing Enter.
- macOS
-
Use the Character Viewer, shortcut Ctrl+Cmd+Space to find and insert symbols, or enable the Unicode Hex Input keyboard in Keyboard settings. With the Unicode Hex Input active, hold the Option key and type the character's hexadecimal code to insert it.
- Windows
-
If you know the number of the character, you can enter that character by pressing and holding the left Alt followed by the number using the numbers on the keypad, and then releasing the Alt key. This only works for a limited set of characters.
Alternatively you can select a character or emoji by opening a dialog using the shortcut Windows-key+.. By default emojis are shown, but you can change that to symbols using the tabs at the top, and then further select a category with the tabs at the bottom.
The third option is by opening the Character Map™ application that is part of Windows and select the desired character from there.
Of course this feature is more useful for entering special (even exotic) characters, provided that the required glyphs for these characters are supplied by the selected font — only few fonts support Klingon. ;-)
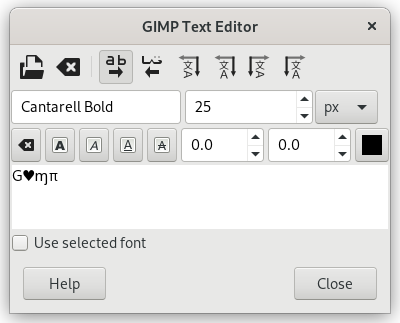
Unicode 0x47 (「G」), 0x2665, 0x0271, 0x03C0
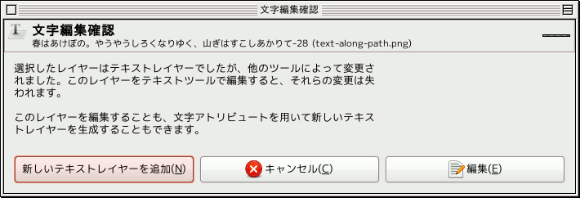
テキストレイヤーは他のレイヤーと同じ要領で操作できますが、 操作によってはその成果を失なわずにテキストを再編集する望みの無いことも覚悟せねばなりません。
テキストレイヤーには見たままの画素データだけではない情報が詰まっていることがわかると、 テキスト操作の特質を少しでも理解する助けになるかもしれません。 その情報とは、 テキストについてのテキストエディター形式による表現です。 テキストツールを使うときに現れるテキストエディターウィンドウ内で見られます。 テキストを変更するたびに画像のレイヤー上でもその成果が反映されます。
テキストレイヤーを作成したあとで、 テキストツールを通さない操作 (たとえば回転) をしたとします。 そのテキストをまたテキストツールで編集すると、 テキストツールはテキストレイヤーを再描画しますので、 それまでのこのレイヤーに対する操作の成果は破棄されることになります。
目立たない危険ですので、 テキストツールはそれに陥らないようにはからいます。 操作してあるテキストレイヤーのテキストを再び編集しようとすると、 メッセージが現れ、 それまでの操作が取り消されてしまうことを警告し、 つぎの 3 つの選択肢を示します。
-
そのまま編集を続行
-
断念
-
そのテキストレイヤーはそのままに、 テキストや属性が同じテキストレイヤーを新たに作成
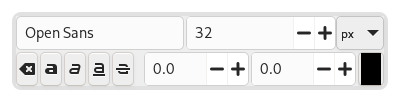
You get this box, which overlays canvas, as soon as you click on canvas with the Text Tool. It allows you to edit text directly on canvas.
Apart from the usual text formatting features like font family, style and size selectors you get numeric control over baseline offset and kerning, as well as the ability to change text color for a selection.
-
Change font of selected text: as soon as you start editing the default font name, a drop-down list appears, allowing you to select a font.
-
Change size of selected text: self-explanatory.
-
Bold, Italic, Underline, Strikethrough : self-explanatory.
-
Change baseline of selected text: "In European typography and penmanship, baseline is the line upon which most letters "sit" and below which descenders extend" (Wikipedia). In HTML, there are several kinds of baselines (alphabetic, ideographic, bottom…). Here, consider that baseline is "bottom" and determines the place for descenders. The default baseline "0" gives place for descenders. You can use it to increase space between two lines only, while 「Adjust line spacing」 in tool options increases space between all lines.
-
Change kerning of selected text: "In typography, kerning… is the process of adjusting the spacing between characters in a proportional font." (Wikipedia). You will probably use this setting to adjust letter spacing of a selected part of text.
Let us look at a selected text (zoomx800 to see pixels):
We can see that the Sans font is a proportional font: letters widths are different, and 「T」 glyph comes over the 「e」. Letters widths are marked with thin vertical lines and left borders of letter width cover preceding letters by one pixel. Now we set 「Change kerning of selected text」 to 2 pixels:
Blank spaces, 2 pixels wide, are added between all selected characters and letter widths are preserved. If no text is selected, a blank space is added at the place of the mouse pointer between two characters.
Here is a comparison with the Adjust letter spacing option of the Text tool:
The option applies to the whole text, not only to the selected text. Blank spaces are added inside letters widths and letter widths are not respected.
-
You can also use Alt+arrow keys to change baseline offset and kerning.
-
Change color of selected text: this command opens a color dialog where you choose a color for the selected text.
-
Clear style of selected text: using this command, you can get rid of all new settings you applied to the selected text.

The context menu can be brought up by right-clicking on text. It is somewhat different from that of the Text Editor dialog.
The context menu offers the following options:
-
Cut, Copy, Paste, Delete: these commands work with selected text. Except for Paste, they are disabled as long as no text is selected. Paste is enabled when the clipboard contains text.
-
Open text file…: this command opens a file dialog where you can select a text file. The contents of this file will be opened in the current text layer.
-
: このコマンドはそのレイヤー内の文字を選択のあるなしにかかわらず全部消去します。
-
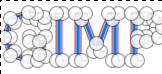
Text to Path: this command creates a path from the outlines of the current text. The result is not evident. You have to open the Paths dialog and make path visible. Then select the Path tool and click on the text. Every letter is now surrounded with a path component. So you can modify the shape of letters by moving path control points.
このコマンドは画像ウィンドウのメニューの → と同じものです。
-
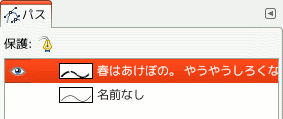
This option is enabled only if a path exists. When your text is created, then create or import a path and make it active. If you create your path before the text, the path becomes invisible and you have to make it visible in the Paths dialog.
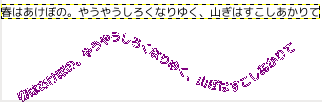
The Text along path command is also available from the menu in the main menu.
The commands , , and only appear in the menu if a text layer is selected.
Select the option. The text is wrapped along the path. Letters are represented with their outline. Each of them is a component of the new path that appears in the Paths dialog.
注記 You can change the direction that the text is wrapped around the path by reversing the stroke direction when editing the path with the Path Tool. In the same way you can change at which anchor stroking starts.
By converting a text item to a selection or a path, you can fill it, stroke the outlines, transform it, or generally apply the whole panoply of GIMP tools to get interesting effects.
-
From left to right, From right to left, Vertical, right to left (mixed orientation), Vertical, right to left (upright orientation), Vertical, left to right (mixed orientation), Vertical, left to right (upright orientation): These commands let you adjust the writing direction of the text.