画像上に何かを正確に配置する必要に迫られた経験が少からずあるかと思いますが、 そのときマウスで作業するのは簡単ではなかったでしょう。 こんなときキーボードの 上 下 左 右 矢印キーを使うとうまくできます。 (そのままなら 1 回押すごとに 1 ピクセルの移動、 Shift キーとの組み合わせなら 25 ピクセルごとの移動になります。) ただし GIMP には他にも配置作業を楽にしてくれるグリッド (格子線) とガイド (見当線) という 2 種類のしくみがあります。
Each image has a grid. It is always present, but by default it is not visible until you activate it by toggling → in the main menu. If you want grids to be present more often than not, you can change the default behavior by checking Show grid in the Image Windows Appearance page of the Preferences dialog. (Note that there are separate settings for Normal Mode and Fullscreen Mode.)
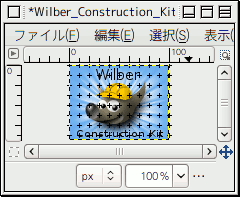
The default grid appearance, set up when you install GIMP, consists of solid lines, spaced every 10 pixels both vertically and horizontally. You can customize the default grid using the Default Image Grid page of the Preferences dialog. If you only want to change the grid appearance for the current image, you can do so by choosing → from the main menu: this brings up the Configure Grid dialog.
Not only can a grid be helpful for judging distances and spatial relationships, it can also permit you to align things exactly with the grid, if you toggle → in the main menu: this causes the pointer to "warp" perfectly to any grid line located within a certain distance. You can customize the snap distance threshold by setting "Snap distance" in the Snapping Behavior page of the Preferences dialog, but most people seem to be happy with the default value of 8 pixels. (Note that it is perfectly possible to snap to the grid even if the grid is not visible.)
![[注記]](images/note.png)
|
注記 |
|---|---|
|
To create a grid that is actually part of the image, use the Grid plug-in. |
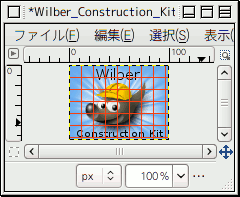
GIMP にはグリッドの他にももっと柔軟な位置合わせ支援のしくみがあります。 その名前を ガイド (見当線) といいます。 水平な線も垂直な線も画像ウィンドウの定規をクリックして画像までドラッグすれば作れます。
To create a guide, simply click on one of the rulers in the image window and pull out a guide, while holding the mouse pressed. The guide is then displayed as a blue, dashed line, which follows the pointer. As soon as you create a guide, the 「Move」 tool is activated and the mouse pointer changes to the Move icon.
新規ガイド... コマンドを使ってもガイドが置けます。 しかも画像上に精密にガイドを置くための 新規ガイド (パーセントで)... や、 選択範囲から新規ガイド コマンドもあります。
You can create as many guides as you like, positioned wherever you like. To move a guide after you have created it, activate the Move tool in the Toolbox (or press the M key), you can then click and drag a guide; click-and-drag the intersection of two guides to move them together. To delete a guide, simply drag it outside the image. Holding down the Shift key, you can move everything but a guide, using the guides as an effective alignment aid.
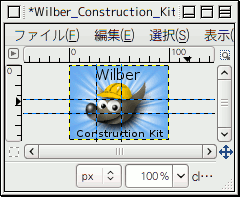
ガイドの扱い方は 「移動」 ツールの 移動対象 モードに依存します。 「レイヤー」を移動対象に選んだときは、 マウスポインターをガイドにかざすとその姿が小さな掌の形になります。 さらにガイドが活性化されて赤くなりますので、 クリックしてドラッグすると移動でき、 定規の上までドラッグすれば消去できます。 「選択範囲」を移動対象に選んでいる場合は、 新たにガイドを作成できてもいったん置くと移動ができません。
As with the grid, you can cause the pointer to snap to nearby guides, by toggling → in the main menu. If you have a number of guides and they are making it difficult for you to judge the image properly, you can hide them by toggling → . It is suggested that you only do this momentarily, otherwise you may get confused the next time you try to create a guide and don't see anything happening.
If it makes things easier for you, you can change the default behavior for guides in the Image Windows Appearance page of the Preferences dialog. Disabling Show guides is probably a bad idea, though, for the reason just given.
ガイドをまとめて削除したいときには → → コマンドをご利用ください。
|
|
注記 |
|---|---|
|
Another use for guides: the Slice Using Guides plug-in can use guides to slice an image into a set of sub-images. |


