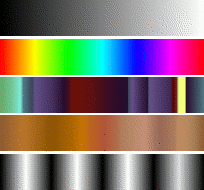
Kuva 7.22. Joitain esimerkkejä GIMP liukuväreistä.

Gradients from top to bottom: FG to BG (RGB); Full Saturation Spectrum CCW; Nauseating Headache; Browns; Four Bars
A gradient is a set of colors arranged in a linear order. The most basic use of gradients is by the Gradient tool, sometimes known as ”gradient fill tool”: it works by filling the selection with colors from a gradient. You have many options to choose from for controlling the way the gradient colors are arranged within the selection. There are also other important ways to use gradients, including:
- Liukuvärillä maalaaminen
-
Jokainen GIMPin perusmaalaustyökalut mahdollistavat asetuksen, jossa maalataan käyttäen liukuvärin väreillä. Tämä mahdollistaa siveltimenvetoja, jotka vaihtavat väriä päädystä päätyyn.
- Liukuvärin karttasuodin
-
This filter is in the Colors menu, and allows you to ”colorize” an image, using the color intensity of each point with the corresponding color from the active gradient (the intensity 0, very dark, is replaced by the color at most left end of the gradient, progressively until the intensity is 255, very light, replaced by the most right color of the gradient. See Kohta 8.39, ”Gradient Map” for more information.
GIMP comes presupplied with a large number of gradients. You can also add new gradients that you create or download from other sources. You can access the full set of available gradients using the Gradients dialog, a dockable dialog that you can either activate when you need it, or keep around as a tab in a dock. The ”current gradient”, used in most gradient-related operations, is shown in the Brush/Pattern/Gradient area of the Toolbox. Clicking on the gradient symbol in the Toolbox is an alternative way of bringing up the Gradients dialog.
Some quick examples of working with gradients (for more information see Gradient Tool) are:
-
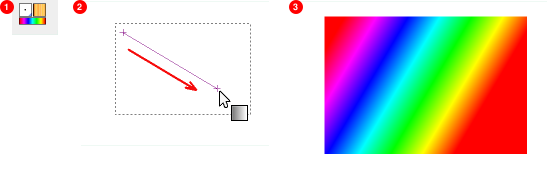
Laita liukuväri valintaan:
-
Valitse liukuväri
-
Kun sekoitustyökalu on valittuna napsauta ja vedä hiirellä kahden kohdan väliltä valintaa.
-
Värit jakautuvat kohtisuorasti hiirenvedon suuntaan ja sen pituuden mukaisesti.
-
-
Liukuvärillä maalaaminen:
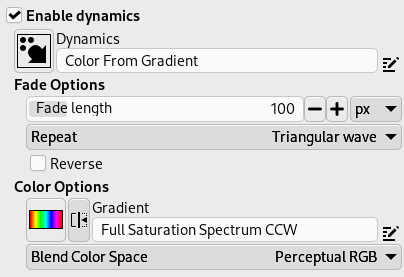
You can also use a gradient with one of the drawing tools (e.g. Pencil, Paintbrush or Airbrush) if you switch on Enable dynamics and set Dynamics to Color From Gradient. In the next step, set the gradients length and the Repeat style in the Fade Options section, and select a suitable gradient in the Color Options section. Kohta 3.2.6, ”Dynamics Options” describes these parameters in more detail.
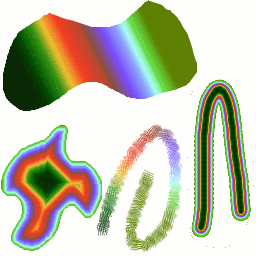
The following example shows the impact on the Pencil tool.
Kuva 7.24. How to use a gradient with a drawing tool

Tool settings

Resulting succession of the gradients colors
-
Eri tuotoksia samalla liukuvärillä:
Kuva 7.25. Liukuvärien käyttö

Neljä tapaa käyttää Tropical Colors (Trooppiset värit) liukuväriä: lineaarinen liukuväritäyttö, muotoiltu liukuväritäyttö, vedoin maalattu käyttäen liukuvärin värejä, ja maalattu sumealla siveltimellä sitten värjätty käyttäen Gradient Map suodinta.
Muutama hyödyllinen asia GIMPin liukuväreistä:
-
The first gradients in the list are special: They use the colors from the Foreground/Background Colors Area in the Toolbox, instead of being fixed.
-
FG to BG (HSV Counter-Clockwise) represents the hue succession in a color wheel from the selected hue to 360°.
-
FG to BG (HSV Clockwise) represents the hue succession in a color wheel from the selected hue to 0°.
-
FG to BG (RGB) is the RGB representation of the gradient from the Foreground color to the Background color in Toolbox.
-
TheFG to BG (Hard Edge) gradient generates a gradient from the foreground color to the background color, with hard-edged transitions in between.
-
With FG to Transparent, the selected hue becomes more and more transparent. You can modify these colors by using the Color Selector. Thus, by altering the foreground and background colors, you can make these gradients transition smoothly between any two colors you want.
-
The FG to Transparent (Hard Edge) gradient generates a gradient from the foreground color to transparency, with hard-edged transitions in between.
Using this gradient, you can generate patterns very quickly with the ”Repeat” option, alternating repetitive colored shapes with full transparency over a given background. Does works best with shapes like spiral, radial, square and linear.
-
-
Liukuväreihin ei liity vain värin muutoksia, vaan myös muutoksia peittokykyyn. Jotkut liukuvärit ovat täysin peittäviä; muissa on mukana läpinäkyviä tai läpikuultavia osia. Kun täytät tai maalaat ei-peittävällä liukuvärillä tason olemassa oleva sisältö näkyy sen takaa.
-
Voit luoda uusia kustomoituja liukuvärejä käyttäen Liukuvärin muokkain. Et voi muokata liukuvärejä, jotka toimitetaan GIMPin mukana, mutta voit kopioida niitä tai luoda uusia ja muokata niitä.
The gradients that are supplied with GIMP are stored in
a system gradients folder.
Gradients that you create are automatically saved in the
gradients folder of your personal
GIMP directory. Any gradient files (ending with
the extension .ggr) found in one of these
folders, will automatically be loaded when you start
GIMP. You can add more directories to the
gradient search path, if you want to, in the Gradients tab of the
Data Folders
section of the Preferences dialog.
GIMP can also load gradient files in SVG format, used
by many vector graphics programs. To make GIMP load an
SVG gradient file, place it in the
gradients folder of your personal
GIMP directory, or any other folder in your gradient
search path.
![[Vihje]](images/tip.png)
|
Vihje |
|---|---|
|
You can find a large number of interesting SVG gradients on the web, in particular at OpenClipArt Gradients [OPENCLIPART-GRADIENT]. |


