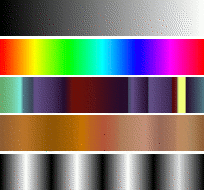
Fig. 7.22. Câteva exemple de degradeuri GIMP.

Gradients from top to bottom: FG to BG (RGB); Full Saturation Spectrum CCW; Nauseating Headache; Browns; Four Bars
Un Degradeu este un set de culori aranjate într-o ordine liniară. Utilizarea cea mai de bază a degradeului este de Instrument degradeu, uneori cunoscut sub numele de „Instrument de umplere degradeu”: acesta funcționează prin completarea selecției cu culori dintr-un degradeu. Aveți mai multe opțiuni pentru a alege modul de control în care culorile degradeu sunt aranjate în cadrul selecției. Există, de asemenea, alte moduri importante de a utiliza degradeuri, inclusiv:
- Desenarea cu un degradeu
-
Fiecare dintre instrumentele de bază de desen GIMP vă permite opțiunea de a folosi culori dintr-un degradeu. Acest lucru vă permite să creați tușe care își schimba culoarea de la un capăt la altul.
- Filtrul Hartă de degradeu
-
This filter is in the Colors menu, and allows you to „colorize” an image, using the color intensity of each point with the corresponding color from the active gradient (the intensity 0, very dark, is replaced by the color at most left end of the gradient, progressively until the intensity is 255, very light, replaced by the most right color of the gradient. See Secțiune 8.39, „Hartă degrade” for more information.
GIMP comes presupplied with a large number of gradients. You can also add new gradients that you create or download from other sources. You can access the full set of available gradients using the Gradients dialog, a dockable dialog that you can either activate when you need it, or keep around as a tab in a dock. The „current gradient”, used in most gradient-related operations, is shown in the Brush/Pattern/Gradient area of the Toolbox. Clicking on the gradient symbol in the Toolbox is an alternative way of bringing up the Gradients dialog.
Some quick examples of working with gradients (for more information see Gradient Tool) are:
-
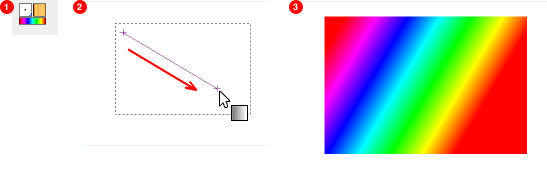
Puneți un degradeu într-o selecție:
-
Alegeți un degradeu.
-
Cu instrumentul Amestec apăsați clic și glisați cu mausul între două puncte ale unei selecții.
-
Culorile vor fi distribuite perpendicular pe direcția de glisare a mausului și în funcție de lungimea deplasării.
-
-
Desenarea cu un degradeu:
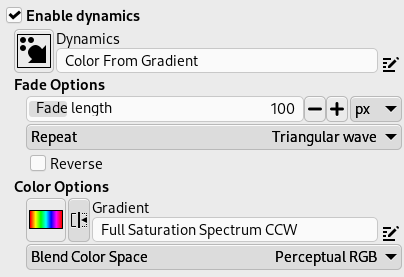
You can also use a gradient with one of the drawing tools (e.g. Pencil, Paintbrush or Airbrush) if you switch on Enable dynamics and set Dynamics to Color From Gradient. In the next step, set the gradients length and the Repeat style in the Fade Options section, and select a suitable gradient in the Color Options section. Secțiune 3.2.6, „Dynamics Options” describes these parameters in more detail.
The following example shows the impact on the Pencil tool.
Fig. 7.24. How to use a gradient with a drawing tool

Tool settings

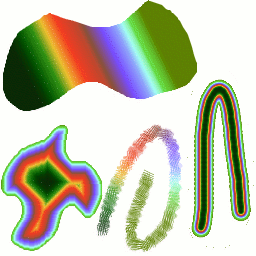
Resulting succession of the gradients colors
-
Produse diferite cu același degradeu:
Fig. 7.25. Utilizare degradeu

Patru moduri de utilizare degradeu culori tropicale: o umplere cu degradeu liniar, o umplere în formă de degradeu, o tușă folosind culori de la un degradeu, și o tușă desenată cu o pensulă difuză apoi colorată folosind filtrul Hartă degradeu .
Câteva lucruri utile de a fi știute despre degradeurile din GIMP :
-
The first gradients in the list are special: They use the colors from the Foreground/Background Colors Area in the Toolbox, instead of being fixed.
-
FG to BG (HSV Counter-Clockwise) represents the hue succession in a color wheel from the selected hue to 360°.
-
FG to BG (HSV Clockwise) represents the hue succession in a color wheel from the selected hue to 0°.
-
FG to BG (RGB) is the RGB representation of the gradient from the Foreground color to the Background color in Toolbox.
-
TheFG to BG (Hard Edge) gradient generates a gradient from the foreground color to the background color, with hard-edged transitions in between.
-
With FG to Transparent, the selected hue becomes more and more transparent. You can modify these colors by using the Color Selector. Thus, by altering the foreground and background colors, you can make these gradients transition smoothly between any two colors you want.
-
The FG to Transparent (Hard Edge) gradient generates a gradient from the foreground color to transparency, with hard-edged transitions in between.
Using this gradient, you can generate patterns very quickly with the „Repeat” option, alternating repetitive colored shapes with full transparency over a given background. Does works best with shapes like spiral, radial, square and linear.
-
-
Degradeurile pot implica nu doar modificări de culoare, dar, de asemenea, modificări în opacitate. Unele dintre degradeuri sunt complet opace; altele includ piese transparente sau translucide. Când completați sau desenați cu un degradeu neopac, conținutul existent al stratului se va afișa prin spatele acestuia.
-
Puteți crea noi degradeuri particularizate , folosind Editorul de degradeuri. Nu aveți posibilitatea să modificați degradeuri care sunt furnizate cu GIMP, dar aveți posibilitatea să le duplicați sau să creați unele noi, și apoi editați pe ele.
The gradients that are supplied with GIMP are stored in
a system gradients folder.
Gradients that you create are automatically saved in the
gradients folder of your personal
GIMP directory. Any gradient files (ending with
the extension .ggr) found in one of these
folders, will automatically be loaded when you start
GIMP. You can add more directories to the
gradient search path, if you want to, in the Gradients tab of the
Data Folders
section of the Preferences dialog.
GIMP can also load gradient files in SVG format, used
by many vector graphics programs. To make GIMP load an
SVG gradient file, place it in the
gradients folder of your personal
GIMP directory, or any other folder in your gradient
search path.
![[Indicație]](images/tip.png)
|
Indicație |
|---|---|
|
You can find a large number of interesting SVG gradients on the web, in particular at OpenClipArt Gradients [OPENCLIPART-GRADIENT]. |


