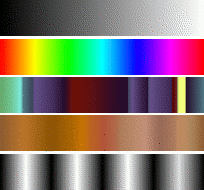
Afbeelding 7.22. Enkele voorbeelden van kleurverlopen.

Kleurverlopen van boven naar onder: VG naar AG (RGB); Full Saturation Spectrum CCW; Nauseating Headache; Browns; Four Bars
Een kleurverloop is een set kleuren die is geschikt in een lineaire volgorde. Het meest basale gebruik van kleurverlopen is door het gereedschap Kleurverlopen, soms ook wel bekend als “gereedschap Kleurverloop vullen”: het werkt door de selectie te vullen met de kleuren uit een kleurverloop. U heeft heel veel opties om uit te kiezen voor het beheren van de manier waarop kleuren van het kleurverloop worden geschikt binnen de selectie. Er zijn ook andere belangrijke manieren om kleurverlopen te gebruiken, inclusief:
- Tekenen met een kleurverloop
-
Elk van de basis tekengereedschappen van GIMP geven u de optie om kleuren uit een kleurverloop te gebruiken. Dat geeft u de mogelijkheid om penseelstreken te maken die in kleur veranderen van het ene einde naar het andere.
- Filter Kleurverloopprojectie
-
Dit filter staat in het menu Kleuren en stelt u in staat om een afbeelding te “kleuren”, waarbij de kleurintensiteit van elk punt wordt gebruikt met de corresponderende kleur uit het actieve kleurverloop (de intensiteit 0, heel donker, wordt vervangen door de kleur van het meest links gelegen uiteinde van het kleurverloop, progressief totdat de intensiteit 255 is, heel licht, vervangen door de meest rechts gelegen kleur in het kleurverloop. Bekijk Paragraaf 8.39, “Kleurverloopprojectie” voor meer informatie.
GIMP wordt geleverd met een groot aantal kleurverlopen. U kunt ook nieuwe kleurverlopen toevoegen die u maakt of download vanaf andere bronnen. U krijgt toegang tot de volledige set beschikbare kleurverlopen met het dialoogvenster Kleurverlopen, een dokbaar dialoogvenster dat u ofwel kunt activeren als u het nodig hebt, of vast kunt zetten als een tab in een dok. Het “huidige kleurverloop”, gebruikt in de meeste aan kleurverlopen gerelateerde bewerkingen, wordt weergegeven in het gebied Penseel/Patroon/Kleurverloop van de Gereedschapskist. Klikken op het symbool Kleurverloop in de Gereedschapskist is een alternatieve manier om het dialoogvenster Kleurverlopen op te roepen.
Enkele snelle voorbeelden van het werken met kleurverlopen (bekijk voor meer informatie gereedschap Kleurverlopen) zijn:
-
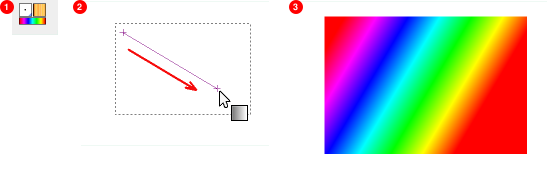
Een kleurverloop in een selectie:
-
Kies een kleurverloop.
-
Met het gereedschap Kleurverloop, klik en sleep met de muis tussen twee punten van een selectie.
-
Kleuren worden dan loodrecht verdeeld in de richting van het slepen met de muis en overeenkomstig de lengte ervan.
-
-
Tekenen met een kleurverloop:
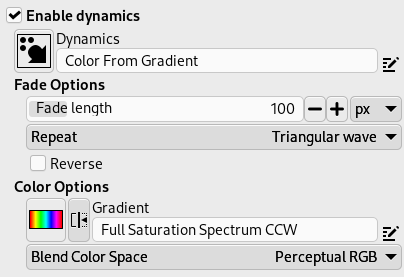
U kunt ook een kleurverloop gebruiken met een van de tekengereedschappen (bijv. Potlood, Penseel of Verfspuit) als u inschakelt Penseelgedrag uitvoeren en Gedrag instelt op Kleur uit kleurverloop. In de volgende stap, stel de lengte voor het kleurverloop en de stijl Herhalen in in het gedeelte Uitvloeiingsopties en selecteer een geschikt kleurverloop in het gedeelte Kleuropties. Paragraaf 3.2.6, “Uitvloeiingsopties” beschrijft deze parameters meer in detail.
Het volgende voorbeeld toont de impact met het gereedschap Potlood.
Afbeelding 7.24. Hoe een kleurverloop te gebruiken met een tekengereedschap

Instellingen gereedschap

Resulterende opvolging van de kleuren in het kleurverloop
-
Verschillende resultaten met hetzelfde kleurverloop:
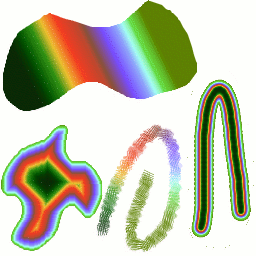
Afbeelding 7.25. Gebruik van kleurverlopen

Vier manieren om het kleurenverloop Tropical Colors te gebruiken: Een lineaire vulling, Naar vorm, een penseelstreek met kleuren uit het verloop en een penseelstreek met een wazig penseel dat daarna is ingekleurd met het filter Kleurverloopprojectie.
Meer over het gebruiken van kleurverlopen in GIMP :
-
De eerste kleurverlopen in de lijst zijn speciaal: Zij gebruiken geen vaste kleuren, maar de actuele kleuren van de Voorgrond-/Achtergrondkleur in de Gereedschapskist.
-
VG naar AG (HSV tegen de klok in) geeft de opeenvolgende tint weer in een kleurenwiel, vanaf de geselecteerde tint naar 360°.
-
VG naar AG (HSV-tint met de klok mee) geeft de opeenvolgende tint weer in een kleurenwiel, vanaf de geselecteerde tint naar 0°.
-
VG naar AG (RGB) geeft weergave RGB weer van het kleurverloop, vanaf de kleur van de voorgrond naar de achtergrondkleur in Gereedschapskist.
-
Het kleurverloop VG naar AG (Harde rand) genereert een kleurverloop uit de voorgrondkleur naar de achtergrondkleur, met tussenliggende overgangen met een harde rand.
-
Met VG naar Transparant, wordt de geselecteerde tint meer en meer transparant. U kunt deze kleuren aanpassen met de Kleurenkiezer. Dus, door de kleuren van de voor- en achtergrond te veranderen, kunt u deze kleurverlopen zo maken dat ze gladjes overgaan tussen elke twee kleuren die u wilt.
-
Het kleurverloop VG naar Transparant (Harde rand) genereert een kleurverloop uit de voor- achtergrondkleur naar transparantie, met daartussen overgangen met een harde rand.
Door dit kleurverloop te gebruiken kunt u heel snel patronen maken met de optie “Herhalen”, afwisselend herhaalde gekleurde vormen met volledige transparantie over een bepaalde achtergrond maken. Werkt het beste met vormen als spiralen, radialen, vierkanten en lineair.
-
-
Kleurverlopen hoeven niet alleen kleurwijzigingen te betreffen, maar mogen ook wijzigen in dekking. Sommig kleurverlopen zijn volledig ondoorzichtig; anders bevatten transparante of doorschijnende delen. Wanneer u met een niet ondoorzichtig kleurverloop vult of tekent, zal de bestaande inhoud van de laag er vanachter doorheen schijnen.
-
U kunt nieuwe aangepaste kleurverlopen maken met de Kleurverloopbewerker. U kunt geen met GIMP meegeleverde kleurverlopen bewerken, maar u kunt ze wel kopiëren of nieuwe maken en dan die bewerken.
De kleurverlopen die zijn meegeleverd met GIMP zijn opgeslagen in een systeemmap gradients.
Kleurverlopen die u maakt worden automatisch opgeslagen in de map gradients van uw persoonlijke map van GIMP. Elk bestand van een kleurverloop (eindigend met de extensie .ggr) dat wordt gevonden in een van deze mappen, zal automatisch worden geladen als u GIMP opstart. U kunt meer mappen toevoegen aan het zoekpad voor kleurverlopen, als u dat wilt, op de tab Kleurverlopen van het gedeelte Mappen van het dialoogvenster Voorkeuren.
GIMP kan ook bestanden voor kleurverlopen laden in de indeling SVG, gebruikt door vele programma's voor vectorafbeeldingen. In GIMP laden van een bestand voor een kleurverloop in SVG, plaats het in de map gradients van uw persoonlijke map van GIMP, of een andere map in het zoekpad voor uw kleurverlopen.
![[Tip]](images/tip.png)
|
Tip |
|---|---|
|
U kunt een groot aantal interessante kleurverlopen in SVG op het web vinden, in het bijzonder op OpenClipArt Gradients [OPENCLIPART-GRADIENT]. |


