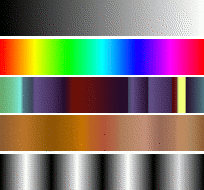
Рисунок 7.22. Несколько примеров градиентов в GIMP.

Градиенты сверху вниз: из переднего плана в задний (RGB); полное насыщение спектра против часовой стрелки; «головная боль»; коричневые цвета; четыре планки.
Градиент — это набор цветов, упорядоченных линейно. Самое базовое использование градиентов — с помощью инструмента «Градиент», который иногда ещё называют«заливка градиентом»: с его помощью выделения заливаются цветами градиента. Существует много способов расположения цветов градиента в границах выделения. Есть также и другие важные способы работы с градиентами, включая:
- Рисование градиентом
-
Любой из основных инструментов рисования в GIMP даёт вам возможность использовать цвета из градиента. Это позволяет вам создавать мазки кистью, которые меняют цвет от одного конца к другому.
- Фильтр «Отображение градиента»
-
Этот фильтр находится в меню цветов и позволяет вам «раскрасить» чёрно-белое изображение, заменяя каждый оттенок серого соответствующим цветом из активного градиента. Так, для оттенка 0 (самый тёмный) выбирается цвет в левом конце градиента, для оттенка 255 — в правом конце градиента. Для дополнительной информации смотрите Раздел 8.39, «Отображение градиента».
Когда вы устанавливаете GIMP, вместе с ним устанавливается большое количество интересных градиентов, и вы можете добавлять новые, создавая собственные или загружая из других источников. Для доступа к полному набору доступных градиентов используйте диалоговое окно Градиенты — диалоговое окно, которое вы можете активировать при необходимости или оставить рядом как вкладку на панели. «Текущий градиент», используемый в большинстве операций с градиентом, отображается в области Кисть/Текстура/Градиент панели инструментов. Щелчок по символу градиента на панели инструментов — это альтернативный метод вызова диалогового окна градиентов.
Несколько быстрых примеров работы с градиентами (подробности смотрите здесь: Градиент):
-
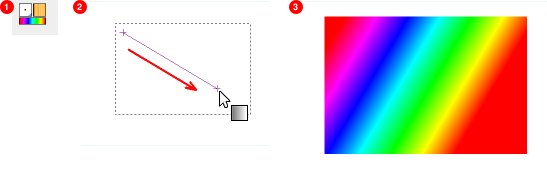
Разместить градиент в выделении:
-
Выбор градиента
-
С помощью инструмента смешивания нажмите и переместите курсор мыши по выделению.
-
Цвета будут распределяться перпендикулярно направлению перемещения мыши и по всей длине перемещения.
-
-
Рисование градиентом:
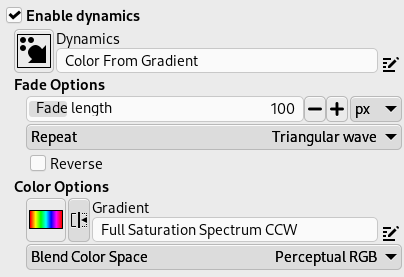
Инструменты «Карандаш», «Кисть» или «Аэрограф» тоже могут работать с градиентами, если выбрать динамику Цвет из градиента. На следующем шаге выберите подходящий градиент в параметрах цвета и в параметрах угасания укажите длину градиента и стиль повторения. В главе Раздел 3.2.6, «Параметры динамики» эти параметры описываются более подробно.
В следующем примере показано воздействие на инструмент «Карандаш».
Рисунок 7.24. Как использовать градиент с инструментом рисования

Параметры инструмента

Конечная последовательность градиентных цветов
-
Разный результат с тем же градиентом:
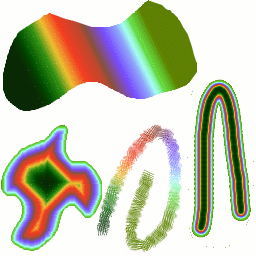
Рисунок 7.25. Использование градиентов

Четыре способа использования градиента «тропические цвета»: линейная градиентная заливка; заливка по форме; обводка с использованием цветов из градиента; обводка мягкой кистью, окрашенная с помощью фильтра Отображение градиента.
Немного полезных вещей о градиентах в GIMP:
-
Первые градиенты в списке — особенные: они используют цвета из области цветов переднего плана/заднего плана на панели инструментов, вместо того, чтобы быть фиксированными.
-
ПП в ЗП (HSV против часовой) представляет собой последовательность оттенков в цветовом круге от выбранного оттенка до 360°.
-
ПП в ЗП (HSV по часовой) представляет собой последовательность оттенков в цветовом круге от выбранного оттенка до 0°.
-
ПП в ЗП (RGB) — это RGB-представление градиента от цвета переднего плана к цвету фона на панели инструментов .
-
Градиент ПП в ЗП (резкий переход) создаёт градиент от цвета переднего плана к цвету фона с жёсткими переходами между ними.
-
С помощью ПП в прозрачный выбранный оттенок становится всё более и более прозрачным. Вы можете изменить эти цвета с помощью диалогового окна выбора цвета. Таким образом, изменяя цвета переднего и заднего плана, вы можете сделать эти градиенты плавно переходящими между любыми двумя цветами.
-
Градиент ПП в прозрачный (резкий переход) создаёт градиент от цвета переднего плана к прозрачному с жёсткими переходами между ними.
Используя этот градиент, вы можете очень быстро создавать текстуры с помощью опции «Повтор», чередуя повторяющиеся цветные фигуры с полной прозрачностью на заданном фоне. Лучше всего это работает с такими формами, как спиральные, радиальные, квадратные и линейные.
-
-
Градиенты могут не только изменять цвета, но и работать с прозрачностью. Некоторые градиенты полностью непрозрачны, другие могут иметь прозрачные части. При заливке или рисовании непрозрачным градиентом существующее содержимое слоя будет видно за ним.
-
Вы можете создавать новые собственные градиенты с помощью редактора градиентов. Вы не можете изменить установленные вместе с GIMP градиенты, но вы можете их дублировать или создавать новые для последующего редактирования.
Градиенты, поставляемые вместе с GIMP, хранятся в системной папке gradients.
Создаваемые градиенты автоматически сохраняются в папке gradients вашего личного каталога GIMP. Любой файл градиента (имеющий расширение .ggr), найденный в одной из этих папок, будет автоматически загружаться при запуске GIMP. При желании можно добавить больше каталогов в путь поиска градиентов на вкладке «Градиенты» раздела каталогов хранения данных диалогового окна параметров.
GIMP также может загружать файлы градиентов в формате SVG, используемые многими программами векторной графики. Чтобы GIMP загрузила файл градиента в формате SVG, поместите его в папку gradients вашего личного каталога GIMP или в любую другую папку по пути поиска градиентов.
![[Подсказка]](images/tip.png)
|
Подсказка |
|---|---|
|
Вы можете найти большое количество интересных градиентов SVG в сети, в частности на странице OpenClipArt Gradients [OPENCLIPART-GRADIENT]. |


