The “Paths” dialog is used to manage paths, allowing you to create or delete them, save them, convert them to and from selections, etc. Please see Seção 4, “ Vetores ” for more information about paths.
O diálogo de “Buffers” é um diálogo de encaixe;veja a seção Seção 2.3, “Caixas de diálogo e de encaixe” para mais informações sobre como gerenciá-lo.
Você pode acessa-lo:
-
From the main menu, as → → .
-
From the Tab menu in any dockable dialog by clicking on
 and selecting
→ .
and selecting
→ .
In the menu, there is a list of detached windows which exists only if at least one dialog remains open. In this case, you can raise the “Paths” dialog from the main menu: → .
- Visão geral
-
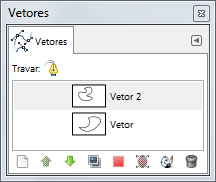
This dialog shows a list of all paths present in the current image. For each path you can set their attributes, as explained below, and perform certain actions using the buttons at the bottom of the dialog, or using the context menu.
In multi-window mode, you can show the name of the active image at the top of the dock by choosing “Show Image Selection” from the Tab menu. This allows you to see at a glance to which image the paths you are working on belong.
Se a lista não for vazia, sempre haverá um vetor que será o vetor ativo. Ele será o alvo de qualquer operação feita através do menu do diálogo ou os botões na parte de baixo. O vetor ativo é exibido em destaque na lista. Clicar em qualquer outro vetor, vai fazer dele o novo vetor ativo.
Right-clicking on any entry in the list brings up the Paths Menu. You can also access the Paths Menu from the dialog Tab menu.
- Selecting multiple paths
-
GIMP allows you to select multiple paths and perform actions on them, like stroking or filling. Selecting multiple paths is done by using the mouse and Shift key, for adding a range of paths, or Ctrl key, for adding or removing the clicked path.
- Path list header
-
Directly above the list of paths is the header bar. On the left you see the icons that identify the visibility and lock columns. In the middle a text label will tell you how many paths are currently selected if it is more than one.
- Path attributes
-
Every path is shown in the list with its own attributes, which are very similar to the layer attributes:
-
 Visibilidade do vetor
-
By default, paths are not visible. This icon is shown when the path is visible. Clicking this toggles between visible and invisible. When a path is “visible”, a border is drawn over each path segment on the image display. This does not change the actual pixel data of the image. Shift-clicking on the icon causes all other paths to be hidden.
-
 Path lock attributes
-
Each path has lock attributes. If one of its attributes is set, the respective lock icon will show up in front of the thumbnail.
When multiple attributes are set, a double lock icon will show here. Clicking in this column allows you to change these attributes.
-
 Lock path
-
This icon shows when “lock path” is enabled for the current path. When this is enabled, the path is locked for any action that changes it, meaning there will be no changes done to this path. Clicking the icon toggles between enabled and disabled.
-
 Lock position and size
-
This icon shows when “lock path position” is enabled for the current path. When this is enabled, the path is locked for any action that changes its position. Clicking the icon toggles between enabled and disabled.
-
 Lock visibility
-
This toggle button controls the “Lock” setting for the visibility of the path. If this is enabled, the path visibility cannot be changed until you disable the lock.
-
- Miniatura
-
A small preview icon represents the effect of the path. This preview can be enlarged by holding down the left mouse button on it. If you drag the thumbnail into the Layers dialog, it will create a new layer with a rasterized copy of the path.
- Nome do vetor
-
O nome do vetor, que deve ser único na imagem. Clicar duas vezes no nome permite que você o edite (pressione “enter” após editar). Se o nome que você criou já existe, um número será adicionado ( por exemplo “#1”), para garantir que o nome continue único.
-
- Managing paths
-
The button bar at the bottom offers the following functionality:
These buttons correspond to entries in the context menu (accessed by right-clicking on an entry in the list), but some of them have extra options obtainable by holding down modifier keys while pressing the button.
-
 Novo vetor
-
See New Path. Holding down Shift makes a new (empty) path with the last used values, without opening the New Path dialog.
-
 Raise Paths
-
See Raise Paths. Holding down Shift moves the selected paths to the top of the list.
-
 Lower Paths
-
See Lower Paths. Holding down Shift moves the selected paths to the bottom of the list.
-
 Duplicate Paths
-
See Duplicate Paths.
-
 Paths to Selection
-
Converts paths into a selection; see Paths to Selection for a full explanation. You can use modifier keys to set the way the new selection interacts with the existing selection:
Modificadores Ação Nenhuma Substitui a seleção existente Shift Adiciona à seleção Ctrl Subtrai da seleção atual Shift+Ctrl Faz intersecção com a seleção existente. -
 Seleção para vetor
-
Shift-clicking this button brings up the Advanced Settings dialog that allows you to adjust how the selection is converted to a path.
-
 Paint along the paths
-
See Stroke Paths. Holding down Shift strokes the paths based on the last used values without opening the Stroke Paths dialog.
-
 Delete Paths
-
Delete Paths deletes the currently selected paths.
-
O menu de vetores pode ser acessado clicando-se com o botão direito no diálogo de Vetores, ou escolhendo-se a entrada de cima (“Menu de vetores”) do menu de guias do diálogo de vetores. Esse menu dá acesso a maioria das operações que envolve vetores.
- Edit Path
-
Edit Path is an alternative way to activate the Paths tool, used for creating and manipulating paths. It can also be activated from the Toolbox, or by using the keyboard shortcut B.
- Editar atributos de vetor
-
A opção Editar atributos de vetor faz aparecer um pequeno diálogo que permite que você altere o nome de um vetor. Também é possível fazer isso com um clique-duplo direto sobre o nome do vetor na lista do diálogo de Vetores.
- Color Tags
-
Color Tags brings up a sub menu, similar to the one in the Layers Dialog, that allows you to select a color tag for the selected paths.
- Novo vetor
-
New Path creates a new path, adds it to the list in the Paths dialog, and makes it the active path for the image. It brings up a dialog that allows you to give a name to the path. The new path is created with no anchor points, so you will need to use the Path tool to give it some before you can use it for anything.
- Raise Paths
-
Raise Paths moves the selected paths one slot higher in the list in the Paths dialog.
The position of a path in the list has no functional significance, so this is simply a convenience to help you keep things organized.
- Lower Paths
-
Lower Paths moves the selected paths one slot lower in the list in the Paths dialog.
The position of a path in the list has no functional significance, so this is simply a convenience to help you keep things organized.
- Duplicate Paths
-
Duplicate Paths creates a copy of the selected paths, assigns unique names, adds them to the list in the Paths dialog, and makes them the selected paths for the image. The copies will be visible only if the original paths were visible.
- Delete Paths
-
Delete Paths deletes the currently selected paths.
- Combinar vetores visíveis
-
A opção Combinar vetores visíveis torna todos os vetores que estão visíveis na imagem (isto é, todos os que tem o ícone de “olho aberto”), e os transforma em componentes de um único vetor. Isso pode ser conveniente se você deseja contornar a todos com as mesmas opções, etc.
- Paths to Selection, Add Paths to Selection, Subtract Paths from Selection, Intersect Paths with Selection
-
These commands all convert the active paths into a selection, and then combine it with the existing selection in the specified ways. (Paths to Selection discards the existing selection and replaces it with one formed from the path.) If necessary, any unclosed components of the path are closed by connecting the last anchor point to the first anchor point with a straight line. The “marching ants” for the resulting selection should closely follow the path, but don't expect the correspondence to be perfect.
- Seleção para vetor
-
Esta operação pode ser acessada de várias formas diferentes:
-
From the main menu, as →
-
Do menu do diálogo de Vetores, como .
-
From the Selection to Path button
at the bottom of the Paths dialog.
Selection to Path creates a new path from the image's selection. In most cases the resulting path will closely follow the “marching ants” of the selection, but the correspondence will not usually be perfect.
Converting a two-dimensional selection mask into a one-dimensional path involves some rather tricky algorithms: you can alter the way it is done using the Advanced Options, which are accessed by holding down the Shift key while pressing the Selection to Path button
at the bottom of the Paths dialog. This brings up the
Advanced
Settings dialog, which allows you to set a lot of different
options. In general, Selection to Path will do
what you expect it to, without the need to adjust the advanced
settings.
-
- Fill Paths
-
Esta operação pode ser acessada de várias formas diferentes:
-
From the main menu, as →
-
From the Paths dialog menu, as .
-
From the Fill Paths button in the Tool Options for the Paths tool.
Fill Paths fills all areas delimited by the selected paths with the current foreground color or currently selected pattern. See the section about Fill Paths for more information.
-
- Stroke Paths…
-
Esta operação pode ser acessada de várias formas diferentes:
-
From the main menu, as →
-
From the Paths dialog menu, as .
-
From the Paint along the path button
at the bottom of the Paths dialog.
-
From the Stroke Paths button in the Tool Options for the Paths tool.
Stroke Paths renders the selected paths on the active layer of the image, permitting a wide variety of line styles and stroking options. See the sections about Stroke Paths and Stroking for more information.
-
- Copy Paths
-
Copy Paths copies the selected paths to the Paths Clipboard, enabling you to paste it into a different image.
![[Dica]](images/tip.png)
Dica You can also copy and paste paths by dragging their icon from the Paths dialog into the target image's display.
![[Nota]](images/note.png)
Nota When you copy a path to an image, it is not visible. You have to make it visible in the Paths dialog.
- Colar vetor
-
Paste Path creates a new path from the contents of the Path Clipboard, adds it to the list in the Paths dialog, and makes it the active path for the image. If no path has previously been copied into the clipboard, the menu entry will be disabled.
- Export Paths
-
Export Paths… allows you to save a path to a file: it pops up a file save dialog that allows you to specify the file name and location. You can later add this path to any GIMP image using the Import Path command. The format used for saving paths is SVG: this means that vector-graphics programs such as Inkscape will also be able to import the paths you save. See the Paths section for more information on SVG files and how they relate to GIMP paths.
- Importar vetor
-
Import Path… creates a new path from an SVG file: it pops up a file chooser dialog that allows you to navigate to the file. See the Paths section for information on SVG files and how they relate to GIMP paths.


