Inhoudsopgave
U zult het waarschijnlijk al heel vaak hebben meegemaakt dat u iets in een afbeelding heel nauwkeurig wilt plaatsen en gemerkt hebben dat dat met een muis niet zo eenvoudig is. Vaak kunt u betere resultaten verkrijgen door de pijltoetsen op het toetsenbord te gebruiken (die het betreffende object met een pixel per keer verplaatsen, of met 25 pixels als u de Shift-toets ingedrukt houd), maar GIMP verschaft u ook twee andere hulpmiddelen om het plaatsen gemakkelijker te maken: rasters en hulplijnen.
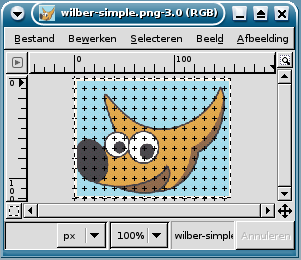
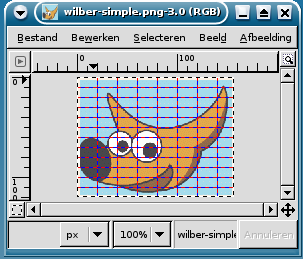
Elke afbeelding heeft een raster. Het is altijd aanwezig, maar standaard is het niet zichtbaar, totdat u het activeert door te schakelen met → in het hoofdmenu. Als u wilt dat rasters vaker aanwezig zijn dan niet, zou u het standaard gedrag kunnen veranderen door Raster tonen op de pagina Afbeeldingsvensters Weergave van het dialoogvenster Voorkeuren. (Onthoud dat er afzonderlijke instellingen zijn voor modus Normaal en modus Volledig scherm.)
De standaard weergave van het raster, ingesteld toen u GIMP installeerde, bestaat uit doorlopende lijnen, met een tussenruimte van 10 pixels zowel verticaal als horizontaal. U kunt het standaard raster aanpassen met de pagina Standaardafbeelding Raster van het dialoogvenster Voorkeuren. Als u alleen de weergave van het raster voor de huidige afbeelding wilt wijzigen, kunt u dat doen door te kiezen → uit het hoofdmenu: dat brengt het dialoogvenster Raster instellen naar voren.
Niet alleen kan een raster nuttig zijn voor het beoordelen van afstanden en ruimtelijke relaties, het kan u ook toestaan om dingen exact aan het raster uit te lijnen, als u schakelt met → in het hoofdmenu: dat zorgt ervoor dat de muisaanwijzer perfect "trekt" naar een rasterlijn die is geplaatst binnen een bepaalde afstand. U kunt de drempel voor de afstand van het kleven instellen met "Magneetafstand" op de pagina Canvasinteractie Kleven van het dialoogvenster Voorkeuren, maar de meeste mensen lijken voldoende te hebben aan de standaard waarde van 8 pixels. (Onthoud dat het perfect mogelijk is om te kleven aan het raster, zelfs als het raster niet zichtbaar is.)
![[Opmerking]](images/note.png)
|
Opmerking |
|---|---|
|
Een raster maken dat gedeeltelijk deel van de afbeelding is, gebruik de plug-in Raster. |
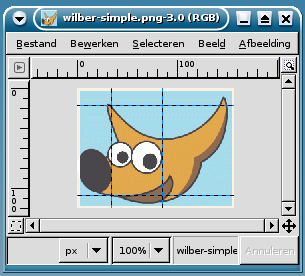
In aanvulling op het raster voor de afbeelding, geeft GIMP ook een ook meer flexibel type van hulp bij het plaatsen: hulplijnen. Dit zijn horizontale of verticale lijnen die u tijdelijk kunt weergeven op een afbeelding als u daaraan werkt.
To create a guide, simply click on one of the rulers in the image window and pull out a guide, while holding the mouse pressed. The guide is then displayed as a blue, dashed line, which follows the pointer. As soon as you create a guide, the “Move” tool is activated and the mouse pointer changes to the Move icon.
U kunt hulplijnen ook toevoegen met de optie Hulplijnen in het menu Afbeelding. Daarmee kunt u exact aangeven waar hij moet komen. Ook hebt u daar de opties Nieuwe Hulplijn (op percentage) en Nieuwe Hulplijnen vanaf selectie.
U mag net zoveel hulplijnen maken als u wilt, geplaatst waar u dat wilt. Een hulplijn verplaatsen nadat u die hebt gemaakt, activeer het gereedschap Verplaatsen in de gereedschapskist (of druk op de M-toets), u kunt dan op een hulplijn klikken en slepen; klik-en-sleep aan de kruising van twee hulplijnen om ze samen te verplaatsen. Verwijderen van een hulplijn, sleep hem eenvoudigweg buiten de afbeelding. Ingedrukt houden van de Shift-toets, u kunt alles verplaatsen, behalve een hulplijn, daarbij de hulplijnen gebruikend als een effectief hulpmiddel voor uitlijnen.
Het gedrag van de hulplijnen is afhankelijk van de modus Verplaatsen (beïnvloeden) van het gereedschap “Verplaatsen”. Als de modus Laag is geselecteerd, verandert de muisaanwijzer naar een hand zodra het dicht bij een hulplijn komt. Dan wordt de hulplijn geactiveerd en wordt rood, u kunt dan de hulplijn verplaatsen of verwijderen door hem terug te verplaatsen naar de liniaal. Als modus Selectie is geselecteerd, kunt u een hulplijn plaatsen, maar die kunt u daarna niet meer verplaatsen.
Net als met het raster kunt u ervoor zorgen dat de aanwijzer kleeft aan dichtbij gelegen hulplijnen, door te schakelen met → in het hoofdmenu. Als u een aantal hulplijnen hebt en zij maken het voor u moeilijk om de afbeelding goed te beoordelen, kunt u ze verbergen door te schakelen met → . Voorgesteld wordt om dat slechts tijdelijk te doen, anders zou u in verwarring kunnen worden gebracht, als u de volgende keer probeert een hulplijn te maken en vervolgens niets ziet gebeuren.
If it makes things easier for you, you can change the default behavior for guides in the Image Windows Appearance page of the Preferences dialog. Disabling Show guides is probably a bad idea, though, for the reason just given.
Hebt u geen hulplijnen meer nodig dan verwijdert u ze met → → .
![[Opmerking]](images/note.png)
|
Opmerking |
|---|---|
|
Een ander gebruik van hulplijnen: de plug-in Opdelen met gebruik van hulplijnen kan hulplijnen gebruiken om een afbeelding in een verzameling deel-afbeeldingen te splitsen. |


